|
|
| Line 1: |
Line 1: |
| − | {{Specs-Card|code=uk_chieftain_marksman}} | + | {{Specs-Card|code=bf-109a_1}} |
| | {{About | | {{About |
| − | |about=self-propelled anti-aircraft vehicle '''{{PAGENAME}}''' | + | | about = premium German fighter '''{{PAGENAME}}''' |
| − | |usage=other uses | + | | usage = other uses |
| − | |link=Chieftain (Family) | + | | link = Bf 109 (Family) |
| | }} | | }} |
| | | | |
| | == Description == | | == Description == |
| − | <!--''In the description, the first part needs to be about the history of the creation and combat usage of the vehicle, as well as its key features. In the second part, tell the reader about the ground vehicle in the game. Insert the screenshot of the vehicle. If the novice player does not remember the vehicle by name, they will immediately understand what kind of vehicle it is talking about.''--> | + | <!--''In the description, the first part needs to be about the history of and the creation and combat usage of the aircraft, as well as its key features. In the second part, tell the reader about the aircraft in the game. Insert screenshot of the vehicle. If the novice player does not remember the vehicle by name, he will immediately understand what kind of vehicle it is talking about.''--> |
| − | [[File:GarageImage_{{PAGENAME}}.jpg|420px|thumb|left]] | + | [[File:GarageImage_Bf109AFlegel.jpg |420px|thumb|left]] |
| − | {{Break}} | + | {{break}} |
| − | The '''{{Specs|name}}''' (shortened to '''{{Specs|pseudonym}}''') is a rank {{Specs|rank}} British self-propelled anti-aircraft vehicle {{Battle-rating|1}}. It was introduced in [[Update 1.79 "Project X"]].
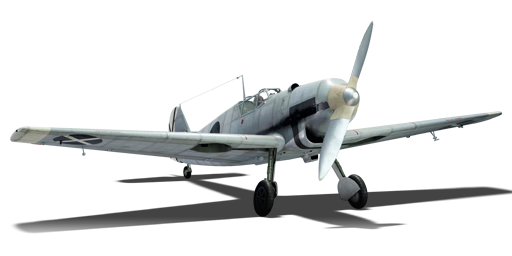
| + | '''{{specs|name}}''' is a premium rank {{specs|rank}} German fighter {{battle-rating}} It was introduced in [[Update 1.69 "Regia Aeronautica"]]. The plane is painted after the camouflage scheme of Luftwaffe pilot Norbert Flegel in the Condor Legion of the Spanish Civil War. |
| | | | |
| − | The Marksman looks like Chieftain tank hull with a giant boxy turret in the middle of it. The turret has a radar on the back of it and clearly visible handles with cannons on its front. The front has a distinctive double slope. There is no other such turret in-game and so it is very easy to identify.
| + | Though capable in engagements against similar BR'd aircraft, Flegel's Bf 109 A finds itself lacking in power, handling, and armament. As with later 109s, energy preservation is a must, and this aircraft should be used as a Boom and Zoom fighter against larger targets. |
| | | | |
| − | Like the [[Falcon]], the Marksman's role is hiding around the battlefield, shooting at planes and punishing unsuspecting ground opponents, however, it is much slower so it does its job from about kilometre away, or further if possible.
| + | This early Bf 109 is a definite collectors vehicle. With a 2 bladed wooden prop and a distinctive camouflage, this plane really only has its looks going for it. With a meagre armament of 2 x 7.92 mm MG 17 guns, it finds itself struggling to bring down heavy aircraft. |
| − | | |
| − | Radar allows it to have an aiming reticle against incoming planes in RB. The reticle works the same way as in AB, however, it doesn't say how far away the plane is.
| |
| − | | |
| − | Since [[Update 1.87 "Locked On"]], radar also allows you to lock your turret to follow a specific target (the one closest to your targeting reticle) and to see a "true" targeting reticle, which will guarantee a hit up to 3km range and, on some occasions even further, even if you don't have any modifications, unless the enemy aircraft changes course. It is ''very important'' to change the keybinding of the radar lock key (default "alt + f"), as radar won't reliably lock on to targets, due to "mouse pointer" mode from "alt" button.
| |
| − | | |
| − | If you want to use radar to specifically try and "find" a target that is too far away for you to see, you can try to stop radar dish by using "change radar search mode" (not bound by default) and specifically look towards the direction you expect them to come from (the enemy airfield, for example). If your turret happens to detect them, they will appear on your radar screen, and you can target them. However, the use of this option is severely limited due to the fact that planes rarely move in a straight line, so even if you try to snipe them from 4km range, it will likely result in a miss, so the default search mode is generally better.
| |
| − | | |
| − | [[File:Helisnipe marksman.jpg|thumb|You can snipe ATGM helicopters now. However, do not waste ammo on helicopters that move around a lot, even radar cannot predict their dodges from '''this''' far away.]]
| |
| − | | |
| − | The playstyle is much less aggressive than the [[Falcon]]; however, the APDS belt is no joke, as '''every''' shell in it can penetrate about 100 mm of armour up to 500 meters and up to 60 mm at 2,000 meters at 30°. As such, weaker side armour on most rank 5+ vehicles of all nations can be threatened by the Marksman from almost any range, and it only brings much more pain to light vehicles from afar. Only [[:Category:USSR ground vehicles|Soviet tanks]] have decent enough armour on nearly all vehicles to negate its firepower in optimal weapon range.
| |
| − | | |
| − | It may feel like the guns are similar to the [[Falcon]]'s when you fire them but due to them being 35 mm you can tear off plane wings even in one hit, and you can hit them even with stock gun easily from 1.8 km range without wasting too much ammo. Guns have a convergence of about 1.5km (more or less, depending on "adjustments of fire" upgrade), which makes them better for leading targets, but also wasting some ammunition in process, and making vehicle weak at closer ranges.
| |
| − | | |
| − | Guns still overheat in 10 seconds and can put the Marksman out of fighting capability for half a minute. Luckily, it's hardly necessary to go trigger happy with the Marksman's accuracy and you can change belts to instantly unjam the cannons.
| |
| | | | |
| | == General info == | | == General info == |
| − | === Survivability and armour === | + | === Flight Performance === |
| − | <!--''Describe armour protection. Note the most well protected and key weak areas. Appreciate the layout of modules as well as the number and location of crew members. Is the level of armour protection sufficient, is the placement of modules helpful for survival in combat?'' | + | <!--''Describe how the aircraft behaves in the air. Maximum speed, maneuverability, speed and allowable loads - these are the most important characteristics of the vehicle.''--> |
| − | | |
| − | ''If necessary use a visual template to indicate the most secure and weak zones of the armour.''-->
| |
| − | The Chieftain chassis makes this SPAA invulnerable to hull breaks and protects it fairly well against frontal attacks by light vehicles. The turret protection is not great, but it will stop most heavy machine-gun fire at close range. It is almost like the FV4005 with slightly more armour on turret.
| |
| − | | |
| − | Do not show the lower front plate to the enemy's tanks, as it's considerably weaker. Despite having better armour for hull, the Marksman is extremely slow for it, so keeping the enemy away from this vehicle is the key to making the most of the armour you have.
| |
| − | | |
| − | The vehicle can be taken out by attacking the turret: Firstly the enemy does a precise shot at the bottom-left (vehicle's right) of the turret to take out the gunner, then fires at the opposite to take out tank commander. It's also easy to destroy your turret with chemical rounds. Your turret may tank 20 mm autocannon shots, but only at about 1.2 km range, which is an acceptable duel range for the Marksman. Any non-stock combat SPAA's and light tanks, though, will breach it with no effort even from 3 km away.
| |
| − | | |
| − | === Mobility ===
| |
| − | <!-- Write about the mobility of the ground vehicle. Estimate the specific power and manoeuvrability as well as the maximum speed forward and backwards. -->
| |
| − | | |
| | {| class="wikitable" style="text-align:center" | | {| class="wikitable" style="text-align:center" |
| | |- | | |- |
| − | ! colspan="3" |Mobility characteristic | + | ! colspan="8" | Characteristics |
| | + | |- |
| | + | ! colspan="8" | ''Stock'' |
| | + | |- |
| | + | ! colspan="2" | Max Speed<br>(km/h at 4,000 m) |
| | + | ! rowspan="2" | Max altitude<br>(meters) |
| | + | ! colspan="2" | Turn time<br>(seconds) |
| | + | ! colspan="2" | Rate of climb<br>(meters/second) |
| | + | ! rowspan="2" |Take-off run<br>(meters) |
| | |- | | |- |
| − | !Weight (tons) | + | ! AB |
| − | ! colspan="1" |Add-on Armor<br>weight (tons) | + | ! RB |
| − | ! colspan="1" |Max speed (km/h) | + | ! AB |
| | + | ! RB |
| | + | ! AB |
| | + | ! RB |
| | |- | | |- |
| − | | rowspan="2" |55.0|| colspan="1" rowspan="2" |N/A|| colspan="1" |44 (AB) | + | | 422 || 414 || 9,000 || 21.5 || 22.2 || 5.2 || 6.5 || 210 |
| | |- | | |- |
| − | |41 (RB/SB) | + | ! colspan="8" | ''Upgraded'' |
| | |- | | |- |
| − | ! colspan="3" |Engine power (horsepower) | + | ! colspan="2" | Max Speed<br>(km/h at 4,000 m) |
| | + | ! rowspan="2" |Max altitude (meters) |
| | + | ! colspan="2" | Turn time (seconds) |
| | + | ! colspan="2" | Rate of climb<br>(meters/second) |
| | + | ! rowspan="2" |Take-off run (meters) |
| | |- | | |- |
| − | ! colspan="1" |Mode | + | ! AB |
| − | !Stock | + | ! RB |
| − | !Upgraded | + | ! AB |
| | + | ! RB |
| | + | ! AB |
| | + | ! RB |
| | |- | | |- |
| − | |''Arcade'' | + | | 462 || 444 || 9,000 || 18.6 || 20.0 || 14.9 || 9.3 || 210 |
| − | |937 | |
| − | |___ | |
| | |- | | |- |
| − | |''Realistic/Simulator'' | + | |} |
| − | |548
| + | |
| − | |___ | + | ====Details==== |
| | + | {| class="wikitable" style="text-align:center" |
| | |- | | |- |
| − | ! colspan="3" |Power-to-weight ratio (hp/ton) | + | ! colspan="5" | Features |
| | |- | | |- |
| − | ! colspan="1" |Mode | + | ! Combat flap |
| − | !Stock | + | ! Take-off flap |
| − | !Upgraded | + | ! Landing flap |
| | + | ! Air brakes |
| | + | ! Arrestor gear |
| | |- | | |- |
| − | |''Arcade'' | + | | ✓ || ✓ || ✓ || X || X <!-- ✓ --> |
| − | |17.03 | |
| − | |__.__ | |
| | |- | | |- |
| − | |''Realistic/Simulator''
| |
| − | |9.96
| |
| − | |__.__
| |
| | |} | | |} |
| − |
| |
| − | The speed of the Marksman is very low. It barely can turn around and you can't use speed against the enemy, due to its poor horsepower-to-weight ratio.
| |
| − |
| |
| − | If you keep moving forward without changing direction, you might eventually reach 40 km/h on flat terrain.
| |
| − |
| |
| − | == Armaments ==
| |
| − | === Main armament ===
| |
| − | <!--''Give the reader information about the characteristics of the main gun. Assess its effectiveness in a battle based on the reloading speed, ballistics and the power of shells. Do not forget about the flexibility of the fire, that is how quickly the cannon can be aimed at the target, open fire on it and aim at another enemy. Add a link to the main article on the gun: <code><nowiki>{{main|Name of the weapon}}</nowiki></code>. Describe in general terms the ammunition available for the main gun. Give advice on how to use them and how to fill the ammunition storage.''--><!--Details on the main armament of the tank, which should default be the one fired with a left-click and also that the stat card follows-->
| |
| − | {{main|Oerlikon KDA (35 mm)}}
| |
| | | | |
| | {| class="wikitable" style="text-align:center" | | {| class="wikitable" style="text-align:center" |
| | |- | | |- |
| − | ! colspan="6" | [[Oerlikon KDA (35 mm)|35 mm Oerlikon KDA]] (x2) | + | ! colspan="5" | Limits |
| | |- | | |- |
| − | ! colspan="2" rowspan="1" style="width:5em" |Capacity (Belt capacity each) | + | ! rowspan="2" | Wing-break speed<br>(km/h) |
| − | ! rowspan="1" | Fire rate <br> (shots/minute)
| + | ! rowspan="2" | Gear limit<br>(km/h) |
| − | ! rowspan="1" | Vertical <br> guidance | + | ! rowspan="2" | Combat flap<br> (km/h) |
| − | ! rowspan="1" | Horizontal <br> guidance | + | ! colspan="2" | Max Static G |
| − | ! rowspan="1" | Stabilizer | |
| | |- | | |- |
| − | | colspan="2" | 500 (230) || 550 || -10°/+80° || ±180° || Two-plane
| + | ! + |
| | + | ! - |
| | |- | | |- |
| − | ! colspan="6" | Turret rotation speed (°/s)
| + | | ??? || ??? || ??? || ~?? || ~? |
| | |- | | |- |
| − | ! style="width:4em" |Mode
| + | |} |
| − | ! style="width:4em" |Stock
| + | |
| − | ! style="width:4em" |Upgraded
| + | {| class="wikitable" style="text-align:center" |
| − | ! style="width:4em" |Prior + Full crew
| |
| − | ! style="width:4em" |Prior + Expert qualif.
| |
| − | ! style="width:4em" |Prior + Ace qualif.
| |
| − | |-
| |
| − | | ''Arcade'' || 79.3 || __.__ || __.__ || __.__ || __.__
| |
| | |- | | |- |
| − | | ''Realistic'' || 53.5 || __.__ || __.__ || __.__ || __.__ | + | ! colspan="4" | Optimal velocities |
| | |- | | |- |
| − | ! colspan="4" | Reloading rate (seconds) | + | ! Ailerons<br>(km/h) |
| − | | colspan="2" |Rearm rate (seconds)
| + | ! Rudder<br>(km/h) |
| | + | ! Elevators<br>(km/h) |
| | + | ! Radiator<br>(km/h) |
| | |- | | |- |
| − | ! colspan="1" style="width:4em" |Stock
| + | | < ??? || < ??? || < ??? || > ??? |
| − | ! colspan="1" style="width:4em" |Prior + Full crew
| |
| − | ! colspan="1" style="width:4em" |Prior + Expert qualif.
| |
| − | ! colspan="1" style="width:4em" |Prior + Ace qualif.
| |
| − | |Main belt | |
| − | |Secondary belt | |
| − | |- | |
| − | | 1.3 || __.__ || __.__ || __.__
| |
| − | |~45.0
| |
| − | |~5.0
| |
| | |- | | |- |
| | |} | | |} |
| | | | |
| − | <!-- Rearm rate have been taken from AB. May be different in RB.-->
| |
| − | Marksman has an extremely fast turning turret, so any incoming plane or light vehicle can be targeted fast.
| |
| − |
| |
| − | Guns converge at about 1.2 km range without "Adjustments of Fire" modification and about 1.8 km with it. This makes firing at close range enemy vehicles very impractical, due to low ammunition count. However, it's very convenient for firing at moving targets, including light tanks and jets, as if two separate autocannons increase the probability of a hit.
| |
| − |
| |
| − | The guns can disable both tracks of the enemy vehicle at once at 300 m distance if facing the enemy's front. This allows you to escape and ask teammates to finish off the threat.
| |
| − |
| |
| − | Since the guns are 35 mm, they also deal more damage than 30 mm of the previous generation SPAA, use the explosive ammo to destroy planes in about 1 to 2 hits, lightly armoured vehicles get destroyed in about 30 shots at worst.
| |
| − |
| |
| − | '''Belt types:'''
| |
| | {| class="wikitable" style="text-align:center" | | {| class="wikitable" style="text-align:center" |
| − | ! colspan="9" |Penetration statistics
| |
| | |- | | |- |
| − | ! rowspan="2" |Belt | + | ! colspan="3" | Compressor (RB/SB) |
| − | ! rowspan="2" |Type of <br>warhead | + | |- |
| − | ! colspan="6" |'''Penetration''' '''''in mm''''' '''@ 0° Angle of Attack''' | + | ! colspan="3" | Setting 1 |
| | + | |- |
| | + | ! Optimal altitude |
| | + | ! 100% Engine power |
| | + | ! WEP Engine power |
| | + | |- |
| | + | | ?,??? m || ??? hp || ?,??? hp |
| | + | |- |
| | + | <!--! colspan="3" | Setting 2 |
| | |- | | |- |
| − | !10m | + | ! Optimal altitude |
| − | !100m | + | ! 100% Engine power |
| − | !500m | + | ! WEP Engine power |
| − | !1000m
| |
| − | !1500m
| |
| − | !2000m
| |
| | |- | | |- |
| − | |Default || API-T, HEI-T || 67 || 64 || 52 || 39 || 30 || 23 | + | | ?,??? m || ?,??? hp || ?,??? hp |
| | |- | | |- |
| − | |DM11A1 || HEI-Tx3, API-T || 67 || 64 || 52 || 39 || 30 || 23 | + | ! colspan="3" | Setting 3 |
| | |- | | |- |
| − | | DM-13 || API-Tx3, HEI-T || 67 || 64 || 52 || 39 || 30 || 23
| + | ! Optimal altitude |
| | + | ! 100% Engine power |
| | + | ! WEP Engine power |
| | |- | | |- |
| − | | DM-23 || APDS || 112 || 110 || 101 || 90 || 71 || 62 | + | | ?,??? m || ?,??? hp || ?,??? hp |
| | + | |- --> |
| | |} | | |} |
| | | | |
| − | '''Note''': HEI-T does no damage to armoured targets, but critically damages planes. | + | === Survivability and armour === |
| | + | <!--''Examine the survivability of the aircraft. Note how vulnerable the structure is and how secure the pilot is, whether the fuel tanks are armoured. Describe the armour, if there is any, also mention the vulnerability of other critical aircraft systems.''--> |
| | + | |
| | + | * No armour plating |
| | + | * No armour glazing |
| | + | * Critical components located at front of aircraft (fuel, pilot, engine, controls) |
| | + | * More fuel tanks located in wings near fuselage |
| | | | |
| − | Ammunition belts are split into 2: the main belt and secondary belt.
| + | == Armaments == |
| | + | === Offensive armament === |
| | + | <!--''Describe the offensive armament of the aircraft, if any. Describe how effective the cannons and machine guns are in a battle, and also what belts or drums are better to use. If there is no offensive weaponry, delete this subsection.''--> |
| | + | {{main|MG 17 (7.92 mm)}} |
| | | | |
| − | The Marksman can take 460 shells for the main belt and 40 for secondary, which is barely enough for one engagement. This may be insulting, but it's necessary for survival. Unlike the [[Falcon]], when ammo for the main belt runs out, this could be reloaded at a capture point while the second belt of pure anti-air or anti-armour rounds can be used as self-defence. | + | The Flegel's Bf 109 A is armed with: |
| | | | |
| − | Also, there won't be a need to reload a new belt once the ammo restocks is complete, so the Marksman is ready to fight quicker.
| + | * 2 x 7.92 mm MG 17 machine guns, nose-mounted (500 rpg = 1,000 total) |
| | | | |
| − | The other thing with ammunition belts is that its APDS belt is now purely APDS and can '''only''' be a secondary belt. This makes the decision about the secondary belt being fully anti-tank or fully anti-air ever more annoying and affecting your playstyle. | + | The two machine guns are arranged with both mounted in the upper fuselage, just in front of the cockpit. Each are armed with the same amount of ammunition, which means that all guns will fire with each other until empty. |
| | + | <!--=== Suspended armament === |
| | + | ''Describe the aircraft's suspended armament: additional cannons under the wings, bombs, rockets and torpedoes. This section is especially important for bombers and attackers. If there is no suspended weaponry remove this subsection.'' |
| | | | |
| − | You can only reload one belt at once. Your secondary belt rearms in about 5 seconds, while your main belt rearms for about 45 seconds. Thus, your playstyle is majorly dictated by how far from the capture point you are.
| + | === Defensive armament === |
| | + | ''Defensive armament with turret machine guns or cannons, crewed by gunners. Examine the number of gunners and what belts or drums are better to use. If defensive weaponry is not available remove this subsection.'' |
| | + | --> |
| | + | == Usage in the battles == |
| | + | <!--''Describe the tactics of playing in an aircraft, the features of using vehicles in a team and advice on tactics. Refrain from creating a "guide" - do not impose a single point of view but give the reader food for thought. Examine the most dangerous enemies and give recommendations on fighting them. If necessary, note the specifics of the game in different modes (AB, RB, SB).''--> |
| | + | As with the other 109s, Flegel's aircraft should be used as a high-energy fighter. Long turning engagements will almost always result in a loss, especially against Japanese and Russian monoplanes and all biplanes. Side climb for the first bit of the match until you attain at least 2000 meters of altitude, and build airspeed before engaging targets. |
| | | | |
| − | ===== [[Ammo racks|Ammo racks]] ===== | + | Enemy biplanes will outperform you in turning engagements, and many outgun you. Japanese and Russian monoplanes will also outperform you at low speed, making them dangerous targets to engage. |
| − | [[File:Ammoracks_{{PAGENAME}}.png|right|thumbnail|[[Ammo racks|Ammo racks]] of the Chieftain Marksman]]
| + | |
| − | {| class="wikitable sortable" style="text-align:center" | + | Keep your speed high and altitude higher. Energy is your friend in this aircraft, as the less than heavy armament will often require you to make more than one pass, especially against bombers. |
| | + | ===Manual Engine Control=== |
| | + | {| class="wikitable" style="text-align:center" |
| | + | |- |
| | + | ! colspan="7" | MEC elements |
| | |- | | |- |
| − | ! class="wikitable unsortable" |Full<br /> ammo | + | ! rowspan="2" |Mixer |
| − | ! class="wikitable unsortable" |1st<br /> rack empty | + | ! rowspan="2" |Pitch |
| − | ! class="wikitable unsortable" |2nd<br /> rack empty | + | ! colspan="3" |Radiator |
| − | ! class="wikitable unsortable" |3rd<br /> rack empty | + | ! rowspan="2" |Supercharger |
| − | ! class="wikitable unsortable" |4th<br /> rack empty | + | ! rowspan="2" |Turbocharger |
| − | ! class="wikitable unsortable" |5th<br /> rack empty
| |
| − | ! class="wikitable unsortable" |6th<br /> rack empty
| |
| − | ! class="wikitable unsortable" |Visual<br /> discrepancy
| |
| | |- | | |- |
| − | || '''XX''' || XX ''(X+)'' || ''(+)'' || ''(+)'' || ''(+)'' || ''(+)'' || ''(+)'' || style="text-align:left" | no | + | ! Oil |
| | + | ! Water |
| | + | ! Type |
| | + | |- |
| | + | | Controllable || rowspan="2" | Not controllable || rowspan="2" | Not controllable || rowspan="2" | Not controllable || rowspan="2" | Separate || rowspan="2" | Not ontrollable || rowspan="2" | Not controllable |
| | |- | | |- |
| | |} | | |} |
| | | | |
| − | ===Radars=== | + | ===Modules=== |
| − | {{main|Marconi S 400}}
| + | {| class="wikitable" |
| − | The Chieftain Marksman is equipped with a [[Marconi S 400]] search and tracking radar, mounted on top of the turret, at the rear. The radar system lacks track while scan but can track targets in a full 360° area around the turret (instead of just to the front of the turret). The tank often spawns with radar off, it is folded when powered down.
| + | ! Tier |
| − | | + | ! Flight performance |
| − | {| class="wikitable" style="text-align:center" | + | ! Survivability |
| − | ! colspan="5" | [[Marconi S 400]] - Target Detection Radar | + | ! Weaponry |
| − | |-
| |
| − | ! {{Annotation|Maximum<br/>Detection<br/>Range|The maximum possible range at which a target can be detected}} | |
| − | ! {{Annotation|Minimum<br/>Detection<br/>Range|The range, below which, a target cannot be detected}} | |
| − | ! {{Annotation|Max Azimuth<br/>Scan Angle|How far to each side the radar can scan (widest search mode)}}
| |
| − | ! {{Annotation|Max Elevation<br/>Scan Angle|How far up and down the radar can scan (widest search mode)}} | |
| − | ! {{Annotation|Minimum<br/>relative speed|The minimum speed a target must be moving, relative to the radar, in order to be detectable by the radar}}
| |
| | |- | | |- |
| − | | 12,000 m || 1,000 m || 360° || -10°/+90° || 15 m/s (54 km/h) | + | | I |
| | + | | Fuselage Repair, Radiator |
| | + | | |
| | + | | Offensive 7 mm |
| | |- | | |- |
| − | ! colspan="5" | [[Marconi S 400]] - Target Tracking Radar
| + | | II |
| | + | | Compressor |
| | + | | Airframe |
| | + | | |
| | |- | | |- |
| − | ! {{Annotation|Maximum<br/>Tracking<br/>Range|The maximum range at which a target can be tracked}}
| + | | III |
| − | ! {{Annotation|Minimum<br/>Tracking<br/>Range|The range below which targets cannot be tracked by the radar}}
| + | | Wing Repair, Engine |
| − | ! {{Annotation|Azimuth Tracking<br/>Angle|How far to each side the radar can track a target}}
| + | | |
| − | ! {{Annotation|Elevation Tracking<br/>Angle|How far up and down the radar can track a target}}
| + | | New 7 mm MGs |
| − | ! {{Annotation|Minimum<br/>relative speed|The minimum speed a target must be moving, relative to the radar, in order to be tracked by the radar}}
| |
| | |- | | |- |
| − | | 10,000 m || 100 m || 360° || -10°/+87° || 15 m/s (54 km/h) | + | | IV |
| | + | | Engine Injection |
| | + | | Cover |
| | + | | |
| | |- | | |- |
| | |} | | |} |
| | | | |
| − | == Usage in battles == | + | === Pros and cons === |
| − | <!--''Describe the tactics of playing in the vehicle, the features of using vehicles in the team and advice on tactics. Refrain from creating a "guide" - do not impose a single point of view but give the reader food for thought. Describe the most dangerous enemies and give recommendations on fighting them. If necessary, note the specifics of the game in different modes (AB, RB, SB).''--> | + | <!--''Summarize and briefly evaluate the vehicle in terms of its characteristics and combat effectiveness. Mark its pros and cons in the bulleted list. Do not use more than 6 points for each of the characteristics. Avoid using categorical definitions such as "bad", "good" and the like - they have a substitution in the form of softer "inadequate", "effective".''--> |
| − | | |
| − | Follow the team's push and take some nice fortified position with sight on the capture point, destroying any scout vehicles that attempt to get close while looking for planes. Conducting both actions at once is crucial to not only deny the enemy a recon point but also for self-preservation to keep the Marksman protected. Fighting at a distance will be best to minimize convergence distance to avoid wasting ammunition on the lead. Vertical traverse of cannons is almost instant, so that should not be a concern when shifting from ground to air target. As the main belt's ammo runs out, move closer to the capture point to rearm. With this tactic, use the secondary belt only for self-defence on the capture point, or if it's really necessary for a teammate's survival.
| |
| − | | |
| − | Alternatively, you could go straight for capture point defence and unload secondary belts onto every passing plane, light tank, SPAA and poorly armoured MBT, then immediately rearm. Since your guns convergence is 1-2km depending on upgrades, there is little chance that any vehicle which is travelling in a straight line can dodge your double cannon lead. However, don't expect to successfully push away medium tanks, if your belt isn't APDS, and it's very likely that the enemy's return fire will heavily damage you, as capture points rarely provide any cover, so move out and use your main belt, when forced to.
| |
| − | | |
| − | Using radar-assisted aim is advised since it's more accurate and can lead to hits at over 3km range. To conserve ammo, however, do not just blindly follow it, especially in arcade, as arcade mode aircraft tend to dodge direct shots - do some short bursts around it. If you are standing on a frontline, remember that Marksman is very tall and it is not rare for some tankers to get annoyed by your presence and try to shoot the radar off the turret, even if the turret itself is almost entirely behind cover and attack achieves nothing else, so try to move somewhere remotely safe if you are expecting an air raid.
| |
| − | | |
| − | In arcade mode your combat ability is severely limited, due to many maps being 2 x 2 km wide at best, so on such maps you could try to train your crew with very high "keen vision", then try to camp enemy base entrances across the map, using the fact that your shells have little penetration falloff over distance and slight armour angling. This would require great map knowledge, though. As soon as enemy planes or attack helicopters appear, destroy them.
| |
| − | | |
| − | On big maps in arcade mode, keep in mind, that every sniper tank on enemy team might try to shoot in your direction, as soon as they are done destroying medium tanks, or if hostile light tank "scout" you. It is very hard to snipe planes from spawn on such maps, so try to secure some "trench line" in form of a hill, which you can use to follow your team even under sniper fire. Snipe lightly armoured tanks back, if they expose themselves. Having high "keen vision" greatly helps at this as well.
| |
| − | | |
| − | Some enemies to be concerned about:
| |
| | | | |
| − | * '''Soviet tanks''': Avoid them as much as possible. With the gun convergence and reduced movement speed, it will not be easy to defeat them in a duel, as their frontal armour is almost always impenetrable, even for APDS belt. Detrack them and communicate with teammates to finish them off. Sometimes their medium tank drivers are very arrogant and underestimate Marksman, due to how rarely it is spaded and do not immediately turn their frontal armour towards it, thinking that you cannot destroy them anyway - punish them by shredding their tank with APDS belt, or by firing AP belt into generally weak side-bottom part of their tank.
| |
| − | * '''Maus''': It's invulnerable. Best not to show up in parts of that map it controls.
| |
| − | * '''Centauro''': This is the epitome of all tanks Marksman wants to shoot at - it is mobile, can reach and flank your position in a minute and has scouting as well. Fortunately, it also has the armour of a light tank, so if you see it out of cover, drop your lock on and fire at it, before it hides away.
| |
| − | * '''Helicopters''': While helicopters are slow and may look like an easy target, they can change direction of flight and throw off radar aim or try to drop altitude, avoiding shots from over two kilometres away, so keep checking where it is trying to turn or roll, instead of just firing at the radar aiming reticle. Also, due to Marksman cannon convergence, it is not rare to only cut off weapon pylons off attack helicopter, but fail to actually disable its gunner/co-pilot, so if after critical hit on a helicopter or setting it on fire ATGM still flies directly at your SPAA, it is better to hide behind something. Rocket carpet bombing is also dangerous for Marksman due to turret being very big, so try to move out of the way of the main volley, if only a bit - a close miss of weak rockets should fail to penetrate chieftain hull. The radar will keep your aim true, so don't worry about accuracy during movement too much.
| |
| − |
| |
| − | === Pros and cons ===
| |
| − | <!--''Summarize and briefly evaluate the vehicle in terms of its characteristics and combat effectiveness. Mark its pros and cons in the bulleted list. Try not to use more than 6 points for each of the characteristics. Avoid using categorical definitions such as "bad", "good" and the like - they have a substitution in the form of softer "inadequate", "effective".''-->[[File:Radar shot marksman.jpg|thumb|400x400px|Radar makes hitting passive pilots extremely easy, and in Realistic Battle you can take them down with just 1 hit of explosive ammo. Even if it doesn't look like a fatal hit, it can eventually force plane to crash. In arcade mode radar guidance ensures you won't need to spend your entire ammunition trying to take down one bomber or ATGM helicopter.]]
| |
| | '''Pros:''' | | '''Pros:''' |
| | | | |
| − | * Guns produce a great effect upon shell contact on target, requiring only one or two hits to down a plane | + | * Good energy retention |
| − | * Can fire effectively at longer ranges than [[Falcon]] and has radar guidance on top of that | + | * Performance at altitude remains decent compared to its contemporaries |
| − | * Compared to [[Gepard]] and [[Type 87]] has relatively easy time shooting down planes even without use of a sniper scope
| |
| − | * Secondary belts allow for safer rearms compared to [[Falcon]] and [[M163|Vulcan]]
| |
| − | * Has a stable radar system with full 360° target tracking - it rarely ever needs to be manually locked on
| |
| − | * Impossible to hull break due to chieftain hull being used, although it rarely matters due to turret size
| |
| | | | |
| | '''Cons:''' | | '''Cons:''' |
| | | | |
| − | * Low mobility | + | * Two bladed wooden prop limits acceleration |
| − | * The cannon's convergence makes the Marksman weaker in close combat, as it can only hit targets with one gun at short range | + | * Offensive armament is underwhelming, especially against heavily defended targets |
| − | * LFP is a weak spot even for some light tanks, turret is lightly armoured and is a big target for rockets and other explosives - keeping 1.3 km distance is crucial when fighting light tanks and other SPAA
| |
| − | * Ammunition count is low, firing in 20-30 shot bursts is almost a must
| |
| − | * APDS ammo is now put into a separate belt, which may be inconvenient to use with a low ammunition capacity
| |
| − | * Slower rate of fire than other SPAA
| |
| − | * Radar system lacks track while scan and has relatively poor range
| |
| − | * No night vision whatsoever, unlike [[Falcon]] - even though it does not really need it for AA duty, you may overlook enemy ground forces at night (only matters in RB and SB)
| |
| | | | |
| | == History == | | == History == |
| − | <!--''Describe the history of the creation and combat usage of the ground vehicle in more detail than in the introduction. If the historical reference turns out to be too big, take it to a separate article, taking a link to an article about the vehicle and adding a block "/ History" (example: <nowiki>https://wiki.warthunder.com/(Vehicle-name)/History</nowiki>) and add a link to it here using the <code>main</code> template. Be sure to reference text and sources by using <code><nowiki><ref></nowiki></code>, as well as adding them at the end of the article.''-->
| + | ''Describe the history of the creation and combat usage of the aircraft in more detail than in the introduction. If the historical reference turns out to be too big, take it to a separate article, taking a link to an article about the vehicle and adding a block "/ historical reference" (example: https://wiki.warthunder.com/Name-vehicles/historical reference) and add a link to it here using the <code>main</code> template. Be sure to include links to sources at the end of the article.'' |
| − | With the development of more effective modern weapon systems, deployed from aircraft capable of flying at very high speeds and low altitudes, mobile ground troops were more susceptible to air attack than ever. The British Marconi Electronic Systems company came to the same conclusion during the early 1980s and began independently developing the Marksman project after realizing how little work was being done in the field of modern SPAA development. The concept of the Marksman project wasn’t the development of an entirely new vehicle, but rather of a modern anti-air platform that could be fitted to a wide range of suitable military vehicles, even non-British ones. Naturally, the platform had to be capable of dealing with the most modern threats, such as high-speed attack aircraft and helicopters. In order to achieve this, Marconi engineers gave the Marksman a highly advanced radar detection and targeting system and paired it up with twin 35mm Oerlikon KDA cannons in a similar fashion as found on the German Flakpanzer Gepard.
| |
| − | | |
| − | The testing of the first construction prototype was done on the chassis of the Chinese Type 59 tank. This decision was primarily made in an effort to optimize the platform for use on similar Chinese machines in order to attract potential customers using Chinese vehicles. In 1984, further tests were conducted, only this time around, using chassis of British vehicles such as the Centurion, Chieftain and Challenger 1. However, in order to further increase the number of vehicles that could potentially fit the Marksman platform, Marconi developed several adapters that allowed the platform to be fitted on hulls with a turret ring diameter smaller or in excess of 1840mm. However, as even newer, more capable aircraft weapon systems were developed during the ‘80s which could easily destroy such SPAAs, the Marksman system became more or less obsolete before it was even deployed. Due to this, the primary expected customer - the British Armed Forces - didn’t show any interest in adopting a conventional SPAA system, such as the Marksman. Only a limited number of Marksman systems was employed by the Finnish army on their ItPsv 90 SPAAs, which were retired from active service in 2010 and replaced with Leopard 2 Marksman conversions which are still in service today.
| |
| − | | |
| − | ''- From [https://warthunder.com/en/news/5523-development-chieftain-marksman-top-scoring-shooter-en Devblog]''
| |
| | | | |
| | == Media == | | == Media == |
| | ''An excellent addition to the article will be video guides, as well as screenshots from the game and photos.'' | | ''An excellent addition to the article will be video guides, as well as screenshots from the game and photos.'' |
| | | | |
| − | == See also == | + | == Read also == |
| − | ''Links to the articles on the War Thunder Wiki that you think will be useful for the reader, for example:'' | + | ''Links to the articles on the War Thunder Wiki that you think will be useful for the reader, for example,'' |
| | | | |
| − | * ''reference to the series of the vehicles;'' | + | * ''reference to the series of the aircraft;'' |
| | * ''links to approximate analogues of other nations and research trees.'' | | * ''links to approximate analogues of other nations and research trees.'' |
| | + | <!--''ETC.''--> |
| | + | |
| | + | ===Obtainable events=== |
| | + | |
| | + | * Flegel's Bf 109A was available to be earned during the [https://warthunder.com/en/news/4994-special-german-unity-day-en German Unity Day] in October 2017. If already unlocked, the player could also receive [[Pz.II С (DAK)|Panzer II DAK]], and 250 GE if a player also has that tank as well. |
| | + | |
| | + | == Sources == |
| | + | ''Paste links to sources and external resources, such as:'' |
| | | | |
| − | == External links ==
| |
| − | <!--''Paste links to sources and external resources, such as:''
| |
| | * ''topic on the official game forum;'' | | * ''topic on the official game forum;'' |
| − | * ''encyclopedia page on tank;'' | + | * ''page on aircraft encyclopedia;'' |
| − | * ''other literature.''--> | + | * ''other literature.'' |
| − | | |
| − | * [https://warthunder.com/en/news/5523-development-chieftain-marksman-top-scoring-shooter-en [Devblog<nowiki>]</nowiki> Chieftain Marksman: Top Scoring Shooter]
| |
| | | | |
| − | {{Britain anti-aircraft vehicles}} | + | {{Germany fighters}} |