Difference between revisions of "ARL-44 (ACL-1)"
Inceptor57 (talk | contribs) m |
(Redesign of the "Ammorack" sub-section, my first major Wiki change! I'm so happy!) |
||
| (40 intermediate revisions by 10 users not shown) | |||
| Line 1: | Line 1: | ||
| − | {{Specs-Card|code=fr_arl_44_acl1}} | + | {{About |
| + | |about=heavy tank '''{{PAGENAME}}''' | ||
| + | |usage=the tank destroyer version | ||
| + | |link=ARL-44 | ||
| + | }} | ||
| + | {{Specs-Card | ||
| + | |code=fr_arl_44_acl1 | ||
| + | |images={{Specs-Card-Image|GarageImage_{{PAGENAME}}.jpg}} | ||
| + | }} | ||
== Description == | == Description == | ||
| − | <!--''In the description, the first part | + | <!-- ''In the description, the first part should be about the history of the creation and combat usage of the vehicle, as well as its key features. In the second part, tell the reader about the ground vehicle in the game. Insert a screenshot of the vehicle, so that if the novice player does not remember the vehicle by name, he will immediately understand what kind of vehicle the article is talking about.'' --> |
| − | + | The ARL-44 (ACL-1) bears very distinctive characteristics, with a WWI-style track system (similar to the Churchill) which runs across the whole side of its chassis. This tank is a mix of different inspirations, mainly late-war German tank technology such as the [[Panther D|Panther series]] or the [[Tiger II (H)|Tiger II]], from which it takes its sloped frontal armour and tall profile. As France was reviving from WW2, its engineers were hard at work to catch up with tank technology, the ARL-44 series was a training ground for them. This is why this tank has rather weird design choices, coming from both experience and experimentation. Originally armed with a 75 mm cannon, an ACL-1 turret, and a 60 mm sloped front plate in 1944, the design was deemed to weak, and many considered that it would quickly be outdated. It was later improved with a 90 mm SA45 gun with 37 rounds, a 120 mm front plate and a redesigned sloped turret ([[ARL-44]]). | |
| − | |||
| − | |||
| − | The ARL-44 (ACL-1) | + | It was introduced in [[Update 1.75 "La Résistance"]]. The ARL-44 (ACL-1) is a well-rounded vehicle more suited for a medium tank role than an heavy one due to lacking armour (which is still decent). It distinguishes from previous French heavy tanks for having a potent gun. The vehicle features an adequate cannon (although with a limited ammo selection), good frontal and side armour that allows for limited angling, and -10 degrees of gun depression. However, the tank does have a very large profile and the turret ammo storage is very exposed and lightly armoured. |
| − | |||
| − | |||
| − | |||
| − | |||
| − | |||
| − | |||
== General info == | == General info == | ||
=== Survivability and armour === | === Survivability and armour === | ||
| − | <!--''Describe armour protection. Note the most well protected and key weak areas. Appreciate the layout of modules as well as the number and location of crew members. Is the level of armour protection sufficient, is the placement of modules | + | {{Specs-Tank-Armour}} |
| + | <!-- ''Describe armour protection. Note the most well protected and key weak areas. Appreciate the layout of modules as well as the number and location of crew members. Is the level of armour protection sufficient, is the placement of modules helpful for survival in combat? If necessary use a visual template to indicate the most secure and weak zones of the armour.'' --> | ||
| − | |||
'''Armour type:''' | '''Armour type:''' | ||
| + | |||
| + | * Rolled homogeneous armour (Hull) | ||
| + | * Cast homogeneous armour (Turret, gun mantlet, MG port) | ||
| + | |||
{| class="wikitable" | {| class="wikitable" | ||
|- | |- | ||
! Armour !! Front (Slope angle) !! Sides !! Rear !! Roof | ! Armour !! Front (Slope angle) !! Sides !! Rear !! Roof | ||
|- | |- | ||
| − | | Hull || 60 mm (48°) ''Front glacis'' <br> | + | | Hull || 60 mm (48°) ''Front glacis'' <br> 100 mm (spherical) ''MG port'' <br> 50 mm ''Hull compartment between the tracks'' <br> 50 mm (63°) ''Lower glacis'' || 50 mm <br> 25 mm ''Tracks cover'' || 35 mm (32°) ''Rear glacis'' <br> 35 mm (20°) ''Hull compartment between the tracks'' || 20 mm <br> 5 mm ''Radiator vents'' <br> 5 mm (18°) ''Engine access panel'' |
| − | |||
| − | |||
|- | |- | ||
| − | + | | Turret || 100 mm (0-44°) ''Turret front'' <br> 80-100 + 30 mm (spherical) ''Gun mantlet'' || 60 mm (3°) || 30 mm <br> 20 mm ''Rear hatch'' <br> 60 mm (52°) ''Turret overhang'' || 20 mm (13-15°) | |
|- | |- | ||
| − | | Cupola || 60 mm || | + | | Cupola || colspan="3" style="text-align:center" | 60 mm || 20 mm |
|} | |} | ||
| + | |||
'''Notes:''' | '''Notes:''' | ||
| − | |||
| − | |||
| − | |||
| − | The ARL-44 | + | * Suspension wheels are 15 mm thick while tracks are 20 mm thick and bogies are 10 mm thick. |
| + | * 25 mm RHA plate separates the engine from the crew compartment. | ||
| + | * The Turret ring is 55 mm thick, with an additional 20 mm of armour behind it. | ||
| + | |||
| + | The armour on this version of the ARL-44 is average as the frontal glacis plate can be penetrated by most foes it encounters up close from the front: with 60 mm at 48°, it is similar to a [[M4A3 (105)]]. With that in mind, this tank should be kept a fair distance from the frontline. In order to put this "Heavy Tank" to good use, it should be angled at about 25° facing towards the enemy. An even better way to maximise its armour is by keeping a hull-down position, using its -10° depression. Turret armour is ~100 mm thick, with a lot of overlapping armour profiles around the mantlet area. With a bit of distance and angle, most rounds will not penetrate, except from tank destroyers with high penetration. | ||
| + | |||
| + | Another thing to consider is this tank's large elevation mechanism, a penetrating shot to the tank's center of mass may damage or disable it, making it very hard to return fire. | ||
=== Mobility === | === Mobility === | ||
| − | <!--''Write about the mobility of the ground vehicle. Estimate the specific power and | + | {{Specs-Tank-Mobility}} |
| − | {| | + | <!-- ''Write about the mobility of the ground vehicle. Estimate the specific power and manoeuvrability, as well as the maximum speed forwards and backwards.'' --> |
| − | | | + | |
| − | + | {{tankMobility|abMinHp= 775|rbMinHp= 531}} | |
| − | + | ||
| − | + | At 47 tons, this is not a light tank, even more so that its tracks have bad ground traction. What saves this vehicle from feeling too slow is its {{Annotation|600 HP|Realistic}} engine, capable of maintaining its top speed even when climbing slight hills. Do not expect too much, as this tank is still heavy and sluggish, especially in highly inclined and soft terrains. Don't forget its reverse speed of "only" -7.5 km/h, it won't get you out quickly of the situations so don't over-extend. | |
| − | + | ||
| − | + | === Modifications and economy === | |
| − | + | {{Specs-Economy}} | |
| − | |||
| − | |||
| − | |||
| − | |||
| − | |||
| − | |||
| − | |||
| − | |||
| − | |||
| − | |||
| − | |||
| − | |||
| − | |||
| − | |||
| − | |||
| − | |||
| − | |||
| − | |||
| − | |||
| − | |||
| − | |||
| − | |||
| − | |||
| − | |||
| − | |||
| − | |||
| − | |||
| − | |||
| − | |||
| − | |||
| − | |||
| − | |||
| − | |||
== Armaments == | == Armaments == | ||
| + | {{Specs-Tank-Armaments}} | ||
=== Main armament === | === Main armament === | ||
| − | <!--''Give the reader information about the characteristics of the main gun. Assess its effectiveness in a battle based on the reloading speed, ballistics and the power of shells. Do not forget about the | + | {{Specs-Tank-Weapon|1}} |
| − | {{main| | + | <!-- ''Give the reader information about the characteristics of the main gun. Assess its effectiveness in a battle based on the reloading speed, ballistics and the power of shells. Do not forget about the flexibility of the fire, that is how quickly the cannon can be aimed at the target, open fire on it and aim at another enemy. Add a link to the main article on the gun: <code><nowiki>{{main|Name of the weapon}}</nowiki></code>. Describe in general terms the ammunition available for the main gun. Give advice on how to use them and how to fill the ammunition storage.'' --> |
| + | {{main|SA44 (75 mm)}} | ||
| − | {| class="wikitable" style="text-align:center" | + | {| class="wikitable" style="text-align:center" width="100%" |
|- | |- | ||
| − | ! colspan=" | + | ! colspan="5" | [[SA44 (75 mm)|75 mm SA44]] || colspan="5" | Turret rotation speed (°/s) || colspan="4" | Reloading rate (seconds) |
|- | |- | ||
| − | ! | + | ! Mode !! Capacity !! Vertical !! Horizontal !! Stabilizer |
| − | ! | + | ! Stock !! Upgraded !! Full !! Expert !! Aced |
| − | ! | + | ! Stock !! Full !! Expert !! Aced |
| − | ! | ||
|- | |- | ||
| − | | | + | ! ''Arcade'' |
| + | | rowspan="2" | 37 || rowspan="2" | -10°/+20° || rowspan="2" | ±180° || rowspan="2" | N/A || 12.1 || 16.8 || 20.4 || 22.6 || 24.0 || rowspan="2" | 9.75 || rowspan="2" | 8.63 || rowspan="2" | 7.95 || rowspan="2" | 7.50 | ||
|- | |- | ||
| − | ! | + | ! ''Realistic'' |
| − | + | | 8.9 || 10.5 || 12.8 || 14.1 || 15.0 | |
| − | |||
| − | |||
| − | |||
| − | |||
| − | |||
| − | |||
| − | |||
| − | |||
| − | |||
| − | |||
| − | |||
| − | |||
| − | |||
| − | |||
| − | |||
| − | |||
| − | |||
| − | |||
| − | |||
|- | |- | ||
|} | |} | ||
| + | [[File:Penetration chance at 500m when shooting at KV-1 (L-11), not angled..jpg|thumb|Example shot at a [[KV-1 (L-11)]] from a distance of 500 m when not angled.]] | ||
| + | When compared to other Medium or Heavy tanks at the same battle rating, the gun is somewhere in the middle of the group. The standard shell has enough penetration to penetrate all up to the heaviest armour from the front at a distance of 500 m and less when the enemy is not angled. The most notable disadvantage is the lack of an AP shell with an explosive filler meaning it is often needed to shoot and penetrate more than once to destroy a target. The post-penetration damage while quite deadly, can be quite lacklustre if the armour of the target is just thick enough. This will prevent enough shrapnel from being created to critically damage and/or knock out the crew inside an enemy tank. | ||
| − | + | ==== Ammunition ==== | |
| − | { | + | {{:SA44 (75 mm)/Ammunition|75 mm OR Mle.44, 75 mm OE Mle.28}} |
| − | |||
| − | |||
| − | |||
| − | |||
| − | |||
| − | |||
| − | |||
| − | |||
| − | |||
| − | |||
| − | |||
| − | |||
| − | |||
| − | |||
| − | |||
| − | |||
| − | |||
| − | |||
| − | |||
| − | |||
| − | |||
| − | |||
| − | |||
| − | |||
| − | |||
| − | |||
| − | |||
| − | |||
| − | |||
| − | |||
| − | |||
| − | |||
| − | |||
| − | |||
| − | |||
| − | |||
| − | |||
| − | | 75 mm | ||
| − | |||
| − | |||
| − | |||
| − | |||
| − | + | ==== [[Ammo racks]] ==== | |
| − | [[File: | + | [[File:Ammoracks_{{PAGENAME}}.png|right|thumb|x250px|[[Ammo racks]] of the {{PAGENAME}}]] |
| − | {| class="wikitable | + | <!-- '''Last updated: 2.35.0.56''' --> |
| + | {| class="wikitable" style="text-align:center" | ||
|- | |- | ||
| − | ! | + | ! Full<br>ammo |
| − | ! | + | !1st<br>rack empty |
| − | ! | + | !2nd<br>rack empty |
| − | ! | + | ! Visual<br>discrepancy |
| − | |||
|- | |- | ||
| − | + | | '''37''' || 25 ''(+12)'' | |
| + | |1 ''(+36)''|| No | ||
|- | |- | ||
|} | |} | ||
| + | '''Notes''': | ||
| − | + | * Rack 2 is a first-stage ammo rack. It totals 24 shells will get replenished over time when not interrupted by firing. | |
| + | ** The restocking time is longer than the normal reload time of the gun (about 19 seconds). Take this into account when playing. | ||
| + | * Shells are modelled individually and disappear after having being fired or loaded. | ||
| + | * Hull empty: 25 (+12) shells | ||
=== Machine guns === | === Machine guns === | ||
| − | <!--''Offensive and anti-aircraft machine guns not only allow you to fight some aircraft | + | {{Specs-Tank-Weapon|2}} |
| + | <!-- ''Offensive and anti-aircraft machine guns not only allow you to fight some aircraft but also are effective against lightly armoured vehicles. Evaluate machine guns and give recommendations on its use.'' --> | ||
{{main|MAC 31 (7.5 mm)}} | {{main|MAC 31 (7.5 mm)}} | ||
| − | {| class="wikitable" style="text-align:center" | + | {| class="wikitable" style="text-align:center" width="50%" |
|- | |- | ||
| − | ! colspan=" | + | ! colspan="5" | [[MAC 31 (7.5 mm)|7.5 mm MAC 31]] |
|- | |- | ||
| − | ! | + | ! Mount !! Capacity (Belt) !! Fire rate !! Vertical !! Horizontal |
|- | |- | ||
| − | + | | Coaxial || 5,100 (150) || 551 || N/A || N/A | |
| − | |||
| − | |||
| − | |||
| − | |||
| − | |||
|- | |- | ||
|} | |} | ||
| − | + | The small calibre of the MAC 31 machine gun makes it largely ineffective against all armoured vehicles but the ones with an open compartment. It still can be used to ping targets as a rangefinding help or to mow down minor obstacles blocking your line of sight. | |
| − | |||
| − | |||
| − | + | == Usage in battles == | |
| + | <!-- ''Describe the tactics of playing in the vehicle, the features of using vehicles in the team and advice on tactics. Refrain from creating a "guide" - do not impose a single point of view but instead give the reader food for thought. Describe the most dangerous enemies and give recommendations on fighting them. If necessary, note the specifics of the game in different modes (AB, RB, SB).'' --> | ||
| + | |||
| + | ;Combat tactics | ||
| + | |||
| + | The {{PAGENAME}} is a relatively well armoured vehicle and but should still be played as a support tank. From a distance, take advantage of your armour to shrug enemy fire off while answering with well placed shots. Your frontal glacis and turret armour are strong enough to resist most enemy guns beyond 500 m. But there are weak spots your opponents will prioritize: the front glacis (if not properly angled) and the turret cupola. Refrain from rushing towards the frontline: your sides are weak and your turret traverse speed is slow so avoid close combat. Staying at a distance from the frontline will also prevent from being taken in a pincer move. | ||
| + | Your gun has a good penetration power allowing you to stay at a distance but the lack of explosive filler is detrimental to your performance as you'll need two to three shells to take down enemies. Your reload time is a bit longer than most opponents, so aim precisely and make every shot count. | ||
| + | Your mobility is rather poor, with a rigid suspension, outdated tracks and a long and cumbersome chassis. Terrain irregularities will make you slow down and hinder your progress. Position your hull carefully when getting to a shooting spot to avoid hull twitching that will impact your targeting process. | ||
| + | |||
| + | ;Notable enemies: | ||
| + | |||
| + | * Tank destroyers with powerful guns that can penetrate you from afar: M10, StuG III F, YaG-10 (29-K), ASU-57, SU-85A, Achilles, Na-To, 90/53 M41M, Breda 501, Pvkv II and Pvkv m/43 (1946). You can add the Pz.IV F2, the Pz.IV G/J to the list as they sport powerful cannons too. | ||
| + | * Tanks firing HEAT shells that can defeat your frontal glacis: 75/34 M43, P40, | ||
| + | * Tanks whose cannon is powerful enough when in close proximity: any M24, any Sherman (M4, M4A1, M4A2, M4A4, M4A5), any T-34 (1941, 1942, 1943, E STz), any KV-2 (1939, 1940, 754), the Chi-Nu and the AMX-13 (FL11). | ||
| + | * Heavy tank able to resist your fire and get close enough to damage you: KV-1S, MK-II "Matilda" | ||
| + | |||
| + | [[File:ARL-44 weakspot picture.png|thumb|This piece of armour will detonate the shell, leading to the knock out of at least 1 crew member]] | ||
| + | |||
| + | ;How to defeat {{PAGENAME}} | ||
| + | |||
| + | * One might assume that the ARL's side armour is also very thick, complex, and hard to penetrate at an angle but the ARL can actually get penetrated frontally even with 3.7 tanks despite the fact that the tracks and hull sides somewhat resemble the structure of a Churchill heavy tank. Behind the track and front sprocket wheel lays an unangled armour of only 50 mm thickness. The effective thickness of all these components combined are no more than 100 mm when aiming from the front. Therefore even a 3.7 tank can shoot at the track and the shell will most certainly go through the frontmost wheel, then penetrate the 50 mm armour, sending shrapnel into the crew compartment with its explosion. Of course, solid shots will not work as good since you are shooting at the very edge of the tank after all, you need explosive filler to knock out the crew who are beside the point of penetration. This weak spot remains small and requires close proximity. | ||
| + | |||
| + | [[File:ARL-44 (ACL-1) weakspot picture.png|thumb|As seen through protection analysis, this weak spot only has an effective thickness of less than 100 mm, meaning almost any tank can reliably penetrate there]] | ||
| + | |||
| + | * Do not attack the {{PAGENAME}} frontally unless you have enough armour to afford it. | ||
| + | * Sneak around it and target the turret from the back or the side. The {{PAGENAME}} has a slow turret traverse and flat side and rear armour, making it especially vulnerable to flanking. | ||
| + | * If you have no other option than to attack it frontally, blind it with smoke before closing the gap. Target either the turret cupola or the lower part of the front glacis when the {{PAGENAME}} is not angling as they are weak spots. | ||
=== Pros and cons === | === Pros and cons === | ||
| − | <!--'' | + | <!-- ''Summarise and briefly evaluate the vehicle in terms of its characteristics and combat effectiveness. Mark its pros and cons in a bulleted list. Try not to use more than 6 points for each of the characteristics. Avoid using categorical definitions such as "bad", "good" and the like - use substitutions with softer forms such as "inadequate" and "effective".'' --> |
| + | |||
'''Pros:''' | '''Pros:''' | ||
| − | * | + | |
| − | * | + | * Thick side armour enables strong angling |
| + | * Complex side armour can negate HEAT round effectiveness | ||
| + | * 5 crew members increase the survivability | ||
| + | * Good mobility for a heavy tank, suited with a powerful engine | ||
* Hull turning is fast due to wide hull | * Hull turning is fast due to wide hull | ||
| − | * | + | * Potent gun for the battle rating |
| − | + | * -10° of gun depression angle | |
| − | + | * By taking 25 rounds of ammunition, the hull is completely empty of shells, increasing survivability. | |
| − | |||
| − | |||
| − | * -10° of gun depression | ||
'''Cons:''' | '''Cons:''' | ||
| − | * Large | + | |
| − | * Many tanks can reliably penetrate its frontal armour | + | * Large silhouette makes it a priority target |
| − | * No | + | * Many tanks can reliably penetrate its frontal glacis |
| + | * Thin roof armour | ||
| + | * Weak 20 mm plate in turret back protects one of the main ammo racks | ||
| + | * Many weak spots in the armour, including shot traps | ||
| + | * Track traction is subpar (pre-war track pattern) | ||
| + | * Slow reverse speed | ||
| + | * No explosive filler in available shells | ||
| + | * Limited ammunition choice | ||
| + | * Longer reload time compared with tanks of the same battle rating | ||
* Large elevation mechanism, often get damaged | * Large elevation mechanism, often get damaged | ||
| − | |||
| − | |||
| − | |||
| − | |||
| − | |||
| − | |||
| − | |||
| − | |||
== History == | == History == | ||
| − | <!--''Describe the history of the creation and combat usage of the | + | <!-- ''Describe the history of the creation and combat usage of the vehicle in more detail than in the introduction. If the historical reference turns out to be too long, take it to a separate article, taking a link to the article about the vehicle and adding a block "/History" (example: <nowiki>https://wiki.warthunder.com/(Vehicle-name)/History</nowiki>) and add a link to it here using the <code>main</code> template. Be sure to reference text and sources by using <code><nowiki><ref></ref></nowiki></code>, as well as adding them at the end of the article with <code><nowiki><references /></nowiki></code>. This section may also include the vehicle's dev blog entry (if applicable) and the in-game encyclopedia description (under <code><nowiki>=== In-game description ===</nowiki></code>, also if applicable).'' --> |
| + | {{main|ARL-44#History|l1=History of the ARL-44}} | ||
| + | |||
| + | ===Development=== | ||
| + | The {{PAGENAME}} was the initial variant of the ARL-44 in 1944, with a 75 mm SA 44 gun, a 60 mm sloped front plate and an ACL1 turret designed by the shipyard "Ateliers et Chantiers de la Loire". Isolated from the latest evolutions of tank design, the tank was deemed too weak and sent back to the drawing board to equip the tank with better armour and firepower. The design evolved towards the known version of the ARL-44: a 90 mm gun, a Schneider turret and a 120 mm sloped front plate. While 60 ACL1 turrets were ordered, the {{PAGENAME}} never made it past the prototype stage. | ||
| + | |||
| + | ===Combat usage=== | ||
| + | The {{PAGENAME}} saw no service or combat action. | ||
== Media == | == Media == | ||
| − | '' | + | <!-- ''Excellent additions to the article would be video guides, screenshots from the game, and photos.'' --> |
| − | == | + | ;Skins |
| − | ''Links to the articles on the War Thunder Wiki that you think will be useful for the reader, for example | + | |
| + | * [https://live.warthunder.com/feed/camouflages/?vehicle=fr_arl_44_acl1 Skins and camouflages for the {{PAGENAME}} from live.warthunder.com.] | ||
| + | |||
| + | ;Videos | ||
| + | {{Youtube-gallery|fdfFS8z1jsU|'''ARL-44 (ACL-1), French, Tier-3, Heavy Tank''' - ''Angry Nerd Gaming''}} | ||
| + | |||
| + | == See also == | ||
| + | <!-- ''Links to the articles on the War Thunder Wiki that you think will be useful for the reader, for example:'' | ||
* ''reference to the series of the vehicles;'' | * ''reference to the series of the vehicles;'' | ||
| − | * ''links to approximate analogues of other nations and research trees.'' | + | * ''links to approximate analogues of other nations and research trees.'' --> |
| − | |||
| − | == | + | ;Vehicles equipped with the same chassis |
| − | ''Paste links to sources and external resources, such as:'' | + | |
| + | * [[ARL-44]] | ||
| + | |||
| + | ;Other vehicles of similar configuration and role | ||
| + | |||
| + | * [[Churchill III]] | ||
| + | |||
| + | == External links == | ||
| + | <!-- ''Paste links to sources and external resources, such as:'' | ||
* ''topic on the official game forum;'' | * ''topic on the official game forum;'' | ||
| − | * ''other literature.'' | + | * ''other literature.'' --> |
| + | |||
| + | * [[wikipedia:ARL_44|[Wikipedia] ARL 44]] | ||
| + | * [https://tanks-encyclopedia.com/coldwar/France/ARL-44.php <nowiki>[Tanks Encyclopedia]</nowiki> ARL-44] | ||
| + | * [https://www.militaryfactory.com/armor/detail.asp?armor_id=531 <nowiki>[Military Factory]</nowiki> ARL 44 Heavy Tank] | ||
{{France heavy tanks}} | {{France heavy tanks}} | ||
Latest revision as of 13:50, 30 March 2024
| This page is about the heavy tank ARL-44 (ACL-1). For the tank destroyer version, see ARL-44. |
.jpg)
Contents
Description
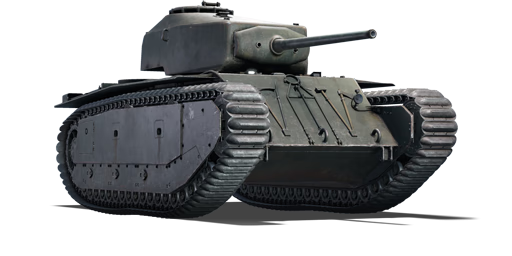
The ARL-44 (ACL-1) bears very distinctive characteristics, with a WWI-style track system (similar to the Churchill) which runs across the whole side of its chassis. This tank is a mix of different inspirations, mainly late-war German tank technology such as the Panther series or the Tiger II, from which it takes its sloped frontal armour and tall profile. As France was reviving from WW2, its engineers were hard at work to catch up with tank technology, the ARL-44 series was a training ground for them. This is why this tank has rather weird design choices, coming from both experience and experimentation. Originally armed with a 75 mm cannon, an ACL-1 turret, and a 60 mm sloped front plate in 1944, the design was deemed to weak, and many considered that it would quickly be outdated. It was later improved with a 90 mm SA45 gun with 37 rounds, a 120 mm front plate and a redesigned sloped turret (ARL-44).
It was introduced in Update 1.75 "La Résistance". The ARL-44 (ACL-1) is a well-rounded vehicle more suited for a medium tank role than an heavy one due to lacking armour (which is still decent). It distinguishes from previous French heavy tanks for having a potent gun. The vehicle features an adequate cannon (although with a limited ammo selection), good frontal and side armour that allows for limited angling, and -10 degrees of gun depression. However, the tank does have a very large profile and the turret ammo storage is very exposed and lightly armoured.
General info
Survivability and armour
Armour type:
- Rolled homogeneous armour (Hull)
- Cast homogeneous armour (Turret, gun mantlet, MG port)
| Armour | Front (Slope angle) | Sides | Rear | Roof |
|---|---|---|---|---|
| Hull | 60 mm (48°) Front glacis 100 mm (spherical) MG port 50 mm Hull compartment between the tracks 50 mm (63°) Lower glacis |
50 mm 25 mm Tracks cover |
35 mm (32°) Rear glacis 35 mm (20°) Hull compartment between the tracks |
20 mm 5 mm Radiator vents 5 mm (18°) Engine access panel |
| Turret | 100 mm (0-44°) Turret front 80-100 + 30 mm (spherical) Gun mantlet |
60 mm (3°) | 30 mm 20 mm Rear hatch 60 mm (52°) Turret overhang |
20 mm (13-15°) |
| Cupola | 60 mm | 20 mm | ||
Notes:
- Suspension wheels are 15 mm thick while tracks are 20 mm thick and bogies are 10 mm thick.
- 25 mm RHA plate separates the engine from the crew compartment.
- The Turret ring is 55 mm thick, with an additional 20 mm of armour behind it.
The armour on this version of the ARL-44 is average as the frontal glacis plate can be penetrated by most foes it encounters up close from the front: with 60 mm at 48°, it is similar to a M4A3 (105). With that in mind, this tank should be kept a fair distance from the frontline. In order to put this "Heavy Tank" to good use, it should be angled at about 25° facing towards the enemy. An even better way to maximise its armour is by keeping a hull-down position, using its -10° depression. Turret armour is ~100 mm thick, with a lot of overlapping armour profiles around the mantlet area. With a bit of distance and angle, most rounds will not penetrate, except from tank destroyers with high penetration.
Another thing to consider is this tank's large elevation mechanism, a penetrating shot to the tank's center of mass may damage or disable it, making it very hard to return fire.
Mobility
| Game Mode | Max Speed (km/h) | Weight (tons) | Engine power (horsepower) | Power-to-weight ratio (hp/ton) | |||
|---|---|---|---|---|---|---|---|
| Forward | Reverse | Stock | Upgraded | Stock | Upgraded | ||
| Arcade | 40 | 9 | 47 | 775 | 1,145 | 16.49 | 24.36 |
| Realistic | 38 | 8 | 531 | 600 | 11.3 | 12.77 | |
At 47 tons, this is not a light tank, even more so that its tracks have bad ground traction. What saves this vehicle from feeling too slow is its 600 HP engine, capable of maintaining its top speed even when climbing slight hills. Do not expect too much, as this tank is still heavy and sluggish, especially in highly inclined and soft terrains. Don't forget its reverse speed of "only" -7.5 km/h, it won't get you out quickly of the situations so don't over-extend.
Modifications and economy
| Mobility | Protection | Firepower | ||||||||||||||||
|---|---|---|---|---|---|---|---|---|---|---|---|---|---|---|---|---|---|---|
|
|
|
Armaments
Main armament
| 75 mm SA44 | Turret rotation speed (°/s) | Reloading rate (seconds) | |||||||||||
|---|---|---|---|---|---|---|---|---|---|---|---|---|---|
| Mode | Capacity | Vertical | Horizontal | Stabilizer | Stock | Upgraded | Full | Expert | Aced | Stock | Full | Expert | Aced |
| Arcade | 37 | -10°/+20° | ±180° | N/A | 12.1 | 16.8 | 20.4 | 22.6 | 24.0 | 9.75 | 8.63 | 7.95 | 7.50 |
| Realistic | 8.9 | 10.5 | 12.8 | 14.1 | 15.0 | ||||||||
,_not_angled..jpg)
When compared to other Medium or Heavy tanks at the same battle rating, the gun is somewhere in the middle of the group. The standard shell has enough penetration to penetrate all up to the heaviest armour from the front at a distance of 500 m and less when the enemy is not angled. The most notable disadvantage is the lack of an AP shell with an explosive filler meaning it is often needed to shoot and penetrate more than once to destroy a target. The post-penetration damage while quite deadly, can be quite lacklustre if the armour of the target is just thick enough. This will prevent enough shrapnel from being created to critically damage and/or knock out the crew inside an enemy tank.
Ammunition
| Penetration statistics | |||||||
|---|---|---|---|---|---|---|---|
| Ammunition | Type of warhead |
Penetration @ 0° Angle of Attack (mm) | |||||
| 10 m | 100 m | 500 m | 1,000 m | 1,500 m | 2,000 m | ||
| OR Mle.44 | APCBC | 125 | 122 | 108 | 93 | 80 | 69 |
| OE Mle.28 | HE | 14 | 13 | 12 | 11 | 10 | 10 |
| Shell details | ||||||||||||
|---|---|---|---|---|---|---|---|---|---|---|---|---|
| Ammunition | Type of warhead |
Velocity (m/s) |
Projectile mass (kg) |
Fuse delay (m) |
Fuse sensitivity (mm) |
Explosive mass (TNT equivalent) (g) |
Ricochet | |||||
| 0% | 50% | 100% | ||||||||||
| OR Mle.44 | APCBC | 715 | 6.4 | - | - | - | 48° | 63° | 71° | |||
| OE Mle.28 | HE | 700 | 6.44 | 0.2 | 0.1 | 675 | 79° | 80° | 81° | |||
Ammo racks
.png)
| Full ammo |
1st rack empty |
2nd rack empty |
Visual discrepancy |
|---|---|---|---|
| 37 | 25 (+12) | 1 (+36) | No |
Notes:
- Rack 2 is a first-stage ammo rack. It totals 24 shells will get replenished over time when not interrupted by firing.
- The restocking time is longer than the normal reload time of the gun (about 19 seconds). Take this into account when playing.
- Shells are modelled individually and disappear after having being fired or loaded.
- Hull empty: 25 (+12) shells
Machine guns
| 7.5 mm MAC 31 | ||||
|---|---|---|---|---|
| Mount | Capacity (Belt) | Fire rate | Vertical | Horizontal |
| Coaxial | 5,100 (150) | 551 | N/A | N/A |
The small calibre of the MAC 31 machine gun makes it largely ineffective against all armoured vehicles but the ones with an open compartment. It still can be used to ping targets as a rangefinding help or to mow down minor obstacles blocking your line of sight.
Usage in battles
- Combat tactics
The ARL-44 (ACL-1) is a relatively well armoured vehicle and but should still be played as a support tank. From a distance, take advantage of your armour to shrug enemy fire off while answering with well placed shots. Your frontal glacis and turret armour are strong enough to resist most enemy guns beyond 500 m. But there are weak spots your opponents will prioritize: the front glacis (if not properly angled) and the turret cupola. Refrain from rushing towards the frontline: your sides are weak and your turret traverse speed is slow so avoid close combat. Staying at a distance from the frontline will also prevent from being taken in a pincer move. Your gun has a good penetration power allowing you to stay at a distance but the lack of explosive filler is detrimental to your performance as you'll need two to three shells to take down enemies. Your reload time is a bit longer than most opponents, so aim precisely and make every shot count. Your mobility is rather poor, with a rigid suspension, outdated tracks and a long and cumbersome chassis. Terrain irregularities will make you slow down and hinder your progress. Position your hull carefully when getting to a shooting spot to avoid hull twitching that will impact your targeting process.
- Notable enemies
- Tank destroyers with powerful guns that can penetrate you from afar: M10, StuG III F, YaG-10 (29-K), ASU-57, SU-85A, Achilles, Na-To, 90/53 M41M, Breda 501, Pvkv II and Pvkv m/43 (1946). You can add the Pz.IV F2, the Pz.IV G/J to the list as they sport powerful cannons too.
- Tanks firing HEAT shells that can defeat your frontal glacis: 75/34 M43, P40,
- Tanks whose cannon is powerful enough when in close proximity: any M24, any Sherman (M4, M4A1, M4A2, M4A4, M4A5), any T-34 (1941, 1942, 1943, E STz), any KV-2 (1939, 1940, 754), the Chi-Nu and the AMX-13 (FL11).
- Heavy tank able to resist your fire and get close enough to damage you: KV-1S, MK-II "Matilda"

- How to defeat ARL-44 (ACL-1)
- One might assume that the ARL's side armour is also very thick, complex, and hard to penetrate at an angle but the ARL can actually get penetrated frontally even with 3.7 tanks despite the fact that the tracks and hull sides somewhat resemble the structure of a Churchill heavy tank. Behind the track and front sprocket wheel lays an unangled armour of only 50 mm thickness. The effective thickness of all these components combined are no more than 100 mm when aiming from the front. Therefore even a 3.7 tank can shoot at the track and the shell will most certainly go through the frontmost wheel, then penetrate the 50 mm armour, sending shrapnel into the crew compartment with its explosion. Of course, solid shots will not work as good since you are shooting at the very edge of the tank after all, you need explosive filler to knock out the crew who are beside the point of penetration. This weak spot remains small and requires close proximity.
_weakspot_picture.png)
- Do not attack the ARL-44 (ACL-1) frontally unless you have enough armour to afford it.
- Sneak around it and target the turret from the back or the side. The ARL-44 (ACL-1) has a slow turret traverse and flat side and rear armour, making it especially vulnerable to flanking.
- If you have no other option than to attack it frontally, blind it with smoke before closing the gap. Target either the turret cupola or the lower part of the front glacis when the ARL-44 (ACL-1) is not angling as they are weak spots.
Pros and cons
Pros:
- Thick side armour enables strong angling
- Complex side armour can negate HEAT round effectiveness
- 5 crew members increase the survivability
- Good mobility for a heavy tank, suited with a powerful engine
- Hull turning is fast due to wide hull
- Potent gun for the battle rating
- -10° of gun depression angle
- By taking 25 rounds of ammunition, the hull is completely empty of shells, increasing survivability.
Cons:
- Large silhouette makes it a priority target
- Many tanks can reliably penetrate its frontal glacis
- Thin roof armour
- Weak 20 mm plate in turret back protects one of the main ammo racks
- Many weak spots in the armour, including shot traps
- Track traction is subpar (pre-war track pattern)
- Slow reverse speed
- No explosive filler in available shells
- Limited ammunition choice
- Longer reload time compared with tanks of the same battle rating
- Large elevation mechanism, often get damaged
History
Development
The ARL-44 (ACL-1) was the initial variant of the ARL-44 in 1944, with a 75 mm SA 44 gun, a 60 mm sloped front plate and an ACL1 turret designed by the shipyard "Ateliers et Chantiers de la Loire". Isolated from the latest evolutions of tank design, the tank was deemed too weak and sent back to the drawing board to equip the tank with better armour and firepower. The design evolved towards the known version of the ARL-44: a 90 mm gun, a Schneider turret and a 120 mm sloped front plate. While 60 ACL1 turrets were ordered, the ARL-44 (ACL-1) never made it past the prototype stage.
Combat usage
The ARL-44 (ACL-1) saw no service or combat action.
Media
- Skins
- Videos
See also
- Vehicles equipped with the same chassis
- Other vehicles of similar configuration and role
External links
| France heavy tanks | |
|---|---|
| B1 | B1 bis · B1 ter |
| 2C | 2C · 2C bis |
| ARL-44 | ARL-44 (ACL-1) |
| AMX-50 | Somua SM · AMX-50 Surbaissé · AMX-50 Surblindé |
| USA | ▄M4A3E2 |
