Difference between pages "Fw 190 A-4" and "Swordfish Mk I"
m (Edits.) |
(→Flight Performance: Updated table design) |
||
| Line 1: | Line 1: | ||
| − | {{Specs-Card|code= | + | {{Specs-Card|code=swordfish_mk1}} |
| − | |||
| − | |||
| − | |||
| − | |||
| − | }} | ||
== Description == | == Description == | ||
| − | <!--''In the description, the first part | + | <!-- ''In the description, the first part should be about the history of and the creation and combat usage of the aircraft, as well as its key features. In the second part, tell the reader about the aircraft in the game. Insert a screenshot of the vehicle, so that if the novice player does not remember the vehicle by name, he will immediately understand what kind of vehicle the article is talking about.'' --> |
| + | [[File:GarageImage_{{PAGENAME}}.jpg|420px|thumb|left]] | ||
| + | {{break}} | ||
| + | The '''{{Specs|name}}''' is a rank {{Specs|rank}} British bomber {{Battle-rating}}. This bomber has been in the game since the start of the Open Beta Test prior to Update 1.27. | ||
| − | + | The Swordfish is a plane often overlooked by new players, but it is common for more experienced players to hold a special love for "ugly ducklings". As such, the Swordfish is valued for providing a change of pace towards slower gameplay and simultaneously a challenge, being mostly staying alive. | |
| − | + | ||
| − | The | + | As with all torpedo bombers, maintaining low altitude, high speed, and fighter cover are all recommended. The optimal distance for launching a torpedo is 1 km from the target, though the Swordfish is slow enough to be able to drop torpedoes efficiently from shorter distances. Targets should be engaged from directly ahead or astern, making "leading" the target much easier. |
| − | + | If torpedo bombing is not an option, the plane can carry bombs for attacking ground targets. The aircraft's slow speed means it is great practice for aiming bombs. With practice, any pilot can make short work of tanks and light pillboxes with the Swordfish. | |
| − | + | The Swordfish is an in-game oddity because it can exceed its max altitude of 3,300 m and go up to about 4,000 m with the 4 x 250 lb bombs attached. | |
| − | + | [[File:BomberImage_Swordfish.jpg|thumbnail|right|Inside the Cockpit of the Swordfish]] | |
| + | A classic biplane design, thus offensive armament is limited. Restrained to only one machine gun offensively and defensively, the Swordfish's true strength is the payload. | ||
| − | |||
== General info == | == General info == | ||
=== Flight Performance === | === Flight Performance === | ||
| − | + | ''Describe how the aircraft behaves in the air. Speed, manoeuvrability, acceleration and allowable loads - these are the most important characteristics of the vehicle.'' | |
| − | {| class="wikitable" style="text-align:center" | + | |
| − | + | {| class="wikitable" style="text-align:center" width="70%" | |
| − | + | ! rowspan="2" | Characteristics | |
| − | + | ! colspan="2" | Max Speed<br>(km/h at 1,800 m) | |
| − | ! | + | ! rowspan="2" | Max altitude<br>(metres) |
| − | |||
| − | ! colspan="2" | Max Speed<br>(km/h at | ||
| − | ! rowspan="2" | Max altitude<br>( | ||
! colspan="2" | Turn time<br>(seconds) | ! colspan="2" | Turn time<br>(seconds) | ||
| − | ! colspan="2" | Rate of climb<br>( | + | ! colspan="2" | Rate of climb<br>(metres/second) |
| − | ! rowspan="2" |Take-off run<br>( | + | ! rowspan="2" | Take-off run<br>(metres) |
| − | |||
| − | |||
| − | |||
| − | |||
| − | |||
| − | |||
| − | |||
| − | |||
| − | |||
| − | |||
| − | |||
|- | |- | ||
| − | ! | + | ! AB !! RB !! AB !! RB !! AB !! RB |
| − | ! | ||
| − | ! | ||
| − | ! | ||
| − | ! | ||
|- | |- | ||
| − | ! | + | ! Stock |
| − | + | | 219 || 209 || rowspan="2" | {{Specs|ceiling}} || 50.7 || 51.3 || 7.8 || 7.7 || rowspan="2" | 297 | |
| − | |||
| − | |||
| − | |||
| − | |||
|- | |- | ||
| − | | | + | ! Upgraded |
| + | | 235 || 226 || 49.8 || 50.2 || 10.6 || 9.2 | ||
|- | |- | ||
|} | |} | ||
====Details==== | ====Details==== | ||
| − | {| class="wikitable" style="text-align:center" | + | {| class="wikitable" style="text-align:center" width="50%" |
|- | |- | ||
! colspan="5" | Features | ! colspan="5" | Features | ||
|- | |- | ||
| − | ! Combat | + | ! Combat flaps !! Take-off flaps !! Landing flaps !! Air brakes !! Arrestor gear |
| − | ! Take-off | ||
| − | ! Landing | ||
| − | ! Air brakes | ||
| − | ! Arrestor gear | ||
|- | |- | ||
| − | | X || | + | | X || X || ✓ || X || ✓ <!-- ✓ --> |
|- | |- | ||
|} | |} | ||
| − | {| class="wikitable" style="text-align:center" | + | {| class="wikitable" style="text-align:center" width="50%" |
|- | |- | ||
| − | ! colspan=" | + | ! colspan="7" | Limits |
|- | |- | ||
| − | ! rowspan="2" | | + | ! rowspan="2" | Wings (km/h) |
| − | ! rowspan="2" | Gear | + | ! rowspan="2" | Gear (km/h) |
| − | ! | + | ! colspan="3" | Flaps (km/h) |
! colspan="2" | Max Static G | ! colspan="2" | Max Static G | ||
|- | |- | ||
| − | ! + | + | ! Combat !! Take-off !! Landing !! + !! - |
| − | ! - | ||
|- | |- | ||
| − | | | + | | {{Specs|destruction|body}} || {{Specs|destruction|gear}} || N/A || N/A || 400 || ~8 || ~5 |
|- | |- | ||
|} | |} | ||
| Line 96: | Line 68: | ||
{| class="wikitable" style="text-align:center" | {| class="wikitable" style="text-align:center" | ||
|- | |- | ||
| − | ! colspan="4" | Optimal velocities | + | ! colspan="4" | Optimal velocities (km/h) |
|- | |- | ||
| − | ! Ailerons | + | ! Ailerons !! Rudder !! Elevators !! Radiator |
| − | ! Rudder | ||
| − | ! Elevators | ||
| − | ! Radiator | ||
|- | |- | ||
| − | | < | + | | < 200 || < 220 || < 260 || > 310 |
|- | |- | ||
|} | |} | ||
| Line 117: | Line 86: | ||
! WEP Engine power | ! WEP Engine power | ||
|- | |- | ||
| − | | | + | | 366 m || 870 hp || N/A |
| − | |||
| − | |||
| − | |||
| − | |||
| − | |||
| − | |||
| − | |||
| − | |||
|- | |- | ||
| − | |||
| − | |||
| − | |||
| − | |||
| − | |||
| − | |||
| − | |||
| − | |||
|} | |} | ||
=== Survivability and armour === | === Survivability and armour === | ||
| − | <!--''Examine the survivability of the aircraft. Note how vulnerable the structure is and how secure the pilot is, whether the fuel tanks are armoured. Describe the armour, if there is any, also mention the vulnerability of other critical aircraft systems.''--> | + | <!-- ''Examine the survivability of the aircraft. Note how vulnerable the structure is and how secure the pilot is, whether the fuel tanks are armoured, etc. Describe the armour, if there is any, and also mention the vulnerability of other critical aircraft systems.'' --> |
| − | + | Swordfish does not feature any armor, and its canvas structure does not provide any degree of protection. One has to rely on the Vitality crew skill to prolong the lifetime of the plane. The only survivability advantage of note is in the airplane's self-sealing fuel tanks and a large, radial engine, which might soak up some bullets before the plane is taken down. Still though, overall the best tactic is to avoid attention, as the low speed combined with negligible protection make it a tempting target for enemy airplanes. | |
| − | |||
| − | |||
| − | |||
| − | |||
| − | |||
| − | |||
| − | |||
| − | |||
== Armaments == | == Armaments == | ||
=== Offensive armament === | === Offensive armament === | ||
| − | <!--''Describe the offensive armament of the aircraft, if any. Describe how effective the cannons and machine guns are in a battle, and also what belts or drums are better to use. If there is no offensive weaponry, delete this subsection.''--> | + | <!-- ''Describe the offensive armament of the aircraft, if any. Describe how effective the cannons and machine guns are in a battle, and also what belts or drums are better to use. If there is no offensive weaponry, delete this subsection.'' --> |
| − | {{main| | + | {{main|Vickers E (7.7 mm)}} |
| − | |||
| − | |||
| − | |||
| − | |||
| − | |||
| − | |||
| − | + | The '''''{{PAGENAME}}''''' is armed with: | |
| − | |||
| − | + | * 1 x 7.7 mm Vickers E machine gun, fuselage-mounted (600 rpg) | |
| − | + | === Suspended armament === | |
| − | + | <!-- ''Describe the aircraft's suspended armament: additional cannons under the wings, bombs, rockets and torpedoes. This section is especially important for bombers and attackers. If there is no suspended weaponry remove this subsection.'' --> | |
| + | {{main|G.P. 250 lb Mk.IV (250 lb)|Mark XII}} | ||
| − | + | The '''''{{PAGENAME}}''''' can be outfitted with the following ordnance: | |
| − | * | + | * 4 x 250 lb G.P. 250 lb Mk.IV bombs (1,000 lb total) |
| − | + | * 1 х 18 inch Mark XII torpedo | |
| − | |||
| − | |||
| − | |||
| − | * | ||
| − | |||
| − | |||
=== Defensive armament === | === Defensive armament === | ||
| − | ''Defensive armament with turret machine guns or cannons, crewed by gunners. Examine the number of gunners and what belts or drums are better to use. If defensive weaponry is not available remove this subsection.'' | + | <!-- ''Defensive armament with turret machine guns or cannons, crewed by gunners. Examine the number of gunners and what belts or drums are better to use. If defensive weaponry is not available, remove this subsection.'' --> |
| − | --> | + | {{main|Vickers K (7.7 mm)}} |
| − | + | The '''''{{PAGENAME}}''''' is defended by: | |
| − | |||
| − | |||
| − | + | * 1 x 7.7 mm Vickers K machine gun, dorsal turret (576 rpg) | |
| − | + | == Usage in battles == | |
| + | <!-- ''Describe the tactics of playing in the aircraft, the features of using aircraft in a team and advice on tactics. Refrain from creating a "guide" - do not impose a single point of view, but instead, give the reader food for thought. Examine the most dangerous enemies and give recommendations on fighting them. If necessary, note the specifics of the game in different modes (AB, RB, SB).'' --> | ||
| + | For now, the use of the Swordfish is confined to the early ranks, where it is moderately effective as a bomber. While it is slow and poorly armed, it is quite manoeuvrable and carries a decent payload. Therefore, it is strictly relegated to bombing and torpedo bombing. During ground realistic battles, the Swordfish can be great for accurately bombing enemy vehicles, however, you will be a very easy target for SPAA and enemy fighters. Even tanks may try to shoot you down. Therefore you must be careful and try to drop your bombs as quickly as possible before returning to base to rearm. Hanging around once your bombs are gone will quickly get you shot down. Pinpoint your target at a distance, drop your bombs and then make your escape. | ||
| − | + | A good tactic is to fly at a distance from the fighting, keeping out of range of machine gun fire or worse. If an enemy starts to capture one of your capture points, you can then swoop in and bomb the capture point, clearing it of any enemy vehicles. This way you can be assured a target is available. Circling over the combat area looking for targets is not a good idea. This is risky enough in faster, more nimble aircraft, so in a big, slow biplane bomber, it is almost suicidal. | |
| − | + | If you are intercepted by an enemy aircraft, your best option is to call for help. The Swordfish is by no means fast or manoeuvrable enough to escape from enemy fighters at the rank. Your rear gunner may be able to deter some more cautious players, but most players will shrug off the small calibre rounds. Therefore, you should not rely too much on the single 7.7 mm gunner. The same goes for the offensive 7.7 mm. Do not be tempted to start trying to dogfight with other aircraft, as you will quickly find yourself outgunned, outmanoeuvred and dead. Avoid enemy aircraft if possible. | |
| − | |||
| − | |||
| − | |||
| − | |||
| − | |||
| − | |||
| − | |||
| − | |||
| − | |||
| − | |||
| − | |||
| − | |||
| − | |||
| − | |||
| − | |||
| − | |||
| − | |||
| − | |||
| − | |||
| − | |||
| − | |||
===Manual Engine Control=== | ===Manual Engine Control=== | ||
{| class="wikitable" style="text-align:center" | {| class="wikitable" style="text-align:center" | ||
| Line 222: | Line 134: | ||
! colspan="7" | MEC elements | ! colspan="7" | MEC elements | ||
|- | |- | ||
| − | ! rowspan="2" |Mixer | + | ! rowspan="2" | Mixer |
| − | ! rowspan="2" |Pitch | + | ! rowspan="2" | Pitch |
| − | ! colspan="3" |Radiator | + | ! colspan="3" | Radiator |
| − | ! rowspan="2" |Supercharger | + | ! rowspan="2" | Supercharger |
| − | ! rowspan="2" |Turbocharger | + | ! rowspan="2" | Turbocharger |
|- | |- | ||
! Oil | ! Oil | ||
! Water | ! Water | ||
| − | ! Type | + | ! Type |
|- | |- | ||
| − | | | + | | Not controllable || rowspan="2" | Not controllable<br>Not auto controlled || rowspan="2" | Not controllable<br>Not auto controlled || rowspan="2" | Not controllable<br>Not auto controlled || rowspan="2" | Combined || rowspan="2" | Not controllable<br>1 gear || rowspan="2" | Not controllable |
|- | |- | ||
|} | |} | ||
| Line 238: | Line 150: | ||
===Modules=== | ===Modules=== | ||
{| class="wikitable" | {| class="wikitable" | ||
| − | ! Tier | + | ! colspan="1" | Tier |
| − | ! Flight performance | + | ! colspan="2" | Flight performance |
| − | ! Survivability | + | ! colspan="1" | Survivability |
| − | ! Weaponry | + | ! colspan="2" | Weaponry |
|- | |- | ||
| I | | I | ||
| − | | Fuselage | + | | Fuselage repair |
| − | | | + | | Radiator |
| + | | | ||
| Offensive 7 mm | | Offensive 7 mm | ||
| + | | | ||
|- | |- | ||
| II | | II | ||
| + | | | ||
| Compressor | | Compressor | ||
| Airframe | | Airframe | ||
| New 7 mm MGs | | New 7 mm MGs | ||
| + | | FTC mk.II | ||
|- | |- | ||
| III | | III | ||
| − | | | + | | Wings repair |
| − | | | + | | Engine |
| − | | | + | | |
| + | | Turret 7 mm | ||
| + | | | ||
|- | |- | ||
| IV | | IV | ||
| − | | | + | | |
| + | | | ||
| Cover | | Cover | ||
| − | | New | + | | New 7 mm MGs (turret) |
| + | | | ||
|- | |- | ||
|} | |} | ||
=== Pros and cons === | === Pros and cons === | ||
| − | <!--'' | + | <!-- ''Summarise and briefly evaluate the vehicle in terms of its characteristics and combat effectiveness. Mark its pros and cons in the bulleted list. Try not to use more than 6 points for each of the characteristics. Avoid using categorical definitions such as "bad", "good" and the like - use substitutions with softer forms such as "inadequate" and "effective".'' --> |
'''Pros:''' | '''Pros:''' | ||
| − | * | + | * Quite manoeuvrable |
| − | * | + | * Good bomb load for its rank |
| − | + | * Useful at downing vehicles in tank battles | |
| − | + | * Easy to aim bombs thanks to its low speed | |
| − | * | + | * One forward firing machine gun for taking out soft/light targets |
| − | * | + | * One rear-facing machine gun that may prove itself useful |
| − | * | + | * Like in real life, unlike most aircraft, it is easy to control at low speeds |
| − | |||
| − | * | ||
| − | * | ||
'''Cons:''' | '''Cons:''' | ||
| − | * | + | * Very slow airspeed |
| − | * | + | * Poor rate of climb |
| − | * Very | + | * Vulnerable to tank MG's and even main cannons |
| + | * Insufficient armament to efficiently fend off planes | ||
| + | * Very poor cockpit visibility | ||
== History == | == History == | ||
| − | ''Describe the history of the creation and combat usage of the aircraft in more detail than in the introduction. If the historical reference turns out to be too | + | <!-- ''Describe the history of the creation and combat usage of the aircraft in more detail than in the introduction. If the historical reference turns out to be too long, take it to a separate article, taking a link to the article about the vehicle and adding a block "/ History" (example: <nowiki>https://wiki.warthunder.com/(Vehicle-name)/History</nowiki>) and add a link to it here using the <code>main</code> template. Be sure to reference text and sources by using <code><nowiki><ref></ref></nowiki></code>, as well as adding them at the end of the article with <code><nowiki><references /></nowiki></code>. This section may also include the vehicle's dev blog entry (if applicable) and the in-game encyclopedia description (under <code><nowiki>=== Encyclopedia Info ===</nowiki></code>, also if applicable).'' --> |
| + | |||
| + | [[File:BomberImage_VD6O5dR.jpg|thumbnail|left|The Swordfish took part during the raids of Kirkenes and Petsamo, find out more from the [http://warthunder.com/en/news/747-Historical-The-Disaster-in-the-Arctic-en Disaster In the Arctic] historical article .]] | ||
| + | Affectionately known as the "Stringbag" by the pilots, engineers and crews who operated her, the Fairey Aviation Company's Swordfish was a design that was outdated from the very beginning of the Second World War. Despite this, it managed to outlive its replacements, including the Fairey Albacore, in service until the arrival of modern monoplane Torpedo Bombers such as the Fairey Barracuda. Seeing 4 models, plus a float plane modification, the Swordfish would finally bow out of service in 1945 after VE day after showing just how successful the outdated design had become. From the Battle of Taranto, Operations in the Atlantic, to the attack on the Bismarck, the Swordfish struggled on to the end. | ||
| + | |||
| + | Taking to the skies for the first time in 1934, the Swordfish was born into an era that ensured its time would be limited from its very conception, as just one year later in 1935, the Hawker Hurricane and Messerschmitt BF 109 also made their debut. Regardless, the Swordfish would make its mark on history, before its swansong over 10 years after its first flight. | ||
| + | |||
| + | === In-game description === | ||
| + | "A single-engine biplane of mixed construction, the Fairey Swordfish was developed initially as a Torpedo Bomber/Spotter/Reconnaissance aircraft. The origins of the Swordfish lay in the TSR I prototype of 1933 which, after being lost in an accident, was replaced by the TSR II which first flew on April 17th 1934. The first order for 86 aircraft was placed in April 1935 and in July 1936 the first Swordfish entered service with 825 Naval Air Squadron of the Fleet Air Arm. | ||
| + | |||
| + | The Swordfish Mk I was powered by a radial air-cooled Bristol Pegasus Mk IIIM engine and was equipped with one synchronised, fuselage-mounted 0.303 inch Vickers Mk.II machine gun and one 0.303 inch Lewis or Vickers ‘K’ machine gun in the Telegraphist Air Gunner’s cockpit. The Swordfish Mk I could carry one 18 inch torpedo (731 kg), one sea mine (680 kg), three Mk VII depth charges or up to 1500 lbs (680 kg) of bombs underneath the fuselage and wings. Later variants could carry 60 lb rockets. | ||
| + | |||
| + | The Swordfish was normally crewed by three; the pilot, the observer and in the rearmost cockpit, the Telegraphist Air Gunner, or TAG. On some occasions the observer would be seated in the TAG’s cockpit whilst an extra fuel tank was fitted in the observer’s cockpit. | ||
| + | |||
| + | As an open cockpit biplane with a fixed undercarriage and areas of fabric skin, the Swordfish was viewed by most as an anachronism and obsolete by the beginning of the Second World War. Nothing could be further from the truth; the Swordfish possessed stable, forgiving handling characteristics which made it ideally suited for naval operations from the unforgiving decks of aircraft carriers in rough seas or at night. With a low stall speed and an incredible agility for an aircraft of its size, the Swordfish could out turn most enemy fighters at slow speeds. It was a tough, robust aircraft capable of withstanding battle damage which would have destroyed many more ‘modern’ aircraft. It even outlasted its intended replacement, the Fairey Albacore. | ||
| + | |||
| + | The Swordfish became immortalised in the annals of naval aviation history when, on the night of 11th-12th November 1940, when 21 Swordfish of 813 NAS, 815 NAS, 819 NAS and 824 NAS carried out a daring attack on the Italian port of Taranto, crippling three Italian battleships and causing significant damage to smaller warships and coastal installations. The attack would become the model for the Japanese Navy’s strike on Pearl Harbour. Swordfish of 818 NAS also succeeded in crippling the steering gear of the German battleship ‘Bismarck’ allowing Royal Navy warships to destroy her. Perhaps the most tragic moment in the illustrious career of the Swordfish was when six aircraft of 825 NAS attacked the German warships ‘Scharnhorst’, ‘Gneisenau’ and ‘Prinz Eugen’ through a screen of anti aircraft fire and squadrons of German fighters. All six Swordfish were lost and their CO, Lt Cdr Eugene Esmonde, was awarded a posthumous Victoria Cross, one of only four ever to be awarded to naval aviators. | ||
| + | |||
| + | After a career matched by no other naval strike aircraft in history, production of the Swordfish ceased in August 1944. A Swordfish carried out the last operational flight by a biplane in the Fleet Air Arm in June 1945, leaving only a few of Swordfish to carry out ancillary duties until the last disappeared from the Royal Navy’s books in the 1950s. A total of 2,391 Swordfish were produced, 992 of which were from the Mk I series." | ||
== Media == | == Media == | ||
| − | + | <!--Excellent additions to the article would be video guides, screenshots from the game, and photos.--> | |
| + | {{Youtube-gallery|FiEXsMxd5rc|'''The Shooting Range #56''' - ''Pages of History'' section at 07:00 discusses the Swordfish.}} | ||
| − | == | + | == See also == |
| − | ''Links to the articles on the War Thunder Wiki that you think will be useful for the reader, for example | + | ''Links to the articles on the War Thunder Wiki that you think will be useful for the reader, for example:'' |
* ''reference to the series of the aircraft;'' | * ''reference to the series of the aircraft;'' | ||
* ''links to approximate analogues of other nations and research trees.'' | * ''links to approximate analogues of other nations and research trees.'' | ||
| − | |||
| − | == | + | == External links == |
''Paste links to sources and external resources, such as:'' | ''Paste links to sources and external resources, such as:'' | ||
* ''topic on the official game forum;'' | * ''topic on the official game forum;'' | ||
| − | * ''page on aircraft | + | * ''encyclopedia page on the aircraft;'' |
* ''other literature.'' | * ''other literature.'' | ||
| − | {{ | + | {{AirManufacturer Fairey}} |
| + | {{Britain bombers}} | ||
Revision as of 15:25, 2 August 2020
Contents
Description

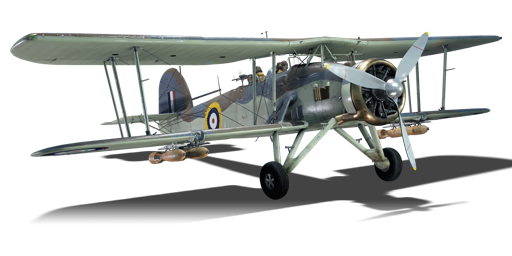
The Swordfish Mk I is a rank I British bomber
with a battle rating of 1.0 (AB/RB/SB). This bomber has been in the game since the start of the Open Beta Test prior to Update 1.27.
The Swordfish is a plane often overlooked by new players, but it is common for more experienced players to hold a special love for "ugly ducklings". As such, the Swordfish is valued for providing a change of pace towards slower gameplay and simultaneously a challenge, being mostly staying alive.
As with all torpedo bombers, maintaining low altitude, high speed, and fighter cover are all recommended. The optimal distance for launching a torpedo is 1 km from the target, though the Swordfish is slow enough to be able to drop torpedoes efficiently from shorter distances. Targets should be engaged from directly ahead or astern, making "leading" the target much easier.
If torpedo bombing is not an option, the plane can carry bombs for attacking ground targets. The aircraft's slow speed means it is great practice for aiming bombs. With practice, any pilot can make short work of tanks and light pillboxes with the Swordfish.
The Swordfish is an in-game oddity because it can exceed its max altitude of 3,300 m and go up to about 4,000 m with the 4 x 250 lb bombs attached.

A classic biplane design, thus offensive armament is limited. Restrained to only one machine gun offensively and defensively, the Swordfish's true strength is the payload.
General info
Flight Performance
Describe how the aircraft behaves in the air. Speed, manoeuvrability, acceleration and allowable loads - these are the most important characteristics of the vehicle.
| Characteristics | Max Speed (km/h at 1,800 m) |
Max altitude (metres) |
Turn time (seconds) |
Rate of climb (metres/second) |
Take-off run (metres) | |||
|---|---|---|---|---|---|---|---|---|
| AB | RB | AB | RB | AB | RB | |||
| Stock | 219 | 209 | 3300 | 50.7 | 51.3 | 7.8 | 7.7 | 297 |
| Upgraded | 235 | 226 | 49.8 | 50.2 | 10.6 | 9.2 | ||
Details
| Features | ||||
|---|---|---|---|---|
| Combat flaps | Take-off flaps | Landing flaps | Air brakes | Arrestor gear |
| X | X | ✓ | X | ✓ |
| Limits | ||||||
|---|---|---|---|---|---|---|
| Wings (km/h) | Gear (km/h) | Flaps (km/h) | Max Static G | |||
| Combat | Take-off | Landing | + | - | ||
| 390 | 400 | N/A | N/A | 400 | ~8 | ~5 |
| Optimal velocities (km/h) | |||
|---|---|---|---|
| Ailerons | Rudder | Elevators | Radiator |
| < 200 | < 220 | < 260 | > 310 |
| Compressor (RB/SB) | ||
|---|---|---|
| Setting 1 | ||
| Optimal altitude | 100% Engine power | WEP Engine power |
| 366 m | 870 hp | N/A |
Survivability and armour
Swordfish does not feature any armor, and its canvas structure does not provide any degree of protection. One has to rely on the Vitality crew skill to prolong the lifetime of the plane. The only survivability advantage of note is in the airplane's self-sealing fuel tanks and a large, radial engine, which might soak up some bullets before the plane is taken down. Still though, overall the best tactic is to avoid attention, as the low speed combined with negligible protection make it a tempting target for enemy airplanes.
Armaments
Offensive armament
The Swordfish Mk I is armed with:
- 1 x 7.7 mm Vickers E machine gun, fuselage-mounted (600 rpg)
Suspended armament
The Swordfish Mk I can be outfitted with the following ordnance:
- 4 x 250 lb G.P. 250 lb Mk.IV bombs (1,000 lb total)
- 1 х 18 inch Mark XII torpedo
Defensive armament
The Swordfish Mk I is defended by:
- 1 x 7.7 mm Vickers K machine gun, dorsal turret (576 rpg)
Usage in battles
For now, the use of the Swordfish is confined to the early ranks, where it is moderately effective as a bomber. While it is slow and poorly armed, it is quite manoeuvrable and carries a decent payload. Therefore, it is strictly relegated to bombing and torpedo bombing. During ground realistic battles, the Swordfish can be great for accurately bombing enemy vehicles, however, you will be a very easy target for SPAA and enemy fighters. Even tanks may try to shoot you down. Therefore you must be careful and try to drop your bombs as quickly as possible before returning to base to rearm. Hanging around once your bombs are gone will quickly get you shot down. Pinpoint your target at a distance, drop your bombs and then make your escape.
A good tactic is to fly at a distance from the fighting, keeping out of range of machine gun fire or worse. If an enemy starts to capture one of your capture points, you can then swoop in and bomb the capture point, clearing it of any enemy vehicles. This way you can be assured a target is available. Circling over the combat area looking for targets is not a good idea. This is risky enough in faster, more nimble aircraft, so in a big, slow biplane bomber, it is almost suicidal.
If you are intercepted by an enemy aircraft, your best option is to call for help. The Swordfish is by no means fast or manoeuvrable enough to escape from enemy fighters at the rank. Your rear gunner may be able to deter some more cautious players, but most players will shrug off the small calibre rounds. Therefore, you should not rely too much on the single 7.7 mm gunner. The same goes for the offensive 7.7 mm. Do not be tempted to start trying to dogfight with other aircraft, as you will quickly find yourself outgunned, outmanoeuvred and dead. Avoid enemy aircraft if possible.
Manual Engine Control
| MEC elements | ||||||
|---|---|---|---|---|---|---|
| Mixer | Pitch | Radiator | Supercharger | Turbocharger | ||
| Oil | Water | Type | ||||
| Not controllable | Not controllable Not auto controlled |
Not controllable Not auto controlled |
Not controllable Not auto controlled |
Combined | Not controllable 1 gear |
Not controllable |
Modules
| Tier | Flight performance | Survivability | Weaponry | ||
|---|---|---|---|---|---|
| I | Fuselage repair | Radiator | Offensive 7 mm | ||
| II | Compressor | Airframe | New 7 mm MGs | FTC mk.II | |
| III | Wings repair | Engine | Turret 7 mm | ||
| IV | Cover | New 7 mm MGs (turret) | |||
Pros and cons
Pros:
- Quite manoeuvrable
- Good bomb load for its rank
- Useful at downing vehicles in tank battles
- Easy to aim bombs thanks to its low speed
- One forward firing machine gun for taking out soft/light targets
- One rear-facing machine gun that may prove itself useful
- Like in real life, unlike most aircraft, it is easy to control at low speeds
Cons:
- Very slow airspeed
- Poor rate of climb
- Vulnerable to tank MG's and even main cannons
- Insufficient armament to efficiently fend off planes
- Very poor cockpit visibility
History

Affectionately known as the "Stringbag" by the pilots, engineers and crews who operated her, the Fairey Aviation Company's Swordfish was a design that was outdated from the very beginning of the Second World War. Despite this, it managed to outlive its replacements, including the Fairey Albacore, in service until the arrival of modern monoplane Torpedo Bombers such as the Fairey Barracuda. Seeing 4 models, plus a float plane modification, the Swordfish would finally bow out of service in 1945 after VE day after showing just how successful the outdated design had become. From the Battle of Taranto, Operations in the Atlantic, to the attack on the Bismarck, the Swordfish struggled on to the end.
Taking to the skies for the first time in 1934, the Swordfish was born into an era that ensured its time would be limited from its very conception, as just one year later in 1935, the Hawker Hurricane and Messerschmitt BF 109 also made their debut. Regardless, the Swordfish would make its mark on history, before its swansong over 10 years after its first flight.
In-game description
"A single-engine biplane of mixed construction, the Fairey Swordfish was developed initially as a Torpedo Bomber/Spotter/Reconnaissance aircraft. The origins of the Swordfish lay in the TSR I prototype of 1933 which, after being lost in an accident, was replaced by the TSR II which first flew on April 17th 1934. The first order for 86 aircraft was placed in April 1935 and in July 1936 the first Swordfish entered service with 825 Naval Air Squadron of the Fleet Air Arm.
The Swordfish Mk I was powered by a radial air-cooled Bristol Pegasus Mk IIIM engine and was equipped with one synchronised, fuselage-mounted 0.303 inch Vickers Mk.II machine gun and one 0.303 inch Lewis or Vickers ‘K’ machine gun in the Telegraphist Air Gunner’s cockpit. The Swordfish Mk I could carry one 18 inch torpedo (731 kg), one sea mine (680 kg), three Mk VII depth charges or up to 1500 lbs (680 kg) of bombs underneath the fuselage and wings. Later variants could carry 60 lb rockets.
The Swordfish was normally crewed by three; the pilot, the observer and in the rearmost cockpit, the Telegraphist Air Gunner, or TAG. On some occasions the observer would be seated in the TAG’s cockpit whilst an extra fuel tank was fitted in the observer’s cockpit.
As an open cockpit biplane with a fixed undercarriage and areas of fabric skin, the Swordfish was viewed by most as an anachronism and obsolete by the beginning of the Second World War. Nothing could be further from the truth; the Swordfish possessed stable, forgiving handling characteristics which made it ideally suited for naval operations from the unforgiving decks of aircraft carriers in rough seas or at night. With a low stall speed and an incredible agility for an aircraft of its size, the Swordfish could out turn most enemy fighters at slow speeds. It was a tough, robust aircraft capable of withstanding battle damage which would have destroyed many more ‘modern’ aircraft. It even outlasted its intended replacement, the Fairey Albacore.
The Swordfish became immortalised in the annals of naval aviation history when, on the night of 11th-12th November 1940, when 21 Swordfish of 813 NAS, 815 NAS, 819 NAS and 824 NAS carried out a daring attack on the Italian port of Taranto, crippling three Italian battleships and causing significant damage to smaller warships and coastal installations. The attack would become the model for the Japanese Navy’s strike on Pearl Harbour. Swordfish of 818 NAS also succeeded in crippling the steering gear of the German battleship ‘Bismarck’ allowing Royal Navy warships to destroy her. Perhaps the most tragic moment in the illustrious career of the Swordfish was when six aircraft of 825 NAS attacked the German warships ‘Scharnhorst’, ‘Gneisenau’ and ‘Prinz Eugen’ through a screen of anti aircraft fire and squadrons of German fighters. All six Swordfish were lost and their CO, Lt Cdr Eugene Esmonde, was awarded a posthumous Victoria Cross, one of only four ever to be awarded to naval aviators.
After a career matched by no other naval strike aircraft in history, production of the Swordfish ceased in August 1944. A Swordfish carried out the last operational flight by a biplane in the Fleet Air Arm in June 1945, leaving only a few of Swordfish to carry out ancillary duties until the last disappeared from the Royal Navy’s books in the 1950s. A total of 2,391 Swordfish were produced, 992 of which were from the Mk I series."
Media
See also
Links to the articles on the War Thunder Wiki that you think will be useful for the reader, for example:
- reference to the series of the aircraft;
- links to approximate analogues of other nations and research trees.
External links
Paste links to sources and external resources, such as:
- topic on the official game forum;
- encyclopedia page on the aircraft;
- other literature.
| Fairey Aviation Company, Limited | |
|---|---|
| Fighters | Firefly F Mk I · Firefly FR Mk V |
| Bombers | Swordfish Mk I · Swordfish Mk II |
| Britain bombers | |
|---|---|
| Torpedo | Swordfish Mk I · Swordfish Mk II · ▄Avenger Mk II |
| Dive | V-156-B1 |
| Hydroplanes | ▄Catalina Mk IIIa · Sunderland Mk IIIa · Sunderland Mk V |
| Light | Blenheim Mk IV · Beaufort Mk VIII · ▄Hudson Mk V · Brigand B 1 |
| Based on A20 | ▄Havoc Mk I · ▄Boston Mk I · ▄DB-7 |
| Hampden | Hampden Mk I · Hampden TB Mk I |
| Wellington | Wellington Mk Ic · Wellington Mk Ic/L · Wellington Mk III · Wellington Mk X |
| Halifax | Halifax B Mk IIIa |
| Stirling | Stirling B Mk I · Stirling B Mk III |
| Lancaster | Lancaster B Mk I · Lancaster B Mk III |
| Lincoln | Lincoln B Mk II |
| Shackleton | Shackleton MR.Mk.2 |
