|
|
| Line 1: |
Line 1: |
| − | {{DISPLAYTITLE:Night Vision Devices}} | + | {{Specs-Card |
| | + | |code=f-82e |
| | + | |cockpit=cockpit_f-82e.jpg |
| | + | }} |
| | + | {{About |
| | + | | about = American twin-engine fighter '''{{PAGENAME}}''' |
| | + | | usage = other versions |
| | + | | link = P-51 (Family) |
| | + | }} |
| | | | |
| − | ==Introduction== | + | == Description == |
| | + | <!--In the description, the first part should be about the history of and the creation and combat usage of the aircraft, as well as its key features. In the second part, tell the reader about the aircraft in the game. Insert a screenshot of the vehicle, so that if the novice player does not remember the vehicle by name, he will immediately understand what kind of vehicle the article is talking about.--> |
| | | | |
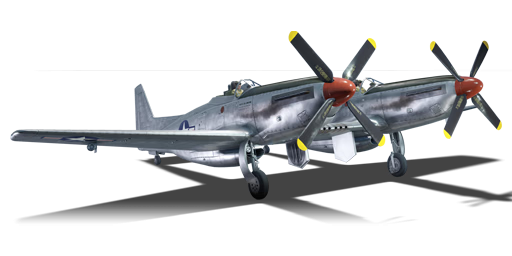
| − | [[Update 1.91 "Night Vision"]] added Night Vision Devices (NVDs) to a number of high tier tanks and helicopters. These devices provide a significant advantage in the now more common night battles. Two types of night vision devices were added, image intensifiers and thermal imaging systems. In addition infrared (IR) searchlights were added to tanks which historically had them. | + | [[File:GarageImage_{{PAGENAME}}.jpg|420px|thumb|left]] |
| | + | {{break}} |
| | + | The '''{{Specs|name}}''' is a rank {{Specs|rank}} American twin-engine fighter {{Battle-rating}}. This fighter was introduced in [[Update 1.39]]. |
| | | | |
| − | Night vision devices are usually unlocked as tier 3 - 4 modifications, however, some tanks or helicopters have them access to them at tier 1 - 2. In addition, some tanks have the option to upgrade their image intensifier to a thermal imager, by unlocking a second modification (on some tanks the thermal imager is included with the original modification).
| + | Perhaps the most distinctive feature about the F-82E "Twin Mustang" is that it literally looks like two P-51 conjoined together into a plane. |
| | | | |
| − | Tanks and helicopters can have different night vision devices for different crew members, for example, the gunners' sight may have a thermal imager, while the commander's (or in the case of helicopters the pilot's) view may have image intensifiers, and the driver's view a less powerful image intensifier. They can only be used from their designated views, for example, the tank commander's night vision system can only be used in binoculars, the driver's night vision is only used from driver seat or third person view and gunner view is only used from sniper seat.
| + | This means the F-82E Twin Mustang has nearly two of everything, two fuselages, two engines, two tails, and two pilots. The last of which makes the Twin Mustang more survivable than most other aircraft as each can work independently if the other is incapacitated. |
| | | | |
| − | ===Controls===
| + | Built with the intent of long-range escort for the B-29 Superfortress bombers, the fuel capacity in the Twin Mustang is also much higher than its contemporaries. |
| | | | |
| − | {| class="wikitable" style="text-align:center"
| + | Unlike the preceding American planes, the Twin Mustang no longer features wing-mounted armament but instead are now centre-mounted between the fuselages, so gun convergence is no longer a big issue. |
| − | ! colspan="3" | Night Vision Controls
| |
| − | |-
| |
| − | ! Control name
| |
| − | ! Default Keybind<br />(PC keyboard & mouse)
| |
| − | ! Description
| |
| − | |-
| |
| − | | Night Vision Mode || ??? || Toggles between standard view and image intensifier / thermal view
| |
| − | |-
| |
| − | | IR Spotlight || ??? || Toggles the IR searchlight on and off
| |
| − | |-
| |
| − | | Changing the colour scheme of the thermal sight || ??? || Toggles the thermal sight between White Hot and Black Hot modes
| |
| − | |-
| |
| − | |}
| |
| | | | |
| − | {{Notice|Images in this article were created at night with the weather set to "Blind" so represent the operation of Night Vision devices under worst-case conditions (or close to it).}}
| + | The F-82E works best as a high-altitude bomber-killer or escort plane. While its respectable payload of bombs, machine guns, and rockets make it an effective ground attacker, it is very vulnerable in that role unless the enemy's fighters have all been neutralized. |
| | | | |
| − | ==Image Intensifiers==
| + | The F-82E's main assets are its destructive firepower (with the gun pod) combined with massive ammo count, its good climbing speed and its amazing escape speed. Using the tracer bullets and shooting continuously it is possible to adjust aim effectively from more than 1.5 km away. In head-ons, this means your opponent will usually be destroyed or crippled well before he gets his own target indicator. With bombers, it means one serious burst from 0.7-1.0 km will deliver a critical, and a full-second burst from less than 0.7 km should cut any bomber into several pieces. |
| − | The most basic type of night vision device is an image intensifier. These devices work by amplifying the light which enters the sensor, as well as converting some light from the infrared spectrum into visible light. When image intensifiers are activated the screen picks up a green hue and you are generally able to see much further. Image intensifiers suffer from noise interference; this appears as a form of TV static over the screen; it is quite noticeable on early image intensifiers however more advanced systems (generally found on newer tanks) are less susceptible and the effect is much less noticeable, leading to them proving much clearer images. | |
| | | | |
| − | {{Notice|Image intensifiers can only be used a night.|!}}
| + | == General info == |
| | + | === Flight performance === |
| | + | ''Describe how the aircraft behaves in the air. Speed, manoeuvrability, acceleration and allowable loads - these are the most important characteristics of the vehicle.'' |
| | | | |
| − | ==Factors affecting performance==
| + | {| class="wikitable" style="text-align:center" |
| − | | |
| − | There are a number of characteristics which affect the performance of image intensifiers, these are the resolution, the light multiplication factor, and the susceptibility to noise. While individually some of these elements may have only a small impact on image quality, newer image intensifiers will have improvements to most or all of them, providing much better image quality.
| |
| − | | |
| − | ===Resolution===
| |
| − | Different image intensifiers are capable of producing images at different resolutions. The higher the resolution that an image intensifier is capable of outputting, the clearer the final image will be. The image intensifiers on tanks in-game typically have a resolution of 800 x 600 or 1600 x 1200, the difference between these resolutions is minimal and is often only noticeable when looking at long-range targets.
| |
| − | | |
| − | Below is an example of looking at a T-80U, located approximately 1.25 km away from the player, using an 800 x 600 intensifier and a 1600 x 1200 intensifier (all other stats are equal). Notice how the distant tank is slightly clearer and the barrel is visible with the higher resolution image intensifier.
| |
| − | | |
| − | {{Notice|Click on an image to open it in full screen and get a better view}}
| |
| − | | |
| − | <gallery mode="packed" heights=200>
| |
| − | File:NightVision Low Res.jpg|A [[T-80U]] seen through an 800 x 600 image intensifier.
| |
| − | File:NightVision High Res.jpg|A [[T-80U]] seen through an 1600 x 1200 image intensifier.
| |
| − | </gallery>
| |
| − | | |
| − | ===Light Multiplier===
| |
| − | The light multiplier of an image intensifier determines by how much it will amplify the available light. Image intensifiers with a higher multiplier will produce a brighter image with more details visible. At present there is not a massive difference between the most and least powerful image intensifiers on tanks, however, it is noticeable, more so when an IR searchlight is in use.
| |
| − | | |
| − | The images below show the view of a target from a [[T-80U]] through the main gunsight (light multiplier of 9.0) and the driver's periscope (light multiplier 5.0), the target is being illuminated with an IR searchlight. Notice how the image through the gunsight is generally brighter and details like the grass and bushes are much more visible (there is obviously a zoom difference, but you can see that more is visible regardless).
| |
| − | | |
| − | {{Notice|Click on an image to open it in full screen and get a better view}}
| |
| − | | |
| − | <gallery mode="packed" heights=200>
| |
| − | File:NightVision 5.0 Mult.jpg|A [[Maus]] seen through an image intensifier with a 5.0 multiplier.
| |
| − | File:NightVision 9.0 Mult.jpg|A [[Maus]] seen through an image intensifier with a 9.0 multiplier.
| |
| − | </gallery>
| |
| − | | |
| − | ===Noise===
| |
| − | In-game image intensifiers are subject to noise. This presents itself as something resembling TV static covering the screen. Due to a difference in optics, sensors and associated circuitry, more advanced image intensifiers suffer much less from this issue and provide a much clearer image, whereas older and more rudimentary electronics are more susceptible to injecting noise on the final image. The images below show the same view when using an image intensifier with a high noise level and a low noise level (all other stats are equal). Notice how the high noise level sight looks slightly fuzzy and has a sort of static effect over the image, while the low noise one is relatively clear.
| |
| − | | |
| − | {{Notice|Click on an image to open it in full screen and get a better view}}
| |
| − | | |
| − | <gallery mode="packed" heights=200>
| |
| − | File:NightVision high noise.jpg|A [[Maus]] seen through an image intensifier with a high amount of noise.
| |
| − | File:NightVision low noise.jpg|A [[Maus]] seen through an image intensifier with a low amount of noise.
| |
| − | </gallery>
| |
| − | | |
| − | ==Infrared Spotlights==
| |
| − | [[File:IR Searchlight OnOff Compare.jpg|thumb|500px|right|The effect of turning on an IR searchlight on visibility]]
| |
| − | In addition to image intensifiers, some tanks are fitted with Infrared searchlights. Infrared (IR) searchlights are like regular searchlights, but they emit light on the infrared spectrum instead of the visible light spectrum; this means that the light they produce cannot normally be seen. However, as image intensifiers use light from the infrared spectrum and convert it to visible light, so IR searchlights can be seen through image intensifiers.
| |
| − | | |
| − | When activated an IR search not be visible unless you are looking through an image intensifier. If you are looking through an image intensifier then the area where the light is pointing will be brightly illuminated. The effect of an IR searchlight can be seen in the image to the right.
| |
| − | | |
| − | While IR searchlights obviously make seeing targets a lot easier in poor conditions their use does have a major drawback: any other players using image intensifiers can also see the light from your searchlight. As seen in the images below, by activating your IR searchlight you will immediately give your position away to any enemy players who are using an image intensifier. Other players on the ground will see the area where your light is pointing lit up, and the light itself will appear as a bright spot on the screen. Likewise, a helicopter will see the area lit up, and even though they may not be in a position to see the light itself, due the spread of the beam the lit-up area will form a sort of triangle with the tip pointing towards the source.
| |
| − | | |
| − | <gallery mode="packed" heights=200>
| |
| − | File:Tank with IR light off.jpg|A tank is hiding in the bushes, without it's light on it can not be seen.
| |
| − | File:Tank with IR light on.jpg|The same tank has now turned it's IR searchlight on, it's position is now fairly obvious.
| |
| − | File:Tank with IR ligh on from air.jpg|The same tank viewed from the air (as if by a helicopter), again it's position is obvious.
| |
| − | </gallery>
| |
| − | | |
| − | ===Factors affecting performance===
| |
| − | The main differentiating characteristics between different IR searchlights is their maximum range, and how wide the beam is. The maximum range is the furthest distance at which the IR searchlight can still illuminate objects. The beamwidth is measured in degrees and determines how wide the beam is, it can be seen in the image below.
| |
| − | | |
| − | Some IR searchlights are also slightly more or less powerful (brighter) than others, but at present, the difference between those currently in-game is so small it is not worth talking about.
| |
| − | | |
| − | [[File:IR Searchlight Beam.jpg|thumb|800px|left|A top-down view of a tank with its IR searchlight on, showing the beam width.]]{{Break}}
| |
| − | | |
| − | ==Thermal Imagers==
| |
| − | Thermal imagers are more advanced than image intensifiers; they use the infrared radiation emitted by objects to produce images showing temperature. Anything which is warmer than the background will stand out clearly on thermal imaging cameras. In game thermal imagers are usually only available for the gunner's sight. When a thermal sight is activated the colour scheme of the screen will change significantly to one of the two thermal imagining modes available, white hot and black hot. In white hot mode the terrain will appear as dark grey and thermal signatures (vehicles, fires, projectiles, etc.) will appear somewhere between lighter grey and bright white, depending on their temperature. In black hot mode the terrain will be be light grey and thermal signatures will show as between darker grey and black depending on temperature. Thermal imagers allow for targets to easily be spotted at very long range.
| |
| − | | |
| − | The two thermal modes can be seen in the images below. Notice how the engine compartment of the Abrams is much hotter than the rest of the tank. Also notice how a tank hiding in the bushes, which would normally be hard to see can easily be seen with thermal imaging.
| |
| − | | |
| − | {{Notice|Thermal imagers, can be used both at night and in the day to improve visibility.|!}}
| |
| − | | |
| − | <gallery mode="packed" heights=200>
| |
| − | File:Thermal Vision White Hot.jpg|White hot thermal imaging.
| |
| − | File:Thermal Vision Black Hot.jpg|Black hot thermal imaging.
| |
| − | </gallery>
| |
| − | | |
| − | ===Factors affecting performance===
| |
| − | Like image intensifiers, thermal imagers can only produce an output of a certain resolution, this resolution is the main differentiating factor between thermal sights on different vehicles. Most thermal imagers in game have a fairly low resolution leading to somewhat blurry and less detailed images, however some have higher resolutions, proving clearer images.
| |
| − | | |
| − | The images below show the same view through a 500 x 300 thermal imager (the lowest resolution in game) and a 1200 x 800 thermal imager (the highest resolution in game). Notice how the higher resolution imager produce a noticeably less blurry and more detailed image. This effect is more pronounced at longer ranges.
| |
| − | | |
| − | {{Notice|Click on an image to open it in full screen and get a better view}}
| |
| − | <gallery mode="packed" heights=200>
| |
| − | File:Thermal Vision Low Res.jpg|A [[T-80U]] seen through an 500 x 300 thermal imager.
| |
| − | File:Thermal Vision High Res.jpg|A [[T-80U]] seen through an 1200 x 800 thermal imager.
| |
| − | </gallery>
| |
| − | | |
| − | ==List of vehicles with Night Vision Devices==
| |
| − | ''As of v.1.99.1.39''
| |
| − | ===Ground vehicles===
| |
| − | ==USA==
| |
| − | {| class="wikitable sortable" style="text-align:center" | |
| | |- | | |- |
| − | ! rowspan="2" | Vehicle !! rowspan="2" | Country !! colspan="2" | Commander !! colspan="2" | Gunner !! colspan="2" | Driver !! rowspan="2" | Infrared<br>Searchlight
| + | ! colspan="8" | Characteristics |
| | |- | | |- |
| − | ! Infrared !! Thermal !! Infrared !! Thermal !! Infrared !! Thermal | + | ! colspan="8" | ''Stock'' |
| | |- | | |- |
| − | | {{Specs-Link|us_adats_bradley}} || [[File:USA_flag.png|40px|link=]] || {{Tick}} || {{Cross}} || {{Cross}} || {{Tick}} || {{Tick}} || {{Cross}} || {{Cross}} | + | ! colspan="2" | Max Speed<br>(km/h at 6,126 m) |
| | + | ! rowspan="2" | Max altitude<br>(meters) |
| | + | ! colspan="2" | Turn time<br>(seconds) |
| | + | ! colspan="2" | Rate of climb<br>(meters/second) |
| | + | ! rowspan="2" |Take-off run<br>(meters) |
| | |- | | |- |
| − | | {{Specs-Link|us_hstv_l}} || [[File:USA_flag.png|40px|link=]] || {{Cross}} || {{Tick}} || {{Cross}} || {{Tick}} || {{Tick}} || {{Cross}} || {{Cross}}
| + | ! AB |
| | + | ! RB |
| | + | ! AB |
| | + | ! RB |
| | + | ! AB |
| | + | ! RB |
| | |- | | |- |
| − | | {{Specs-Link|us_m1_ip_abrams}} || [[File:USA_flag.png|40px|link=]] || {{Tick}} || {{Cross}} || {{Cross}} || {{Tick}} || {{Tick}} || {{Cross}} || {{Cross}} | + | | 713 || 696 || {{Specs|ceiling}} || 28.3 || 28.7 || 15.3 || 15.3 || 450 |
| | |- | | |- |
| − | | {{Specs-Link|us_m1_abrams}} || [[File:USA_flag.png|40px|link=]] || {{Tick}} || {{Cross}} || {{Cross}} || {{Tick}} || {{Tick}} || {{Cross}} || {{Cross}}
| + | ! colspan="8" | ''Upgraded'' |
| | |- | | |- |
| − | | {{Specs-Link|us_m1a1_abrams}} || [[File:USA_flag.png|40px|link=]] || {{Tick}} || {{Cross}} || {{Cross}} || {{Tick}} || {{Tick}} || {{Cross}} || {{Cross}} | + | ! colspan="2" | Max Speed<br>(km/h at 6,126 m) |
| | + | ! rowspan="2" |Max altitude (meters) |
| | + | ! colspan="2" | Turn time (seconds) |
| | + | ! colspan="2" | Rate of climb<br>(meters/second) |
| | + | ! rowspan="2" |Take-off run (meters) |
| | |- | | |- |
| − | | {{Specs-Link|us_m1a2_abrams}} || [[File:USA_flag.png|40px|link=]] || {{Cross}} || {{Tick}} || {{Cross}} || {{Tick}} || {{Tick}} || {{Cross}} || {{Cross}}
| + | ! AB |
| | + | ! RB |
| | + | ! AB |
| | + | ! RB |
| | + | ! AB |
| | + | ! RB |
| | |- | | |- |
| − | | {{Specs-Link|us_m3_bradley}} || [[File:USA_flag.png|40px|link=]] || {{Tick}} || {{Cross}} || {{Cross}} || {{Tick}} || {{Tick}} || {{Cross}} || {{Cross}} | + | | 770 || 742 || {{Specs|ceiling}} || 25.8 || 27.0 || 26.4 || 18.7 || 450 |
| − | |-
| |
| − | | {{Specs-Link|us_m41_walker_bulldog}} || [[File:USA_flag.png|40px|link=]] || {{Cross}} || {{Cross}} || {{Cross}} || {{Cross}} || {{Tick}} || {{Cross}} || {{Cross}}
| |
| − | |-
| |
| − | | {{Specs-Link|us_m42_duster}} || [[File:USA_flag.png|40px|link=]] || {{Cross}} || {{Cross}} || {{Cross}} || {{Cross}} || {{Tick}} || {{Cross}} || {{Cross}}
| |
| − | |-
| |
| − | | {{Specs-Link|us_m47_patton_II}} || [[File:USA_flag.png|40px|link=]] || {{Cross}} || {{Cross}} || {{Cross}} || {{Cross}} || {{Tick}} || {{Cross}} || {{Cross}}
| |
| − | |-
| |
| − | | {{Specs-Link|us_m48a1_patton_III}} || [[File:USA_flag.png|40px|link=]] || {{Cross}} || {{Cross}} || {{Cross}} || {{Cross}} || {{Tick}} || {{Cross}} || {{Cross}}
| |
| − | |-
| |
| − | | {{Specs-Link|us_m60}} || [[File:USA_flag.png|40px|link=]] || {{Tick}} || {{Cross}} || {{Tick}} || {{Cross}} || {{Tick}} || {{Cross}} || {{Cross}}
| |
| − | |-
| |
| − | | {{Specs-Link|us_m60a3_slep}} || [[File:USA_flag.png|40px|link=]] || {{Tick}} || {{Cross}} || {{Cross}} || {{Tick}} || {{Tick}} || {{Cross}} || {{Cross}}
| |
| − | |-
| |
| − | | {{Specs-Link|us_m60a1}} || [[File:USA_flag.png|40px|link=]] || {{Tick}} || {{Cross}} || {{Tick}} || {{Cross}} || {{Tick}} || {{Cross}} || {{Cross}}
| |
| − | |-
| |
| − | | {{Specs-Link|us_m60a1_rise_passive_era}} || [[File:USA_flag.png|40px|link=]] || {{Tick}} || {{Cross}} || {{Tick}} || {{Cross}} || {{Tick}} || {{Cross}} || {{Cross}}
| |
| − | |-
| |
| − | | {{Specs-Link|us_m60a2}} || [[File:USA_flag.png|40px|link=]] || {{Tick}} || {{Cross}} || {{Tick}} || {{Cross}} || {{Tick}} || {{Cross}} || {{Tick}}
| |
| − | |-
| |
| − | | {{Specs-Link|us_m60a3_tts}} || [[File:USA_flag.png|40px|link=]] || {{Tick}} || {{Cross}} || {{Cross}} || {{Tick}} || {{Tick}} || {{Cross}} || {{Cross}}
| |
| − | |-
| |
| − | | {{Specs-Link|us_m103}} || [[File:USA_flag.png|40px|link=]] || {{Cross}} || {{Cross}} || {{Cross}} || {{Cross}} || {{Tick}} || {{Cross}} || {{Cross}}
| |
| − | |-
| |
| − | | {{Specs-Link|us_m163_vulcan}} || [[File:USA_flag.png|40px|link=]] || {{Cross}} || {{Cross}} || {{Tick}} || {{Cross}} || {{Tick}} || {{Cross}} || {{Cross}}
| |
| − | |-
| |
| − | | {{Specs-Link|us_m247}} || [[File:USA_flag.png|40px|link=]] || {{Tick}} || {{Cross}} || {{Tick}} || {{Cross}} || {{Tick}} || {{Cross}} || {{Cross}}
| |
| − | |-
| |
| − | | {{Specs-Link|us_m551}} || [[File:USA_flag.png|40px|link=]] || {{Tick}} || {{Cross}} || {{Tick}} || {{Cross}} || {{Tick}} || {{Cross}} || {{Cross}}
| |
| − | |-
| |
| − | | {{Specs-Link|us_m901_itv}} || [[File:USA_flag.png|40px|link=]] || {{Tick}} || {{Cross}} || {{Cross}} || {{Tick}} || {{Tick}} || {{Cross}} || {{Cross}}
| |
| − | |-
| |
| − | | {{Specs-Link|us_magach_3}} || [[File:USA_flag.png|40px|link=]] || {{Cross}} || {{Cross}} || {{Cross}} || {{Cross}} || {{Tick}} || {{Cross}} || {{Cross}}
| |
| − | |-
| |
| − | | {{Specs-Link|us_mbt_70}} || [[File:USA_flag.png|40px|link=]] || {{Tick}} || {{Cross}} || {{Tick}} || {{Cross}} || {{Tick}} || {{Cross}} || {{Tick}}
| |
| − | |-
| |
| − | | {{Specs-Link|us_merkava_mk_1}} || [[File:USA_flag.png|40px|link=]] || {{Tick}} || {{Cross}} || {{Tick}} || {{Cross}} || {{Tick}} || {{Cross}} || {{Cross}}
| |
| − | |-
| |
| − | | {{Specs-Link|us_merkava_mk_2b_late}} || [[File:USA_flag.png|40px|link=]] || {{Tick}} || {{Cross}} || {{Cross}} || {{Tick}} || {{Tick}} || {{Cross}} || {{Cross}}
| |
| − | |-
| |
| − | | {{Specs-Link|us_t54e1}} || [[File:USA_flag.png|40px|link=]] || {{Cross}} || {{Cross}} || {{Cross}} || {{Cross}} || {{Tick}} || {{Cross}} || {{Cross}} | |
| − | |-
| |
| − | | {{Specs-Link|us_t92}} || [[File:USA_flag.png|40px|link=]] || {{Cross}} || {{Cross}} || {{Cross}} || {{Cross}} || {{Tick}} || {{Cross}} || {{Cross}}
| |
| − | |-
| |
| − | | {{Specs-Link|us_t95e1}} || [[File:USA_flag.png|40px|link=]] || {{Cross}} || {{Cross}} || {{Cross}} || {{Cross}} || {{Tick}} || {{Cross}} || {{Cross}}
| |
| − | |-
| |
| − | | {{Specs-Link|us_xm1_chrysler}} || [[File:USA_flag.png|40px|link=]] || {{Tick}} || {{Cross}} || {{Cross}} || {{Tick}} || {{Tick}} || {{Cross}} || {{Cross}}
| |
| − | |-
| |
| − | | {{Specs-Link|us_xm1_gm}} || [[File:USA_flag.png|40px|link=]] || {{Tick}} || {{Cross}} || {{Cross}} || {{Tick}} || {{Tick}} || {{Cross}} || {{Cross}}
| |
| − | |-
| |
| − | | {{Specs-Link|us_xm_803}} || [[File:USA_flag.png|40px|link=]] || {{Tick}} || {{Cross}} || {{Tick}} || {{Cross}} || {{Tick}} || {{Cross}} || {{Tick}}
| |
| | |- | | |- |
| | |} | | |} |
| − | ==Germany== | + | |
| − | {| class="wikitable sortable" style="text-align:center" | + | ====Details==== |
| − | |-
| + | {| class="wikitable" style="text-align:center" |
| − | ! rowspan="2" | Vehicle !! rowspan="2" | Country !! colspan="2" | Commander !! colspan="2" | Gunner !! colspan="2" | Driver !! rowspan="2" | Infrared<br>Searchlight
| |
| − | |-
| |
| − | ! Infrared !! Thermal !! Infrared !! Thermal !! Infrared !! Thermal
| |
| − | |-
| |
| − | | {{Specs-Link|germ_begleitpanzer_57}} || [[File:Germany_flag.png|40px|link=]] || {{Tick}} || {{Cross}} || {{Cross}} || {{Tick}} || {{Tick}} || {{Cross}} || {{Cross}}
| |
| − | |-
| |
| − | | {{Specs-Link|germ_kanonenjagdpanzer}} || [[File:Germany_flag.png|40px|link=]] || {{Tick}} || {{Cross}} || {{Tick}} || {{Cross}} || {{Tick}} || {{Cross}} || {{Cross}}
| |
| − | |-
| |
| − | | {{Specs-Link|germ_kpz_70}} || [[File:Germany_flag.png|40px|link=]] || {{Tick}} || {{Cross}} || {{Tick}} || {{Cross}} || {{Tick}} || {{Cross}} || {{Tick}}
| |
| − | |-
| |
| − | | {{Specs-Link|germ_le_kpz_m41}} || [[File:Germany_flag.png|40px|link=]] || {{Cross}} || {{Cross}} || {{Cross}} || {{Cross}} || {{Tick}} || {{Cross}} || {{Cross}}
| |
| − | |-
| |
| − | | {{Specs-Link|germ_leopard_2a4}} || [[File:Germany_flag.png|40px|link=]] || {{Tick}} || {{Cross}} || {{Cross}} || {{Tick}} || {{Tick}} || {{Cross}} || {{Cross}}
| |
| − | |-
| |
| − | | {{Specs-Link|germ_leopard_2a5}} || [[File:Germany_flag.png|40px|link=]] || {{Cross}} || {{Tick}} || {{Cross}} || {{Tick}} || {{Tick}} || {{Cross}} || {{Cross}}
| |
| − | |-
| |
| − | | {{Specs-Link|germ_leopard_2k}} || [[File:Germany_flag.png|40px|link=]] || {{Tick}} || {{Cross}} || {{Tick}} || {{Cross}} || {{Tick}} || {{Cross}} || {{Cross}}
| |
| − | |-
| |
| − | | {{Specs-Link|germ_leopard_I_a1}} || [[File:Germany_flag.png|40px|link=]] || {{Tick}} || {{Cross}} || {{Tick}} || {{Cross}} || {{Tick}} || {{Cross}} || {{Cross}}
| |
| − | |-
| |
| − | | {{Specs-Link|germ_leopard_a1a1_120}} || [[File:Germany_flag.png|40px|link=]] || {{Tick}} || {{Cross}} || {{Cross}} || {{Tick}} || {{Tick}} || {{Cross}} || {{Cross}}
| |
| − | |-
| |
| − | | {{Specs-Link|germ_leopard_I}} || [[File:Germany_flag.png|40px|link=]] || {{Tick}} || {{Cross}} || {{Tick}} || {{Cross}} || {{Tick}} || {{Cross}} || {{Tick}}
| |
| − | |-
| |
| − | | {{Specs-Link|germ_mkpz_super_m48}} || [[File:Germany_flag.png|40px|link=]] || {{Cross}} || {{Tick}} || {{Cross}} || {{Tick}} || {{Tick}} || {{Cross}} || {{Tick}}
| |
| − | |-
| |
| − | | {{Specs-Link|germ_mkpz_m48a2c}} || [[File:Germany_flag.png|40px|link=]] || {{Tick}} || {{Cross}} || {{Tick}} || {{Cross}} || {{Tick}} || {{Cross}} || {{Tick}}
| |
| − | |-
| |
| − | | {{Specs-Link|germ_mkpz_m48a2ga2}} || [[File:Germany_flag.png|40px|link=]] || {{Tick}} || {{Cross}} || {{Tick}} || {{Cross}} || {{Tick}} || {{Cross}} || {{Tick}}
| |
| − | |-
| |
| − | | {{Specs-Link|germ_mkpz_m47}} || [[File:Germany_flag.png|40px|link=]] || {{Cross}} || {{Cross}} || {{Cross}} || {{Cross}} || {{Tick}} || {{Cross}} || {{Cross}}
| |
| − | |-
| |
| − | | {{Specs-Link|germ_panther_II}} || [[File:Germany_flag.png|40px|link=]] || {{Tick}} || {{Cross}} || {{Cross}} || {{Cross}} || {{Tick}} || {{Cross}} || {{Tick}}
| |
| − | |-
| |
| − | | {{Specs-Link|germ_radpanzer_90}} || [[File:Germany_flag.png|40px|link=]] || {{Tick}} || {{Cross}} || {{Tick}} || {{Cross}} || {{Tick}} || {{Cross}} || {{Cross}}
| |
| − | |-
| |
| − | | {{Specs-Link|germ_raketenjagdpanzer_2_hot}} || [[File:Germany_flag.png|40px|link=]] || {{Tick}} || {{Cross}} || {{Tick}} || {{Cross}} || {{Tick}} || {{Cross}} || {{Cross}}
| |
| | |- | | |- |
| − | | {{Specs-Link|germ_bmp_1_ddr}} || [[File:Germany_flag.png|40px|link=]] || {{Tick}} || {{Cross}} || {{Tick}} || {{Cross}} || {{Tick}} || {{Cross}} || {{Tick}}
| + | ! colspan="5" | Features |
| | |- | | |- |
| − | | {{Specs-Link|germ_thyssen_henschel_tam}} || [[File:Germany_flag.png|40px|link=]] || {{Cross}} || {{Cross}} || {{Cross}} || {{Cross}} || {{Tick}} || {{Cross}} || {{Cross}}
| + | ! Combat flap |
| | + | ! Take-off flap |
| | + | ! Landing flap |
| | + | ! Air brakes |
| | + | ! Arrestor gear |
| | |- | | |- |
| − | | {{Specs-Link|germ_vt_1_2}} || [[File:Germany_flag.png|40px|link=]] || {{Tick}} || {{Cross}} || {{Tick}} || {{Cross}} || {{Tick}} || {{Cross}} || {{Cross}} | + | | ✓ || ✓ || ✓ || X || X <!-- ✓ --> |
| | |- | | |- |
| | |} | | |} |
| − | ==USSR==
| + | |
| − | {| class="wikitable sortable" style="text-align:center" | + | {| class="wikitable" style="text-align:center" |
| − | |-
| |
| − | ! rowspan="2" | Vehicle !! rowspan="2" | Country !! colspan="2" | Commander !! colspan="2" | Gunner !! colspan="2" | Driver !! rowspan="2" | Infrared<br>Searchlight
| |
| − | |-
| |
| − | ! Infrared !! Thermal !! Infrared !! Thermal !! Infrared !! Thermal
| |
| − | |-
| |
| − | | {{Specs-Link|ussr_asu_57}} || [[File:USSR_flag.png|40px|link=]] || {{Cross}} || {{Cross}} || {{Cross}} || {{Cross}} || {{Tick}} || {{Cross}} || {{Cross}}
| |
| − | |-
| |
| − | | {{Specs-Link|ussr_asu_85}} || [[File:USSR_flag.png|40px|link=]] || {{Tick}} || {{Cross}} || {{Tick}} || {{Cross}} || {{Tick}} || {{Cross}} || {{Tick}}
| |
| − | |-
| |
| − | | {{Specs-Link|ussr_bmp_1}} || [[File:USSR_flag.png|40px|link=]] || {{Tick}} || {{Cross}} || {{Tick}} || {{Cross}} || {{Tick}} || {{Cross}} || {{Tick}}
| |
| − | |-
| |
| − | | {{Specs-Link|ussr_bmp_2}} || [[File:USSR_flag.png|40px|link=]] || {{Tick}} || {{Cross}} || {{Tick}} || {{Cross}} || {{Tick}} || {{Cross}} || {{Tick}}
| |
| − | |-
| |
| − | | {{Specs-Link|ussr_bmp_2m}} || [[File:USSR_flag.png|40px|link=]] || {{Tick}} || {{Cross}} || {{Cross}} || {{Tick}} || {{Tick}} || {{Cross}} || {{Tick}}
| |
| − | |-
| |
| − | | {{Specs-Link|ussr_bmp_3}} || [[File:USSR_flag.png|40px|link=]] || {{Tick}} || {{Tick}} || {{Tick}} || {{Tick}} || {{Tick}} || {{Cross}} || {{Tick}}
| |
| − | |-
| |
| − | | {{Specs-Link|ussr_it_1}} || [[File:USSR_flag.png|40px|link=]] || {{Tick}} || {{Cross}} || {{Tick}} || {{Cross}} || {{Tick}} || {{Cross}} || {{Tick}}
| |
| − | |-
| |
| − | | {{Specs-Link|ussr_9p157}} || [[File:USSR_flag.png|40px|link=]] || {{Cross}} || {{Tick}} || {{Cross}} || {{Tick}} || {{Tick}} || {{Cross}} || {{Cross}}
| |
| − | |-
| |
| − | | {{Specs-Link|ussr_object_120}} || [[File:USSR_flag.png|40px|link=]] || {{Tick}} || {{Cross}} || {{Tick}} || {{Cross}} || {{Tick}} || {{Cross}} || {{Tick}}
| |
| − | |-
| |
| − | | {{Specs-Link|ussr_object_279}} || [[File:USSR_flag.png|40px|link=]] || {{Tick}} || {{Cross}} || {{Tick}} || {{Cross}} || {{Tick}} || {{Cross}} || {{Tick}}
| |
| − | |-
| |
| − | | {{Specs-Link|ussr_object_685}} || [[File:USSR_flag.png|40px|link=]] || {{Tick}} || {{Cross}} || {{Tick}} || {{Cross}} || {{Tick}} || {{Cross}} || {{Tick}}
| |
| − | |-
| |
| − | | {{Specs-Link|ussr_object_906}} || [[File:USSR_flag.png|40px|link=]] || {{Tick}} || {{Cross}} || {{Tick}} || {{Cross}} || {{Tick}} || {{Cross}} || {{Tick}}
| |
| − | |-
| |
| − | | {{Specs-Link|ussr_pt_76b}} || [[File:USSR_flag.png|40px|link=]] || {{Cross}} || {{Cross}} || {{Cross}} || {{Cross}} || {{Tick}} || {{Cross}} || {{Cross}}
| |
| − | |-
| |
| − | | {{Specs-Link|ussr_9p149}} || [[File:USSR_flag.png|40px|link=]] || {{Tick}} || {{Cross}} || {{Cross}} || {{Tick}} || {{Tick}} || {{Cross}} || {{Cross}}
| |
| | |- | | |- |
| − | | {{Specs-Link|ussr_su_122_54}} || [[File:USSR_flag.png|40px|link=]] || {{Cross}} || {{Cross}} || {{Cross}} || {{Cross}} || {{Tick}} || {{Cross}} || {{Cross}}
| + | ! colspan="5" | Limits |
| | |- | | |- |
| − | | {{Specs-Link|ussr_t_10m}} || [[File:USSR_flag.png|40px|link=]] || {{Tick}} || {{Cross}} || {{Tick}} || {{Cross}} || {{Tick}} || {{Cross}} || {{Tick}} | + | ! rowspan="2" | Wing-break speed<br>(km/h) |
| | + | ! rowspan="2" | Gear limit<br>(km/h) |
| | + | ! rowspan="2" | Combat flap<br> (km/h) |
| | + | ! colspan="2" | Max Static G |
| | |- | | |- |
| − | | {{Specs-Link|ussr_t_55a}} || [[File:USSR_flag.png|40px|link=]] || {{Tick}} || {{Cross}} || {{Tick}} || {{Cross}} || {{Tick}} || {{Cross}} || {{Tick}}
| + | ! + |
| | + | ! - |
| | |- | | |- |
| − | | {{Specs-Link|ussr_t_55_am}} || [[File:USSR_flag.png|40px|link=]] || {{Tick}} || {{Cross}} || {{Tick}} || {{Cross}} || {{Tick}} || {{Cross}} || {{Tick}} | + | | 812 || 450 || 520 || ~8 || ~8 |
| − | |-
| |
| − | | {{Specs-Link|ussr_t_62}} || [[File:USSR_flag.png|40px|link=]] || {{Tick}} || {{Cross}} || {{Tick}} || {{Cross}} || {{Tick}} || {{Cross}} || {{Tick}}
| |
| − | |-
| |
| − | | {{Specs-Link|ussr_t_62m1}} || [[File:USSR_flag.png|40px|link=]] || {{Tick}} || {{Cross}} || {{Tick}} || {{Cross}} || {{Tick}} || {{Cross}} || {{Tick}}
| |
| − | |-
| |
| − | | {{Specs-Link|ussr_t_64a_1971}} || [[File:USSR_flag.png|40px|link=]] || {{Tick}} || {{Cross}} || {{Tick}} || {{Cross}} || {{Tick}} || {{Cross}} || {{Tick}}
| |
| − | |-
| |
| − | | {{Specs-Link|ussr_t_64_b_1984}} || [[File:USSR_flag.png|40px|link=]] || {{Tick}} || {{Cross}} || {{Tick}} || {{Cross}} || {{Tick}} || {{Cross}} || {{Tick}}
| |
| − | |-
| |
| − | | {{Specs-Link|ussr_t_72a}} || [[File:USSR_flag.png|40px|link=]] || {{Tick}} || {{Cross}} || {{Tick}} || {{Cross}} || {{Tick}} || {{Cross}} || {{Tick}}
| |
| − | |-
| |
| − | | {{Specs-Link|ussr_t_72b}} || [[File:USSR_flag.png|40px|link=]] || {{Tick}} || {{Cross}} || {{Tick}} || {{Cross}} || {{Tick}} || {{Cross}} || {{Tick}}
| |
| − | |-
| |
| − | | {{Specs-Link|ussr_t_80b}} || [[File:USSR_flag.png|40px|link=]] || {{Tick}} || {{Cross}} || {{Tick}} || {{Tick}} || {{Tick}} || {{Cross}} || {{Tick}}
| |
| − | |-
| |
| − | | {{Specs-Link|ussr_t_80u}} || [[File:USSR_flag.png|40px|link=]] || {{Tick}} || {{Cross}} || {{Tick}} || {{Tick}} || {{Tick}} || {{Cross}} || {{Tick}}
| |
| − | |-
| |
| − | | {{Specs-Link|ussr_zprk_2s6}} || [[File:USSR_flag.png|40px|link=]] || {{Tick}} || {{Cross}} || {{Cross}} || {{Tick}} || {{Tick}} || {{Cross}} || {{Tick}}
| |
| − | |-
| |
| − | | {{Specs-Link|ussr_zsu_23_4}} || [[File:USSR_flag.png|40px|link=]] || {{Tick}} || {{Cross}} || {{Cross}} || {{Cross}} || {{Tick}} || {{Cross}} || {{Tick}}
| |
| | |- | | |- |
| | |} | | |} |
| − | ==Britain==
| + | |
| − | {| class="wikitable sortable" style="text-align:center" | + | {| class="wikitable" style="text-align:center" |
| − | |-
| |
| − | ! rowspan="2" | Vehicle !! rowspan="2" | Country !! colspan="2" | Commander !! colspan="2" | Gunner !! colspan="2" | Driver !! rowspan="2" | Infrared<br>Searchlight
| |
| − | |-
| |
| − | ! Infrared !! Thermal !! Infrared !! Thermal !! Infrared !! Thermal
| |
| − | |-
| |
| − | | {{Specs-Link|uk_centurion_mk_10}} || [[File:Britain_flag.png|40px|link=]] || {{Tick}} || {{Cross}} || {{Tick}} || {{Cross}} || {{Tick}} || {{Cross}} || {{Cross}}
| |
| − | |-
| |
| − | | {{Specs-Link|uk_challenger_II}} || [[File:Britain_flag.png|40px|link=]] || {{Tick}} || {{Cross}} || {{Cross}} || {{Tick}} || {{Tick}} || {{Cross}} || {{Cross}}
| |
| − | |-
| |
| − | | {{Specs-Link|uk_challenger_2_dorchester}} || [[File:Britain_flag.png|40px|link=]] || {{Tick}} || {{Cross}} || {{Cross}} || {{Tick}} || {{Tick}} || {{Cross}} || {{Cross}}
| |
| − | |-
| |
| − | | {{Specs-Link|uk_challenger_1}} || [[File:Britain_flag.png|40px|link=]] || {{Tick}} || {{Cross}} || {{Cross}} || {{Tick}} || {{Tick}} || {{Cross}} || {{Cross}}
| |
| | |- | | |- |
| − | | {{Specs-Link|uk_challenger_mk_3}} || [[File:Britain_flag.png|40px|link=]] || {{Tick}} || {{Cross}} || {{Cross}} || {{Tick}} || {{Tick}} || {{Cross}} || {{Cross}}
| + | ! colspan="4" | Optimal velocities |
| | |- | | |- |
| − | | {{Specs-Link|uk_chieftain_marksman}} || [[File:Britain_flag.png|40px|link=]] || {{Cross}} || {{Cross}} || {{Cross}} || {{Cross}} || {{Tick}} || {{Cross}} || {{Cross}}
| + | ! Ailerons<br>(km/h) |
| | + | ! Rudder<br>(km/h) |
| | + | ! Elevators<br>(km/h) |
| | + | ! Radiator<br>(km/h) |
| | |- | | |- |
| − | | {{Specs-Link|uk_chieftain_mk_3}} || [[File:Britain_flag.png|40px|link=]] || {{Tick}} || {{Cross}} || {{Tick}} || {{Cross}} || {{Tick}} || {{Cross}} || {{Tick}} | + | | < 450 || < 400 || < 500 || > 240 |
| − | |-
| |
| − | | {{Specs-Link|uk_chieftain_mk_5}} || [[File:Britain_flag.png|40px|link=]] || {{Tick}} || {{Cross}} || {{Tick}} || {{Cross}} || {{Tick}} || {{Cross}} || {{Tick}}
| |
| − | |-
| |
| − | | {{Specs-Link|uk_chieftain_mk_10}} || [[File:Britain_flag.png|40px|link=]] || {{Tick}} || {{Cross}} || {{Tick}} || {{Cross}} || {{Tick}} || {{Cross}} || {{Tick}}
| |
| − | |-
| |
| − | | {{Specs-Link|uk_falcon}} || [[File:Britain_flag.png|40px|link=]] || {{Cross}} || {{Cross}} || {{Cross}} || {{Cross}} || {{Tick}} || {{Cross}} || {{Cross}}
| |
| − | |-
| |
| − | | {{Specs-Link|uk_rooikat_105_td}} || [[File:Britain_flag.png|40px|link=]] || {{Tick}} || {{Cross}} || {{Cross}} || {{Tick}} || {{Tick}} || {{Cross}} || {{Cross}}
| |
| − | |-
| |
| − | | {{Specs-Link|uk_rooikat_76}} || [[File:Britain_flag.png|40px|link=]] || {{Tick}} || {{Cross}} || {{Tick}} || {{Cross}} || {{Tick}} || {{Cross}} || {{Cross}}
| |
| − | |-
| |
| − | | {{Specs-Link|uk_centurion_shot_kal_d}} || [[File:Britain_flag.png|40px|link=]] || {{Cross}} || {{Cross}} || {{Cross}} || {{Cross}} || {{Tick}} || {{Cross}} || {{Cross}}
| |
| − | |-
| |
| − | | {{Specs-Link|uk_stormer_hvm}} || [[File:Britain_flag.png|40px|link=]] || {{Tick}} || {{Cross}} || {{Cross}} || {{Tick}} || {{Tick}} || {{Cross}} || {{Cross}}
| |
| − | |-
| |
| − | | {{Specs-Link|uk_fv102_striker}} || [[File:Britain_flag.png|40px|link=]] || {{Tick}} || {{Cross}} || {{Cross}} || {{Tick}} || {{Tick}} || {{Cross}} || {{Cross}}
| |
| − | |-
| |
| − | | {{Specs-Link|uk_fv438_swingfire}} || [[File:Britain_flag.png|40px|link=]] || {{Cross}} || {{Cross}} || {{Cross}} || {{Cross}} || {{Tick}} || {{Cross}} || {{Cross}}
| |
| − | |-
| |
| − | | {{Specs-Link|uk_vickers_mbt_mk_1}} || [[File:Britain_flag.png|40px|link=]] || {{Cross}} || {{Cross}} || {{Cross}} || {{Cross}} || {{Tick}} || {{Cross}} || {{Cross}}
| |
| − | |-
| |
| − | | {{Specs-Link|uk_vickers_mk7}} || [[File:Britain_flag.png|40px|link=]] || {{Tick}} || {{Cross}} || {{Cross}} || {{Tick}} || {{Tick}} || {{Cross}} || {{Cross}}
| |
| − | |-
| |
| − | | {{Specs-Link|uk_fv510_isv}} || [[File:Britain_flag.png|40px|link=]] || {{Tick}} || {{Cross}} || {{Cross}} || {{Tick}} || {{Tick}} || {{Cross}} || {{Cross}}
| |
| | |- | | |- |
| | |} | | |} |
| − | ==Japan==
| + | |
| − | {| class="wikitable sortable" style="text-align:center" | + | {| class="wikitable" style="text-align:center" |
| − | |-
| |
| − | ! rowspan="2" | Vehicle !! rowspan="2" | Country !! colspan="2" | Commander !! colspan="2" | Gunner !! colspan="2" | Driver !! rowspan="2" | Infrared<br>Searchlight
| |
| − | |-
| |
| − | ! Infrared !! Thermal !! Infrared !! Thermal !! Infrared !! Thermal
| |
| | |- | | |- |
| − | | {{Specs-Link|jp_m41_walker_bulldog}} || [[File:Japan_flag.png|40px|link=]] || {{Cross}} || {{Cross}} || {{Cross}} || {{Cross}} || {{Tick}} || {{Cross}} || {{Cross}}
| + | ! colspan="3" | Compressor (RB/SB) |
| | |- | | |- |
| − | | {{Specs-Link|jp_m42_duster}} || [[File:Japan_flag.png|40px|link=]] || {{Cross}} || {{Cross}} || {{Cross}} || {{Cross}} || {{Tick}} || {{Cross}} || {{Cross}}
| + | ! colspan="3" | Setting 1 |
| | |- | | |- |
| − | | {{Specs-Link|jp_type_16}} || [[File:Japan_flag.png|40px|link=]] || {{Cross}} || {{Tick}} || {{Cross}} || {{Tick}} || {{Tick}} || {{Cross}} || {{Cross}}
| + | ! Optimal altitude |
| | + | ! 100% Engine power |
| | + | ! WEP Engine power |
| | |- | | |- |
| − | | {{Specs-Link|jp_type_61}} || [[File:Japan_flag.png|40px|link=]] || {{Cross}} || {{Cross}} || {{Cross}} || {{Cross}} || {{Tick}} || {{Cross}} || {{Cross}} | + | | 5,000 m || 3,200 hp || 4,499 hp |
| | |- | | |- |
| − | | {{Specs-Link|jp_type_74}} || [[File:Japan_flag.png|40px|link=]] || {{Tick}} || {{Cross}} || {{Tick}} || {{Cross}} || {{Tick}} || {{Cross}} || {{Tick}}
| + | <!--! colspan="3" | Setting 2 |
| | |- | | |- |
| − | | {{Specs-Link|jp_type_74_mod_g_kai}} || [[File:Japan_flag.png|40px|link=]] || {{Tick}} || {{Cross}} || {{Cross}} || {{Tick}} || {{Tick}} || {{Cross}} || {{Cross}}
| + | ! Optimal altitude |
| | + | ! 100% Engine power |
| | + | ! WEP Engine power |
| | |- | | |- |
| − | | {{Specs-Link|jp_type_75_mlrs}} || [[File:Japan_flag.png|40px|link=]] || {{Cross}} || {{Cross}} || {{Cross}} || {{Cross}} || {{Tick}} || {{Cross}} || {{Cross}} | + | | ?,??? m || ?,??? hp || ?,??? hp |
| | |- | | |- |
| − | | {{Specs-Link|jp_type_75}} || [[File:Japan_flag.png|40px|link=]] || {{Cross}} || {{Cross}} || {{Cross}} || {{Cross}} || {{Tick}} || {{Cross}} || {{Cross}}
| + | ! colspan="3" | Setting 3 |
| | |- | | |- |
| − | | {{Specs-Link|jp_type_87}} || [[File:Japan_flag.png|40px|link=]] || {{Cross}} || {{Cross}} || {{Cross}} || {{Cross}} || {{Tick}} || {{Cross}} || {{Tick}}
| + | ! Optimal altitude |
| − | |-
| + | ! 100% Engine power |
| − | | {{Specs-Link|jp_type_89}} || [[File:Japan_flag.png|40px|link=]] || {{Tick}} || {{Cross}} || {{Cross}} || {{Tick}} || {{Tick}} || {{Cross}} || {{Cross}}
| + | ! WEP Engine power |
| − | |-
| |
| − | | {{Specs-Link|jp_type_90}} || [[File:Japan_flag.png|40px|link=]] || {{Tick}} || {{Cross}} || {{Cross}} || {{Tick}} || {{Tick}} || {{Cross}} || {{Cross}}
| |
| − | |-
| |
| − | | {{Specs-Link|jp_type_90b}} || [[File:Japan_flag.png|40px|link=]] || {{Tick}} || {{Cross}} || {{Cross}} || {{Tick}} || {{Tick}} || {{Cross}} || {{Cross}}
| |
| − | |-
| |
| − | | {{Specs-Link|jp_type_93}} || [[File:Japan_flag.png|40px|link=]] || {{Cross}} || {{Tick}} || {{Cross}} || {{Tick}} || {{Tick}} || {{Cross}} || {{Cross}}
| |
| | |- | | |- |
| | + | | ?,??? m || ?,??? hp || ?,??? hp |
| | + | |- --> |
| | |} | | |} |
| − | ==China== | + | |
| − | {| class="wikitable sortable" style="text-align:center"
| + | === Survivability and armour === |
| − | |-
| + | <!--Examine the survivability of the aircraft. Note how vulnerable the structure is and how secure the pilot is, whether the fuel tanks are armoured, etc. Describe the armour, if there is any, and also mention the vulnerability of other critical aircraft systems.--> |
| − | ! rowspan="2" | Vehicle !! rowspan="2" | Country !! colspan="2" | Commander !! colspan="2" | Gunner !! colspan="2" | Driver !! rowspan="2" | Infrared<br>Searchlight
| + | |
| − | |-
| + | * 38 mm Bulletproof glass - Windshield |
| − | ! Infrared !! Thermal !! Infrared !! Thermal !! Infrared !! Thermal
| + | * 6.35 mm Steel - Fore cockpit armour plate, pilot and co-pilot |
| − | |-
| + | * 8 mm Steel - Armor plate, pilot and co-pilot's seats |
| − | | {{Specs-Link|cn_cm11}} || [[File:China_flag.png|40px|link=]] || {{Tick}} || {{Cross}} || {{Cross}} || {{Tick}} || {{Tick}} || {{Cross}} || {{Cross}}
| + | * 11 mm Steel - Armor plate headrests, pilot and co-pilot |
| − | |-
| + | * 19.05mm Steel - Engine protective plate |
| − | | {{Specs-Link|cn_m42_duster}} || [[File:China_flag.png|40px|link=]] || {{Cross}} || {{Cross}} || {{Cross}} || {{Cross}} || {{Tick}} || {{Cross}} || {{Cross}}
| + | |
| − | |-
| + | == Armaments == |
| − | | {{Specs-Link|cn_m48a1_patton_III}} || [[File:China_flag.png|40px|link=]] || {{Cross}} || {{Cross}} || {{Cross}} || {{Cross}} || {{Tick}} || {{Cross}} || {{Cross}}
| + | === Offensive armament === |
| − | |-
| + | <!--Describe the offensive armament of the aircraft, if any. Describe how effective the cannons and machine guns are in a battle, and also what belts or drums are better to use. If there is no offensive weaponry, delete this subsection.--> |
| − | | {{Specs-Link|cn_m60a3_tts}} || [[File:China_flag.png|40px|link=]] || {{Tick}} || {{Cross}} || {{Cross}} || {{Tick}} || {{Tick}} || {{Cross}} || {{Cross}}
| + | {{main|Browning M3 (12.7 mm)}} |
| − | |-
| + | |
| − | | {{Specs-Link|cn_m113a1_tow}} || [[File:China_flag.png|40px|link=]] || {{Tick}} || {{Cross}} || {{Tick}} || {{Cross}} || {{Tick}} || {{Cross}} || {{Cross}}
| + | The '''''{{PAGENAME}}''''' is armed with: |
| | + | |
| | + | * 6 x 12.7 mm Browning M3 machine guns, center-mounted (400 rpg = 2,400 total) |
| | + | |
| | + | === Suspended armament === |
| | + | <!--Describe the aircraft's suspended armament: additional cannons under the wings, bombs, rockets and torpedoes. This section is especially important for bombers and attackers. If there is no suspended weaponry remove this subsection.--> |
| | + | {{main|AN-M64A1 (500 lb)|AN-M65A1 (1,000 lb)|AN-M66A2 (2,000 lb)|HVAR|Browning M2 (12.7 mm)}} |
| | + | |
| | + | The '''''{{PAGENAME}}''''' can be outfitted with the following ordinance: |
| | + | |
| | + | * Without load |
| | + | * 2 x 500 lb AN-M64A1 bombs (1,000 lb total) |
| | + | * 2 x 1000 lbs AN-M65A1 bombs (2,000 lb total) |
| | + | * 2 x 2000 lbs AN-M66A2 bombs (4,000 lb total) |
| | + | * 10 x 127 mm HVAR rockets |
| | + | * 8 x 12.7 mm Browning M2 machine guns, center-mounted (400 rpg = 3,200 total) |
| | + | |
| | + | == Usage in battles == |
| | + | <!--Describe the tactics of playing in an aircraft, the features of using vehicles in a team and advice on tactics. Refrain from creating a "guide" - do not impose a single point of view, but instead, give the reader food for thought. Examine the most dangerous enemies and give recommendations on fighting them. If necessary, note the specifics of the game in different modes (AB, RB, SB).--> |
| | + | Start play by climbing above 5,000 m while always maintaining a speed above 290 kph. If this brings you in range of enemy fighters before you have achieved a height advantage simply turn away and let them seek other targets. Once you have achieved 5,000 m altitude with airspeed above 300 kph you are virtually invulnerable since you will always have the option of running away with or without diving. You can seek and destroy bombers. Any fighter foolish enough to go after you should be dealt with head-on starting from more than 1.2 km away to ensure time to adjust and kill with your machine guns. If this is not an option or if you are being engaged by a pair of fighters, or if your initial pass fails to kill, keep running. Very few planes have the ability to follow you and your frame is sturdy enough to withstand the occasional long-distance hit. |
| | + | |
| | + | As a rule, never let your airspeed drop below 300 kph; do not go near ground level if there is more than one enemy fighter in the vicinity unless your airspeed is above 500 kph, and never engage in furballs. |
| | + | |
| | + | When used as a heavy fighter, keep in mind the brutally low handling capability of the F-82. Always avoid "furballs" and stay above your opponents. The climb rate makes the F-82 a capable bomber-killer. As a bomber killer, the aiming problems that many pilots face against smaller, more agile fighters evaporate. It is recommended to utilize the 8 x M2 Gun pod, due to the extremely high damage output. However, more experienced players may do away with this option, as it does hamper the handling of the craft. |
| | + | |
| | + | Due to its high speed, it is very dangerous when used in a boom and run strategy (energy retention and a very high top speed in level flight mean it can be literally untouchable for a lot of single-engine fighters). In this case, it's very important to watch one's speed and to throttle back in dives or it can lose its wings due to high speed. For achieving the maximum straight-line speed at sea level, one should have the engine mixture set to 72%. |
| | + | |
| | + | Remember, do not attempt to engage smaller and nimbler fighters, as most of the times you will overshoot and completely miss due to the poor handling. |
| | + | |
| | + | Always use the tracer bullets with your six or fourteen 12.7 mm machine guns. Not only are the tracers very effective incendiaries, but they also give you the ability to see exactly where you are shooting up to 2 km away. This is invaluable in destroying bombers from far enough away to avoid their tail gunners, and in achieving incredible accuracy in head-ons well before your enemy gets a target indicator on you. |
| | + | |
| | + | Boom and Zoom is not an ideal strategy with the F-82. At about 650 kph you will experience extreme control stiffening. The F-82 excels in the destruction of bombers and other aircraft in head-ons. |
| | + | |
| | + | ===Manual Engine Control=== |
| | + | {| class="wikitable" style="text-align:center" |
| | |- | | |- |
| − | | {{Specs-Link|cn_pt_76}} || [[File:China_flag.png|40px|link=]] || {{Cross}} || {{Cross}} || {{Cross}} || {{Cross}} || {{Tick}} || {{Cross}} || {{Cross}}
| + | ! colspan="7" | MEC elements |
| | |- | | |- |
| − | | {{Specs-Link|cn_t_62}} || [[File:China_flag.png|40px|link=]] || {{Tick}} || {{Cross}} || {{Tick}} || {{Cross}} || {{Tick}} || {{Cross}} || {{Tick}} | + | ! rowspan="2" |Mixer |
| | + | ! rowspan="2" |Pitch |
| | + | ! colspan="3" |Radiator |
| | + | ! rowspan="2" |Supercharger |
| | + | ! rowspan="2" |Turbocharger |
| | |- | | |- |
| − | | {{Specs-Link|cn_type_69_2g}} || [[File:China_flag.png|40px|link=]] || {{Tick}} || {{Cross}} || {{Tick}} || {{Cross}} || {{Tick}} || {{Cross}} || {{Cross}}
| + | ! Oil |
| | + | ! Water |
| | + | ! Type |
| | |- | | |- |
| − | | {{Specs-Link|cn_type_69}} || [[File:China_flag.png|40px|link=]] || {{Tick}} || {{Cross}} || {{Tick}} || {{Cross}} || {{Tick}} || {{Cross}} || {{Tick}} | + | | Controllable || rowspan="2" | Not controllable || rowspan="2" | Not controllable || rowspan="2" | Not controllable || rowspan="2" | Separate || rowspan="2" | Not controllable || rowspan="2" | Not controllable |
| − | |- | |
| − | | {{Specs-Link|cn_type_86}} || [[File:China_flag.png|40px|link=]] || {{Tick}} || {{Cross}} || {{Tick}} || {{Cross}} || {{Tick}} || {{Cross}} || {{Tick}} | |
| − | |-
| |
| − | | {{Specs-Link|cn_type_59d}} || [[File:China_flag.png|40px|link=]] || {{Tick}} || {{Cross}} || {{Cross}} || {{Tick}} || {{Tick}} || {{Cross}} || {{Cross}}
| |
| − | |-
| |
| − | | {{Specs-Link|cn_ztz_96}} || [[File:China_flag.png|40px|link=]] || {{Tick}} || {{Cross}} || {{Tick}} || {{Cross}} || {{Tick}} || {{Cross}} || {{Cross}}
| |
| − | |-
| |
| − | | {{Specs-Link|cn_ztz_96a}} || [[File:China_flag.png|40px|link=]] || {{Tick}} || {{Cross}} || {{Cross}} || {{Tick}} || {{Tick}} || {{Cross}} || {{Cross}}
| |
| | |- | | |- |
| | |} | | |} |
| − | ==Italy== | + | |
| − | {| class="wikitable sortable" style="text-align:center" | + | ===Modules=== |
| − | |-
| + | {| class="wikitable" |
| − | ! rowspan="2" | Vehicle !! rowspan="2" | Country !! colspan="2" | Commander !! colspan="2" | Gunner !! colspan="2" | Driver !! rowspan="2" | Infrared<br>Searchlight | + | ! colspan="1" | Tier |
| − | |-
| + | ! colspan="2" | Flight performance |
| − | ! Infrared !! Thermal !! Infrared !! Thermal !! Infrared !! Thermal
| + | ! colspan="1" | Survivability |
| − | |-
| + | ! colspan="3" | Weaponry |
| − | | {{Specs-Link|it_c1_ariete}} || [[File:Italy_flag.png|40px|link=]] || {{Cross}} || {{Tick}} || {{Cross}} || {{Tick}} || {{Tick}} || {{Cross}} || {{Cross}}
| |
| − | |-
| |
| − | | {{Specs-Link|it_c1_ariete_preserie}} || [[File:Italy_flag.png|40px|link=]] || {{Tick}} || {{Cross}} || {{Cross}} || {{Tick}} || {{Tick}} || {{Cross}} || {{Cross}}
| |
| | |- | | |- |
| − | | {{Specs-Link|it_c1_ariete_pso}} || [[File:Italy_flag.png|40px|link=]] || {{Cross}} || {{Tick}} || {{Cross}} || {{Tick}} || {{Tick}} || {{Cross}} || {{Cross}} | + | | I |
| | + | | Fuselage Repair |
| | + | | Radiator |
| | + | | |
| | + | | Offensive 12 mm |
| | + | | FMBC mk.1 |
| | + | | |
| | |- | | |- |
| − | | {{Specs-Link|it_fiat_6616_cockerill}} || [[File:Italy_flag.png|40px|link=]] || {{Cross}} || {{Cross}} || {{Tick}} || {{Cross}} || {{Cross}} || {{Cross}} || {{Cross}} | + | | II |
| | + | | New Boosters |
| | + | | Compressor |
| | + | | Airframe |
| | + | | |
| | + | | FLBC mk.1 |
| | + | | NAGP mk.1 |
| | |- | | |- |
| − | | {{Specs-Link|it_aubl_74_60_70m}} || [[File:Italy_flag.png|40px|link=]] || {{Cross}} || {{Cross}} || {{Tick}} || {{Cross}} || {{Cross}} || {{Cross}} || {{Cross}} | + | | III |
| | + | | Wings Repair |
| | + | | Engine |
| | + | | |
| | + | | New 12 mm MGs |
| | + | | FLBC mk.3 |
| | + | | |
| | |- | | |- |
| − | | {{Specs-Link|it_b1_centauro}} || [[File:Italy_flag.png|40px|link=]] || {{Tick}} || {{Cross}} || {{Cross}} || {{Tick}} || {{Tick}} || {{Cross}} || {{Cross}} | + | | IV |
| − | |-
| + | | G-Suit |
| − | | {{Specs-Link|it_centauro_mgs_120}} || [[File:Italy_flag.png|40px|link=]] || {{Cross}} || {{Tick}} || {{Cross}} || {{Tick}} || {{Tick}} || {{Cross}} || {{Cross}}
| + | | Engine Injection |
| − | |-
| + | | Cover |
| − | | {{Specs-Link|it_b1_centauro_romor}} || [[File:Italy_flag.png|40px|link=]] || {{Tick}} || {{Cross}} || {{Cross}} || {{Tick}} || {{Tick}} || {{Cross}} || {{Cross}}
| + | | |
| − | |-
| + | | FRC mk.5 |
| − | | {{Specs-Link|it_m47_105}} || [[File:Italy_flag.png|40px|link=]] || {{Cross}} || {{Cross}} || {{Cross}} || {{Cross}} || {{Tick}} || {{Cross}} || {{Cross}}
| + | | |
| − | |-
| |
| − | | {{Specs-Link|it_m60a1_ariete}} || [[File:Italy_flag.png|40px|link=]] || {{Tick}} || {{Cross}} || {{Tick}} || {{Cross}} || {{Tick}} || {{Cross}} || {{Cross}}
| |
| − | |- | |
| − | | {{Specs-Link|it_m113a1_tow}} || [[File:Italy_flag.png|40px|link=]] || {{Tick}} || {{Cross}} || {{Tick}} || {{Cross}} || {{Tick}} || {{Cross}} || {{Cross}} | |
| − | |- | |
| − | | {{Specs-Link|it_of_40_mk_1}} || [[File:Italy_flag.png|40px|link=]] || {{Tick}} || {{Cross}} || {{Tick}} || {{Cross}} || {{Tick}} || {{Cross}} || {{Cross}} | |
| − | |-
| |
| − | | {{Specs-Link|it_of_40_mk_2a}} || [[File:Italy_flag.png|40px|link=]] || {{Tick}} || {{Cross}} || {{Tick}} || {{Cross}} || {{Tick}} || {{Cross}} || {{Cross}} | |
| − | |- | |
| − | | {{Specs-Link|it_of_40_mtca}} || [[File:Italy_flag.png|40px|link=]] || {{Tick}} || {{Cross}} || {{Tick}} || {{Cross}} || {{Tick}} || {{Cross}} || {{Cross}}
| |
| − | |-
| |
| − | | {{Specs-Link|it_otomatic}} || [[File:Italy_flag.png|40px|link=]] || {{Tick}} || {{Cross}} || {{Cross}} || {{Tick}} || {{Tick}} || {{Cross}} || {{Cross}}
| |
| − | |-
| |
| − | |}
| |
| − | ==France==
| |
| − | {| class="wikitable sortable" style="text-align:center"
| |
| − | |-
| |
| − | ! rowspan="2" | Vehicle !! rowspan="2" | Country !! colspan="2" | Commander !! colspan="2" | Gunner !! colspan="2" | Driver !! rowspan="2" | Infrared<br>Searchlight
| |
| − | |-
| |
| − | ! Infrared !! Thermal !! Infrared !! Thermal !! Infrared !! Thermal
| |
| − | |-
| |
| − | | {{Specs-Link|fr_amx_10rc}} || [[File:France_flag.png|40px|link=]] || {{Tick}} || {{Cross}} || {{Cross}} || {{Tick}} || {{Tick}} || {{Cross}} || {{Cross}}
| |
| − | |-
| |
| − | | {{Specs-Link|fr_amx_30}} || [[File:France_flag.png|40px|link=]] || {{Tick}} || {{Cross}} || {{Tick}} || {{Cross}} || {{Tick}} || {{Cross}} || {{Cross}}
| |
| − | |-
| |
| − | | {{Specs-Link|fr_amx_30_1972}} || [[File:France_flag.png|40px|link=]] || {{Tick}} || {{Cross}} || {{Tick}} || {{Cross}} || {{Tick}} || {{Cross}} || {{Cross}}
| |
| − | |-
| |
| − | | {{Specs-Link|fr_amx_30_ACRA}} || [[File:France_flag.png|40px|link=]] || {{Tick}} || {{Cross}} || {{Tick}} || {{Cross}} || {{Tick}} || {{Cross}} || {{Cross}}
| |
| − | |-
| |
| − | | {{Specs-Link|fr_amx_30_super}} || [[File:France_flag.png|40px|link=]] || {{Tick}} || {{Cross}} || {{Cross}} || {{Tick}} || {{Tick}} || {{Cross}} || {{Cross}}
| |
| − | |-
| |
| − | | {{Specs-Link|fr_amx_30_b2}} || [[File:France_flag.png|40px|link=]] || {{Tick}} || {{Cross}} || {{Cross}} || {{Tick}} || {{Tick}} || {{Cross}} || {{Cross}}
| |
| − | |-
| |
| − | | {{Specs-Link|fr_amx_30_b2_brenus}} || [[File:France_flag.png|40px|link=]] || {{Tick}} || {{Cross}} || {{Cross}} || {{Tick}} || {{Tick}} || {{Cross}} || {{Cross}}
| |
| − | |-
| |
| − | | {{Specs-Link|fr_amx_32}} || [[File:France_flag.png|40px|link=]] || {{Tick}} || {{Cross}} || {{Cross}} || {{Tick}} || {{Tick}} || {{Cross}} || {{Cross}}
| |
| − | |-
| |
| − | | {{Specs-Link|fr_amx_40}} || [[File:France_flag.png|40px|link=]] || {{Tick}} || {{Cross}} || {{Cross}} || {{Tick}} || {{Tick}} || {{Cross}} || {{Cross}}
| |
| − | |-
| |
| − | | {{Specs-Link|fr_leclerc_s1}} || [[File:France_flag.png|40px|link=]] || {{Cross}} || {{Tick}} || {{Cross}} || {{Tick}} || {{Tick}} || {{Cross}} || {{Cross}}
| |
| − | |-
| |
| − | |}
| |
| − | ==Sweden==
| |
| − | {| class="wikitable sortable" style="text-align:center"
| |
| − | |-
| |
| − | ! rowspan="2" | Vehicle !! rowspan="2" | Country !! colspan="2" | Commander !! colspan="2" | Gunner !! colspan="2" | Driver !! rowspan="2" | Infrared<br>Searchlight
| |
| − | |-
| |
| − | ! Infrared !! Thermal !! Infrared !! Thermal !! Infrared !! Thermal
| |
| − | |-
| |
| − | | {{Specs-Link|sw_cv_90105_tml}} || [[File:Sweden_flag.png|40px|link=]] || {{Cross}} || {{Tick}} || {{Cross}} || {{Tick}} || {{Tick}} || {{Cross}} || {{Cross}}
| |
| − | |-
| |
| − | | {{Specs-Link|sw_cv_90120}} || [[File:Sweden_flag.png|40px|link=]] || {{Cross}} || {{Tick}} || {{Cross}} || {{Tick}} || {{Tick}} || {{Cross}} || {{Cross}}
| |
| − | |-
| |
| − | | {{Specs-Link|sw_lvkv_90c}} || [[File:Sweden_flag.png|40px|link=]] || {{Tick}} || {{Cross}} || {{Cross}} || {{Tick}} || {{Tick}} || {{Cross}} || {{Cross}}
| |
| − | |-
| |
| − | | {{Specs-Link|sw_pvrbv_551}} || [[File:Sweden_flag.png|40px|link=]] || {{Tick}} || {{Cross}} || {{Tick}} || {{Cross}} || {{Tick}} || {{Cross}} || {{Cross}}
| |
| − | |-
| |
| − | | {{Specs-Link|sw_strf_90c}} || [[File:Sweden_flag.png|40px|link=]] || {{Tick}} || {{Cross}} || {{Cross}} || {{Tick}} || {{Tick}} || {{Cross}} || {{Cross}}
| |
| − | |-
| |
| − | | {{Specs-Link|sw_strf_9056}} || [[File:Sweden_flag.png|40px|link=]] || {{Cross}} || {{Tick}} || {{Cross}} || {{Tick}} || {{Tick}} || {{Cross}} || {{Cross}}
| |
| − | |-
| |
| − | | {{Specs-Link|sw_strv_101}} || [[File:Sweden_flag.png|40px|link=]] || {{Tick}} || {{Cross}} || {{Tick}} || {{Cross}} || {{Tick}} || {{Cross}} || {{Cross}}
| |
| − | |-
| |
| − | | {{Specs-Link|sw_strv_103a}} || [[File:Sweden_flag.png|40px|link=]] || {{Tick}} || {{Cross}} || {{Tick}} || {{Cross}} || {{Tick}} || {{Cross}} || {{Cross}}
| |
| − | |-
| |
| − | | {{Specs-Link|sw_strv_103c}} || [[File:Sweden_flag.png|40px|link=]] || {{Tick}} || {{Cross}} || {{Tick}} || {{Cross}} || {{Tick}} || {{Cross}} || {{Cross}}
| |
| − | |-
| |
| − | | {{Specs-Link|sw_strv_121}} || [[File:Sweden_flag.png|40px|link=]] || {{Tick}} || {{Cross}} || {{Cross}} || {{Tick}} || {{Tick}} || {{Cross}} || {{Cross}}
| |
| − | |-
| |
| − | | {{Specs-Link|sw_strv_122}} || [[File:Sweden_flag.png|40px|link=]] || {{Cross}} || {{Tick}} || {{Cross}} || {{Tick}} || {{Tick}} || {{Cross}} || {{Cross}}
| |
| − | |-
| |
| − | | {{Specs-Link|sw_strv_103_0}} || [[File:Sweden_flag.png|40px|link=]] || {{Tick}} || {{Cross}} || {{Tick}} || {{Cross}} || {{Tick}} || {{Cross}} || {{Cross}}
| |
| − | |-
| |
| − | | {{Specs-Link|sw_udes_33}} || [[File:Sweden_flag.png|40px|link=]] || {{Tick}} || {{Cross}} || {{Tick}} || {{Cross}} || {{Tick}} || {{Cross}} || {{Cross}}
| |
| | |- | | |- |
| | |} | | |} |
| | | | |
| − | ===Helicopters=== | + | === Pros and cons === |
| − | {| class="wikitable sortable" style="text-align:center"
| + | <!--Summarise and briefly evaluate the vehicle in terms of its characteristics and combat effectiveness. Mark its pros and cons in the bulleted list. Try not to use more than 6 points for each of the characteristics. Avoid using categorical definitions such as "bad", "good" and the like - use substitutions with softer forms such as "inadequate" and "effective".--> |
| − | |-
| + | |
| − | ! rowspan="2" | Vehicle !! rowspan="2" | Country !! Pilot !! Gunner !! colspan="2" | Gunsight
| + | '''Pros:''' |
| − | |-
| + | |
| − | ! Infrared !! Infrared !! Infrared !! Thermal
| + | * Variety of payload options |
| − | |-
| + | * Good fast-firing armament (M3 Browning MGs) with a high ammo capacity |
| − | | {{Specs-Link|a_129_a}} || [[File:{{#unit:a_129_a|country}}_flag.png|40px|link=]] || [[File:Icon GreenCheckmark.png|link=]] || [[File:Icon GreenCheckmark.png|link=]] || [[File:Icon RedXCross.png|link=]] || [[File:Icon GreenCheckmark.png|link=]]
| + | * Above average climb rate |
| − | |-
| + | * Fast once upgraded (can outrun pretty much every fighter in level flight) |
| − | | {{Specs-Link|ah_1f}} || [[File:{{#unit:ah_1f|country}}_flag.png|40px|link=]] || [[File:Icon GreenCheckmark.png|link=]] || [[File:Icon GreenCheckmark.png|link=]] || [[File:Icon RedXCross.png|link=]] || [[File:Icon GreenCheckmark.png|link=]]
| + | * Excellent in head-ons (which should rather be avoided due to large profile of F-82) |
| − | |-
| + | * M20 API-T ammunition option |
| − | | {{Specs-Link|ah_1g}} || [[File:{{#unit:ah_1g|country}}_flag.png|40px|link=]] || [[File:Icon GreenCheckmark.png|link=]] || [[File:Icon GreenCheckmark.png|link=]] || [[File:Icon RedXCross.png|link=]] || [[File:Icon RedXCross.png|link=]]
| + | * When equipped with a gun pod the F-82 is a flying flamethrower |
| − | |-
| + | * Brutal acceleration in dive |
| − | | {{Specs-Link|ah_1s_late}} || [[File:{{#unit:ah_1s_late|country}}_flag.png|40px|link=]] || [[File:Icon GreenCheckmark.png|link=]] || [[File:Icon GreenCheckmark.png|link=]] || [[File:Icon RedXCross.png|link=]] || [[File:Icon GreenCheckmark.png|link=]]
| + | * Centre-mounted armament both primary and gun pod, allowing for devastating accuracy |
| − | |-
| + | * Pilot and co-pilot seated offset from the centre of the aircraft, making them harder to reliably hit |
| − | | {{Specs-Link|ah_1s_early}} || [[File:{{#unit:ah_1s_early|country}}_flag.png|40px|link=]] || [[File:Icon GreenCheckmark.png|link=]] || [[File:Icon GreenCheckmark.png|link=]] || [[File:Icon RedXCross.png|link=]] || [[File:Icon RedXCross.png|link=]]
| + | * Sturdy airframe |
| − | |-
| + | |
| − | | {{Specs-Link|ah_1s}} || [[File:{{#unit:ah_1s|country}}_flag.png|40px|link=]] || [[File:Icon GreenCheckmark.png|link=]] || [[File:Icon GreenCheckmark.png|link=]] || [[File:Icon RedXCross.png|link=]] || [[File:Icon GreenCheckmark.png|link=]]
| + | '''Cons:''' |
| − | |-
| + | |
| − | | {{Specs-Link|ah_1z}} || [[File:{{#unit:ah_1z|country}}_flag.png|40px|link=]] || [[File:Icon GreenCheckmark.png|link=]] || [[File:Icon GreenCheckmark.png|link=]] || [[File:Icon RedXCross.png|link=]] || [[File:Icon GreenCheckmark.png|link=]]
| + | * Poor handling |
| − | |-
| + | * Difficult to aim (it gets a bit better with booster upgrade) |
| − | | {{Specs-Link|ah_64a}} || [[File:{{#unit:ah_64a|country}}_flag.png|40px|link=]] || [[File:Icon GreenCheckmark.png|link=]] || [[File:Icon GreenCheckmark.png|link=]] || [[File:Icon GreenCheckmark.png|link=]] || [[File:Icon GreenCheckmark.png|link=]]
| + | * Elevator prone to failure when damaged |
| − | |-
| + | * With the gun pod installed, the continuous fire will slow the plane down significantly |
| − | | {{Specs-Link|ah_64a_peten}} || [[File:{{#unit:ah_64a_peten|country}}_flag.png|40px|link=]] || [[File:Icon GreenCheckmark.png|link=]] || [[File:Icon GreenCheckmark.png|link=]] || [[File:Icon GreenCheckmark.png|link=]] || [[File:Icon GreenCheckmark.png|link=]]
| + | * Prone to control stiffening in a dive |
| − | |-
| + | |
| − | | {{Specs-Link|ah_64d}} || [[File:{{#unit:ah_64d|country}}_flag.png|40px|link=]] || [[File:Icon GreenCheckmark.png|link=]] || [[File:Icon GreenCheckmark.png|link=]] || [[File:Icon GreenCheckmark.png|link=]] || [[File:Icon GreenCheckmark.png|link=]]
| + | == History == |
| − | |-
| + | <!--Describe the history of the creation and combat usage of the aircraft in more detail than in the introduction. If the historical reference turns out to be too long, take it to a separate article, taking a link to the article about the vehicle and adding a block "/ History" (example: <nowiki>https://wiki.warthunder.com/(Vehicle-name)/History</nowiki>) and add a link to it here using the <code>main</code> template. Be sure to reference text and sources by using <code><nowiki><ref></nowiki></code>, as well as adding them at the end of the article. This section may also include the vehicle's dev blog entry (if applicable) and the in-game encyclopedia description (under <code><nowiki>=== In-game description ===</nowiki></code>, also if applicable).--> |
| − | | {{Specs-Link|ah_64d_japan}} || [[File:{{#unit:ah_64d_japan|country}}_flag.png|40px|link=]] || [[File:Icon GreenCheckmark.png|link=]] || [[File:Icon GreenCheckmark.png|link=]] || [[File:Icon GreenCheckmark.png|link=]] || [[File:Icon GreenCheckmark.png|link=]]
| + | |
| − | |-
| + | Designed to provide the US forces with long-range escort capabilities over the Pacific, the F-82 bore the appearance of desperate measures taken to use surplus P-51 parts. In reality, the F-82 was purposely designed as such in order to provide a fighter plane that had fresh pilots ready to engage, despite the tedious nature of long distance flights. Each fuselage carried a pilot and a co-pilot/navigator which reduced individual fatigue over long missions. |
| − | | {{Specs-Link|ah_mk1}} || [[File:{{#unit:ah_mk1|country}}_flag.png|40px|link=]] || [[File:Icon GreenCheckmark.png|link=]] || [[File:Icon GreenCheckmark.png|link=]] || [[File:Icon GreenCheckmark.png|link=]] || [[File:Icon GreenCheckmark.png|link=]]
| + | |
| − | |-
| + | The F-82 started development in 1944, with significant deliveries done in early 1946. Although too late for the war, the fighter still saw extensive use by Air Defense Command as an escort fighter and a night fighter. 14 F-82's were converted to winterized interceptors for use over Alaska. It also saw significant use in the Korean War with Japanese based (US planes deployed from Japan) F-82s among the first aircraft to operate over Korea. In fact, the first three North Korean aircraft shot down by US forces were done so by the Twin Mustang. |
| − | | {{Specs-Link|bo_105cb2}} || [[File:{{#unit:bo_105cb2|country}}_flag.png|40px|link=]] || [[File:Icon GreenCheckmark.png|link=]] || [[File:Icon GreenCheckmark.png|link=]] || [[File:Icon RedXCross.png|link=]] || [[File:Icon RedXCross.png|link=]]
| + | |
| − | |-
| + | === In-game description === |
| − | | {{Specs-Link|bo_105pah1}} || [[File:{{#unit:bo_105pah1|country}}_flag.png|40px|link=]] || [[File:Icon GreenCheckmark.png|link=]] || [[File:Icon GreenCheckmark.png|link=]] || [[File:Icon RedXCross.png|link=]] || [[File:Icon RedXCross.png|link=]]
| + | "In late 1943, North American aviation designers proposed a design project: a new long-range fighter designated the P-82 (NA-120). One two-seat machine was to be created from two P-51D aircraft. The fuselage, one wing (left or right) and the vertical empennage were taken from the production fighter. The fuselages were connected with a new central wing section and a rectangular tailplane. The result was a strong and rigid frame without a central nacelle. |
| − | |-
| + | |
| − | | {{Specs-Link|bo_105pah1_a1}} || [[File:{{#unit:bo_105pah1_a1|country}}_flag.png|40px|link=]] || [[File:Icon GreenCheckmark.png|link=]] || [[File:Icon GreenCheckmark.png|link=]] || [[File:Icon RedXCross.png|link=]] || [[File:Icon RedXCross.png|link=]]
| + | The aircraft was launched into full-scale production in 1944. Several variants were based on it, including the P-82G (NA-150) night interceptor fighter, which started full-scale production in 1946. |
| − | |-
| + | |
| − | | {{Specs-Link|tiger_had_france}} || [[File:{{#unit:tiger_had_france|country}}_flag.png|40px|link=]] || [[File:Icon GreenCheckmark.png|link=]] || [[File:Icon GreenCheckmark.png|link=]] || [[File:Icon GreenCheckmark.png|link=]] || [[File:Icon GreenCheckmark.png|link=]]
| + | The power unit of the P-82G consisted of two Allison V-1710-143 and V-1710-145 (to the left and to the right, respectively) twelve-cylinder, V-type, liquid-cooled engines producing a maximum power of 1,930 hp. The engines were equipped with flame arresters in their exhaust pipes. |
| − | |-
| + | |
| − | | {{Specs-Link|tiger_hap_france}} || [[File:{{#unit:tiger_hap_france|country}}_flag.png|40px|link=]] || [[File:Icon GreenCheckmark.png|link=]] || [[File:Icon GreenCheckmark.png|link=]] || [[File:Icon GreenCheckmark.png|link=]] || [[File:Icon GreenCheckmark.png|link=]]
| + | An SCR-720C radar was housed in a large container fastened under the center wing section. The radar antenna was installed in a radar-transparent nosecone which protruded ahead of the propeller arc. |
| − | |-
| + | |
| − | | {{Specs-Link|tiger_uht}} || [[File:{{#unit:tiger_uht|country}}_flag.png|40px|link=]] || [[File:Icon GreenCheckmark.png|link=]] || [[File:Icon GreenCheckmark.png|link=]] || [[File:Icon GreenCheckmark.png|link=]] || [[File:Icon GreenCheckmark.png|link=]]
| + | The plane's armament consisted of six 12.7 mm Colt-Browning M2.5 machine guns, with 400 rounds each, housed in the center wing section. It was possible to suspend two fuel tanks, two 1,000 lb (454 kg) bombs, or four guide rails for unguided HVAR missiles under the wing panels. |
| − | |-
| + | |
| − | | {{Specs-Link|g_lynx}} || [[File:{{#unit:g_lynx|country}}_flag.png|40px|link=]] || [[File:Icon GreenCheckmark.png|link=]] || [[File:Icon GreenCheckmark.png|link=]] || [[File:Icon RedXCross.png|link=]] || [[File:Icon GreenCheckmark.png|link=]]
| + | The left cockpit was occupied by the pilot, and the right one by the radar operator. The operator did not have a second control system, so an automatic pilot was installed on the aircraft to reduce the in-flight load on the pilot. |
| − | |-
| + | |
| − | | {{Specs-Link|h_34}} || [[File:{{#unit:h_34|country}}_flag.png|40px|link=]] || [[File:Icon GreenCheckmark.png|link=]] || [[File:Icon GreenCheckmark.png|link=]] || [[File:Icon RedXCross.png|link=]] || [[File:Icon RedXCross.png|link=]]
| + | The night interceptor was fitted with extra radio electronic equipment: a blind instrument landing system, a radio altimeter, an AN/APS-13 rear attack warning radar, and an AN/APN-19 identification friend or foe transponder. |
| − | |-
| + | |
| − | | {{Specs-Link|h_34_france}} || [[File:{{#unit:h_34_france|country}}_flag.png|40px|link=]] || [[File:Icon GreenCheckmark.png|link=]] || [[File:Icon GreenCheckmark.png|link=]] || [[File:Icon RedXCross.png|link=]] || [[File:Icon RedXCross.png|link=]]
| + | In June 1948, the US military aircraft designation system was changed. Accordingly, the P-82G was now designated the F-82G. 14 F-82G fighters were converted to a special F-82H Arctic version, to be operated in Alaska. |
| − | |-
| + | |
| − | | {{Specs-Link|iar_316b}} || [[File:{{#unit:iar_316b|country}}_flag.png|40px|link=]] || [[File:Icon GreenCheckmark.png|link=]] || [[File:Icon GreenCheckmark.png|link=]] || [[File:Icon RedXCross.png|link=]] || [[File:Icon RedXCross.png|link=]]
| + | Production of the F-82G was discontinued in 1949, with 59 aircraft built in total. They became the last piston-engined fighters built in the USA. |
| − | |-
| + | |
| − | | {{Specs-Link|ka_29}} || [[File:{{#unit:ka_29|country}}_flag.png|40px|link=]] || [[File:Icon GreenCheckmark.png|link=]] || [[File:Icon GreenCheckmark.png|link=]] || [[File:Icon RedXCross.png|link=]] || [[File:Icon RedXCross.png|link=]]
| + | F-82G night fighters participated in the Korean War. On 27 June 1950, the crew of an F-82G from the 68th Fighter Squadron (68 FS) shot down a North Korean plane. It was the first air victory in the Korean War and the first victory of the newly formed USAF." |
| − | |-
| |
| − | | {{Specs-Link|ka_50}} || [[File:{{#unit:ka_50|country}}_flag.png|40px|link=]] || [[File:Icon GreenCheckmark.png|link=]] || [[File:Icon GreenCheckmark.png|link=]] || [[File:Icon RedXCross.png|link=]] || [[File:Icon RedXCross.png|link=]]
| |
| − | |-
| |
| − | | {{Specs-Link|ka_52}} || [[File:{{#unit:ka_52|country}}_flag.png|40px|link=]] || [[File:Icon GreenCheckmark.png|link=]] || [[File:Icon GreenCheckmark.png|link=]] || [[File:Icon RedXCross.png|link=]] || [[File:Icon GreenCheckmark.png|link=]]
| |
| − | |-
| |
| − | | {{Specs-Link|lynx_ah_mk1}} || [[File:{{#unit:lynx_ah_mk1|country}}_flag.png|40px|link=]] || [[File:Icon GreenCheckmark.png|link=]] || [[File:Icon GreenCheckmark.png|link=]] || [[File:Icon RedXCross.png|link=]] || [[File:Icon GreenCheckmark.png|link=]]
| |
| − | |-
| |
| − | | {{Specs-Link|mi_4av}} || [[File:{{#unit:mi_4av|country}}_flag.png|40px|link=]] || [[File:Icon GreenCheckmark.png|link=]] || [[File:Icon GreenCheckmark.png|link=]] || [[File:Icon RedXCross.png|link=]] || [[File:Icon RedXCross.png|link=]]
| |
| − | |-
| |
| − | | {{Specs-Link|mi_24a}} || [[File:{{#unit:mi_24a|country}}_flag.png|40px|link=]] || [[File:Icon GreenCheckmark.png|link=]] || [[File:Icon GreenCheckmark.png|link=]] || [[File:Icon RedXCross.png|link=]] || [[File:Icon RedXCross.png|link=]]
| |
| − | |-
| |
| − | | {{Specs-Link|mi_24d}} || [[File:{{#unit:mi_24d|country}}_flag.png|40px|link=]] || [[File:Icon GreenCheckmark.png|link=]] || [[File:Icon GreenCheckmark.png|link=]] || [[File:Icon RedXCross.png|link=]] || [[File:Icon RedXCross.png|link=]]
| |
| − | |-
| |
| − | | {{Specs-Link|mi_24p}} || [[File:{{#unit:mi_24p|country}}_flag.png|40px|link=]] || [[File:Icon GreenCheckmark.png|link=]] || [[File:Icon GreenCheckmark.png|link=]] || [[File:Icon RedXCross.png|link=]] || [[File:Icon RedXCross.png|link=]]
| |
| − | |-
| |
| − | | {{Specs-Link|mi_24p_german}} || [[File:{{#unit:mi_24p_german|country}}_flag.png|40px|link=]] || [[File:Icon GreenCheckmark.png|link=]] || [[File:Icon GreenCheckmark.png|link=]] || [[File:Icon RedXCross.png|link=]] || [[File:Icon RedXCross.png|link=]]
| |
| − | |-
| |
| − | | {{Specs-Link|mi_24p_german_hfs80}} || [[File:{{#unit:mi_24p_german_hfs80|country}}_flag.png|40px|link=]] || [[File:Icon GreenCheckmark.png|link=]] || [[File:Icon GreenCheckmark.png|link=]] || [[File:Icon RedXCross.png|link=]] || [[File:Icon RedXCross.png|link=]]
| |
| − | |-
| |
| − | | {{Specs-Link|mi_24v}} || [[File:{{#unit:mi_24v|country}}_flag.png|40px|link=]] || [[File:Icon GreenCheckmark.png|link=]] || [[File:Icon GreenCheckmark.png|link=]] || [[File:Icon RedXCross.png|link=]] || [[File:Icon RedXCross.png|link=]]
| |
| − | |-
| |
| − | | {{Specs-Link|mi_28n}} || [[File:{{#unit:mi_28n|country}}_flag.png|40px|link=]] || [[File:Icon GreenCheckmark.png|link=]] || [[File:Icon GreenCheckmark.png|link=]] || [[File:Icon RedXCross.png|link=]] || [[File:Icon GreenCheckmark.png|link=]]
| |
| − | |-
| |
| − | | {{Specs-Link|mi_35m}} || [[File:{{#unit:mi_35m|country}}_flag.png|40px|link=]] || [[File:Icon GreenCheckmark.png|link=]] || [[File:Icon GreenCheckmark.png|link=]] || [[File:Icon RedXCross.png|link=]] || [[File:Icon GreenCheckmark.png|link=]]
| |
| − | |-
| |
| − | | {{Specs-Link|sa_313b_france}} || [[File:{{#unit:sa_313b_france|country}}_flag.png|40px|link=]] || [[File:Icon GreenCheckmark.png|link=]] || [[File:Icon GreenCheckmark.png|link=]] || [[File:Icon RedXCross.png|link=]] || [[File:Icon RedXCross.png|link=]]
| |
| − | |-
| |
| − | | {{Specs-Link|sa_313b}} || [[File:{{#unit:sa_313b|country}}_flag.png|40px|link=]] || [[File:Icon GreenCheckmark.png|link=]] || [[File:Icon GreenCheckmark.png|link=]] || [[File:Icon RedXCross.png|link=]] || [[File:Icon RedXCross.png|link=]]
| |
| − | |-
| |
| − | | {{Specs-Link|sa_316b}} || [[File:{{#unit:sa_316b|country}}_flag.png|40px|link=]] || [[File:Icon GreenCheckmark.png|link=]] || [[File:Icon GreenCheckmark.png|link=]] || [[File:Icon RedXCross.png|link=]] || [[File:Icon RedXCross.png|link=]]
| |
| − | |-
| |
| − | | {{Specs-Link|sa_341f}} || [[File:{{#unit:sa_341f|country}}_flag.png|40px|link=]] || [[File:Icon GreenCheckmark.png|link=]] || [[File:Icon GreenCheckmark.png|link=]] || [[File:Icon RedXCross.png|link=]] || [[File:Icon GreenCheckmark.png|link=]]
| |
| − | |-
| |
| − | | {{Specs-Link|sa_342m}} || [[File:{{#unit:sa_342m|country}}_flag.png|40px|link=]] || [[File:Icon GreenCheckmark.png|link=]] || [[File:Icon GreenCheckmark.png|link=]] || [[File:Icon RedXCross.png|link=]] || [[File:Icon GreenCheckmark.png|link=]]
| |
| − | |-
| |
| − | | {{Specs-Link|scout_ah_mk1}} || [[File:{{#unit:scout_ah_mk1|country}}_flag.png|40px|link=]] || [[File:Icon GreenCheckmark.png|link=]] || [[File:Icon GreenCheckmark.png|link=]] || [[File:Icon RedXCross.png|link=]] || [[File:Icon RedXCross.png|link=]]
| |
| − | |-
| |
| − | | {{Specs-Link|uh_1b}} || [[File:{{#unit:uh_1b|country}}_flag.png|40px|link=]] || [[File:Icon GreenCheckmark.png|link=]] || [[File:Icon GreenCheckmark.png|link=]] || [[File:Icon RedXCross.png|link=]] || [[File:Icon RedXCross.png|link=]]
| |
| − | |-
| |
| − | | {{Specs-Link|uh_1b_japan}} || [[File:{{#unit:uh_1b_japan|country}}_flag.png|40px|link=]] || [[File:Icon GreenCheckmark.png|link=]] || [[File:Icon GreenCheckmark.png|link=]] || [[File:Icon RedXCross.png|link=]] || [[File:Icon RedXCross.png|link=]]
| |
| − | |-
| |
| − | | {{Specs-Link|uh_1c}} || [[File:{{#unit:uh_1c|country}}_flag.png|40px|link=]] || [[File:Icon GreenCheckmark.png|link=]] || [[File:Icon GreenCheckmark.png|link=]] || [[File:Icon RedXCross.png|link=]] || [[File:Icon RedXCross.png|link=]]
| |
| − | |-
| |
| − | | {{Specs-Link|uh_1c_xm_30}} || [[File:{{#unit:uh_1c_xm_30|country}}_flag.png|40px|link=]] || [[File:Icon GreenCheckmark.png|link=]] || [[File:Icon GreenCheckmark.png|link=]] || [[File:Icon RedXCross.png|link=]] || [[File:Icon RedXCross.png|link=]]
| |
| − | |-
| |
| − | | {{Specs-Link|uh_1d}} || [[File:{{#unit:uh_1d|country}}_flag.png|40px|link=]] || [[File:Icon GreenCheckmark.png|link=]] || [[File:Icon GreenCheckmark.png|link=]] || [[File:Icon RedXCross.png|link=]] || [[File:Icon RedXCross.png|link=]]
| |
| − | |-
| |
| − | | {{Specs-Link|wasp_has_mk1}} || [[File:{{#unit:wasp_has_mk1|country}}_flag.png|40px|link=]] || [[File:Icon GreenCheckmark.png|link=]] || [[File:Icon GreenCheckmark.png|link=]] || [[File:Icon RedXCross.png|link=]] || [[File:Icon RedXCross.png|link=]]
| |
| − | |-
| |
| − | |}
| |
| | | | |
| | == Media == | | == Media == |
| − | <!--Excellent additions to the article would be video guides, screenshots from the game, and photos.--> | + | <!-- ''Excellent additions to the article would be video guides, screenshots from the game, and photos.'' --> |
| − | {{Youtube-gallery|E941IRtmZdE|'''The Shooting Range #165''' - ''Pages of History'' section at 05:30 discusses the development of night vision systems.|aFj2LOWdj5o|'''The Shooting Range #165''' - ''Tactics & Strategy'' section at 09:00 discusses the night battles.}} | + | |
| | + | ;Skins |
| | + | * [https://live.warthunder.com/feed/camouflages/?q=%23f82 Skins and camouflages for the {{PAGENAME}} from live.warthunder.com.] |
| | + | |
| | + | ;Videos |
| | + | {{Youtube-gallery|d5k2T9FP0bQ|'''Avoid them in frontal attack!''' discusses the {{PAGENAME}} at 0:38 - ''War Thunder Official Channel''}} |
| | + | |
| | + | == See also == |
| | + | <!-- ''Links to the articles on the War Thunder Wiki that you think will be useful for the reader, for example:'' |
| | + | * ''reference to the series of the aircraft;'' |
| | + | * ''links to approximate analogues of other nations and research trees.'' --> |
| | + | |
| | + | ;Aircraft of the same family |
| | + | * [[P-51 (Family)]] |
| | + | |
| | + | ;Aircraft of comparable role, configuration and era |
| | + | * [[Bf 109 Z]] |
| | | | |
| − | ==External Links== | + | == External links == |
| | + | ''Paste links to sources and external resources, such as:'' |
| | | | |
| − | * [https://warthunder.com/en/news/6336-development-night-vision-devices-and-thermal-sights-en [Devblog<nowiki>]</nowiki> Night Vision Devices and Thermal Sights] | + | * ''topic on the official game forum;'' |
| | + | * ''encyclopedia page on the aircraft;'' |
| | + | * ''other literature.'' |
| | | | |
| − | [[Category:Game mechanics]]
| + | {{AirManufacturer NAA}} |
| | + | {{USA twin-engine fighters}} |
360://https://wiki.warthunder.com/images/f/fb/Cockpit_f-82e.jpg
F-82E
Research:71 000 
Purchase:210 000 
| This page is about the American twin-engine fighter F-82E. For other versions, see P-51 (Family).
|
Description
The F-82E Twin Mustang is a rank IV American twin-engine fighter
with a battle rating of 5.0 (AB/SB) and 5.3 (RB). This fighter was introduced in Update 1.39.
Perhaps the most distinctive feature about the F-82E "Twin Mustang" is that it literally looks like two P-51 conjoined together into a plane.
This means the F-82E Twin Mustang has nearly two of everything, two fuselages, two engines, two tails, and two pilots. The last of which makes the Twin Mustang more survivable than most other aircraft as each can work independently if the other is incapacitated.
Built with the intent of long-range escort for the B-29 Superfortress bombers, the fuel capacity in the Twin Mustang is also much higher than its contemporaries.
Unlike the preceding American planes, the Twin Mustang no longer features wing-mounted armament but instead are now centre-mounted between the fuselages, so gun convergence is no longer a big issue.
The F-82E works best as a high-altitude bomber-killer or escort plane. While its respectable payload of bombs, machine guns, and rockets make it an effective ground attacker, it is very vulnerable in that role unless the enemy's fighters have all been neutralized.
The F-82E's main assets are its destructive firepower (with the gun pod) combined with massive ammo count, its good climbing speed and its amazing escape speed. Using the tracer bullets and shooting continuously it is possible to adjust aim effectively from more than 1.5 km away. In head-ons, this means your opponent will usually be destroyed or crippled well before he gets his own target indicator. With bombers, it means one serious burst from 0.7-1.0 km will deliver a critical, and a full-second burst from less than 0.7 km should cut any bomber into several pieces.
General info
Flight performance
Describe how the aircraft behaves in the air. Speed, manoeuvrability, acceleration and allowable loads - these are the most important characteristics of the vehicle.
| Characteristics
|
| Stock
|
Max Speed
(km/h at 6,126 m)
|
Max altitude
(meters)
|
Turn time
(seconds)
|
Rate of climb
(meters/second)
|
Take-off run
(meters)
|
| AB
|
RB
|
AB
|
RB
|
AB
|
RB
|
| 713 |
696 |
11600 |
28.3 |
28.7 |
15.3 |
15.3 |
450
|
| Upgraded
|
Max Speed
(km/h at 6,126 m)
|
Max altitude (meters)
|
Turn time (seconds)
|
Rate of climb
(meters/second)
|
Take-off run (meters)
|
| AB
|
RB
|
AB
|
RB
|
AB
|
RB
|
| 770 |
742 |
11600 |
25.8 |
27.0 |
26.4 |
18.7 |
450
|
Details
| Features
|
| Combat flap
|
Take-off flap
|
Landing flap
|
Air brakes
|
Arrestor gear
|
| ✓ |
✓ |
✓ |
X |
X
|
| Limits
|
Wing-break speed
(km/h)
|
Gear limit
(km/h)
|
Combat flap
(km/h)
|
Max Static G
|
| +
|
-
|
| 812 |
450 |
520 |
~8 |
~8
|
| Optimal velocities
|
Ailerons
(km/h)
|
Rudder
(km/h)
|
Elevators
(km/h)
|
Radiator
(km/h)
|
| < 450 |
< 400 |
< 500 |
> 240
|
| Compressor (RB/SB)
|
| Setting 1
|
| Optimal altitude
|
100% Engine power
|
WEP Engine power
|
| 5,000 m |
3,200 hp |
4,499 hp
|
Survivability and armour
- 38 mm Bulletproof glass - Windshield
- 6.35 mm Steel - Fore cockpit armour plate, pilot and co-pilot
- 8 mm Steel - Armor plate, pilot and co-pilot's seats
- 11 mm Steel - Armor plate headrests, pilot and co-pilot
- 19.05mm Steel - Engine protective plate
Armaments
Offensive armament
The F-82E is armed with:
- 6 x 12.7 mm Browning M3 machine guns, center-mounted (400 rpg = 2,400 total)
Suspended armament
The F-82E can be outfitted with the following ordinance:
- Without load
- 2 x 500 lb AN-M64A1 bombs (1,000 lb total)
- 2 x 1000 lbs AN-M65A1 bombs (2,000 lb total)
- 2 x 2000 lbs AN-M66A2 bombs (4,000 lb total)
- 10 x 127 mm HVAR rockets
- 8 x 12.7 mm Browning M2 machine guns, center-mounted (400 rpg = 3,200 total)
Usage in battles
Start play by climbing above 5,000 m while always maintaining a speed above 290 kph. If this brings you in range of enemy fighters before you have achieved a height advantage simply turn away and let them seek other targets. Once you have achieved 5,000 m altitude with airspeed above 300 kph you are virtually invulnerable since you will always have the option of running away with or without diving. You can seek and destroy bombers. Any fighter foolish enough to go after you should be dealt with head-on starting from more than 1.2 km away to ensure time to adjust and kill with your machine guns. If this is not an option or if you are being engaged by a pair of fighters, or if your initial pass fails to kill, keep running. Very few planes have the ability to follow you and your frame is sturdy enough to withstand the occasional long-distance hit.
As a rule, never let your airspeed drop below 300 kph; do not go near ground level if there is more than one enemy fighter in the vicinity unless your airspeed is above 500 kph, and never engage in furballs.
When used as a heavy fighter, keep in mind the brutally low handling capability of the F-82. Always avoid "furballs" and stay above your opponents. The climb rate makes the F-82 a capable bomber-killer. As a bomber killer, the aiming problems that many pilots face against smaller, more agile fighters evaporate. It is recommended to utilize the 8 x M2 Gun pod, due to the extremely high damage output. However, more experienced players may do away with this option, as it does hamper the handling of the craft.
Due to its high speed, it is very dangerous when used in a boom and run strategy (energy retention and a very high top speed in level flight mean it can be literally untouchable for a lot of single-engine fighters). In this case, it's very important to watch one's speed and to throttle back in dives or it can lose its wings due to high speed. For achieving the maximum straight-line speed at sea level, one should have the engine mixture set to 72%.
Remember, do not attempt to engage smaller and nimbler fighters, as most of the times you will overshoot and completely miss due to the poor handling.
Always use the tracer bullets with your six or fourteen 12.7 mm machine guns. Not only are the tracers very effective incendiaries, but they also give you the ability to see exactly where you are shooting up to 2 km away. This is invaluable in destroying bombers from far enough away to avoid their tail gunners, and in achieving incredible accuracy in head-ons well before your enemy gets a target indicator on you.
Boom and Zoom is not an ideal strategy with the F-82. At about 650 kph you will experience extreme control stiffening. The F-82 excels in the destruction of bombers and other aircraft in head-ons.
Manual Engine Control
| MEC elements
|
| Mixer
|
Pitch
|
Radiator
|
Supercharger
|
Turbocharger
|
| Oil
|
Water
|
Type
|
| Controllable |
Not controllable |
Not controllable |
Not controllable |
Separate |
Not controllable |
Not controllable
|
Modules
| Tier
|
Flight performance
|
Survivability
|
Weaponry
|
| I
|
Fuselage Repair
|
Radiator
|
|
Offensive 12 mm
|
FMBC mk.1
|
|
| II
|
New Boosters
|
Compressor
|
Airframe
|
|
FLBC mk.1
|
NAGP mk.1
|
| III
|
Wings Repair
|
Engine
|
|
New 12 mm MGs
|
FLBC mk.3
|
|
| IV
|
G-Suit
|
Engine Injection
|
Cover
|
|
FRC mk.5
|
|
Pros and cons
Pros:
- Variety of payload options
- Good fast-firing armament (M3 Browning MGs) with a high ammo capacity
- Above average climb rate
- Fast once upgraded (can outrun pretty much every fighter in level flight)
- Excellent in head-ons (which should rather be avoided due to large profile of F-82)
- M20 API-T ammunition option
- When equipped with a gun pod the F-82 is a flying flamethrower
- Brutal acceleration in dive
- Centre-mounted armament both primary and gun pod, allowing for devastating accuracy
- Pilot and co-pilot seated offset from the centre of the aircraft, making them harder to reliably hit
- Sturdy airframe
Cons:
- Poor handling
- Difficult to aim (it gets a bit better with booster upgrade)
- Elevator prone to failure when damaged
- With the gun pod installed, the continuous fire will slow the plane down significantly
- Prone to control stiffening in a dive
History
Designed to provide the US forces with long-range escort capabilities over the Pacific, the F-82 bore the appearance of desperate measures taken to use surplus P-51 parts. In reality, the F-82 was purposely designed as such in order to provide a fighter plane that had fresh pilots ready to engage, despite the tedious nature of long distance flights. Each fuselage carried a pilot and a co-pilot/navigator which reduced individual fatigue over long missions.
The F-82 started development in 1944, with significant deliveries done in early 1946. Although too late for the war, the fighter still saw extensive use by Air Defense Command as an escort fighter and a night fighter. 14 F-82's were converted to winterized interceptors for use over Alaska. It also saw significant use in the Korean War with Japanese based (US planes deployed from Japan) F-82s among the first aircraft to operate over Korea. In fact, the first three North Korean aircraft shot down by US forces were done so by the Twin Mustang.
In-game description
"In late 1943, North American aviation designers proposed a design project: a new long-range fighter designated the P-82 (NA-120). One two-seat machine was to be created from two P-51D aircraft. The fuselage, one wing (left or right) and the vertical empennage were taken from the production fighter. The fuselages were connected with a new central wing section and a rectangular tailplane. The result was a strong and rigid frame without a central nacelle.
The aircraft was launched into full-scale production in 1944. Several variants were based on it, including the P-82G (NA-150) night interceptor fighter, which started full-scale production in 1946.
The power unit of the P-82G consisted of two Allison V-1710-143 and V-1710-145 (to the left and to the right, respectively) twelve-cylinder, V-type, liquid-cooled engines producing a maximum power of 1,930 hp. The engines were equipped with flame arresters in their exhaust pipes.
An SCR-720C radar was housed in a large container fastened under the center wing section. The radar antenna was installed in a radar-transparent nosecone which protruded ahead of the propeller arc.
The plane's armament consisted of six 12.7 mm Colt-Browning M2.5 machine guns, with 400 rounds each, housed in the center wing section. It was possible to suspend two fuel tanks, two 1,000 lb (454 kg) bombs, or four guide rails for unguided HVAR missiles under the wing panels.
The left cockpit was occupied by the pilot, and the right one by the radar operator. The operator did not have a second control system, so an automatic pilot was installed on the aircraft to reduce the in-flight load on the pilot.
The night interceptor was fitted with extra radio electronic equipment: a blind instrument landing system, a radio altimeter, an AN/APS-13 rear attack warning radar, and an AN/APN-19 identification friend or foe transponder.
In June 1948, the US military aircraft designation system was changed. Accordingly, the P-82G was now designated the F-82G. 14 F-82G fighters were converted to a special F-82H Arctic version, to be operated in Alaska.
Production of the F-82G was discontinued in 1949, with 59 aircraft built in total. They became the last piston-engined fighters built in the USA.
F-82G night fighters participated in the Korean War. On 27 June 1950, the crew of an F-82G from the 68th Fighter Squadron (68 FS) shot down a North Korean plane. It was the first air victory in the Korean War and the first victory of the newly formed USAF."
Media
- Skins
- Videos
Avoid them in frontal attack! discusses the F-82E at 0:38 - War Thunder Official Channel
See also
- Aircraft of the same family
- Aircraft of comparable role, configuration and era
External links
Paste links to sources and external resources, such as:
- topic on the official game forum;
- encyclopedia page on the aircraft;
- other literature.